Перейти к основному содержанию
Присоединяйся к сообществу ремонтников - Создай аккаунт

Dyson Corrale HS03 Heating Elements Replacement

Выберете то, что вам нужно

    1. Dyson Corrale HS03 Heating Elements Replacement, Outer Casing: шаг 1, изображение 1 из 2 Dyson Corrale HS03 Heating Elements Replacement, Outer Casing: шаг 1, изображение 2 из 2
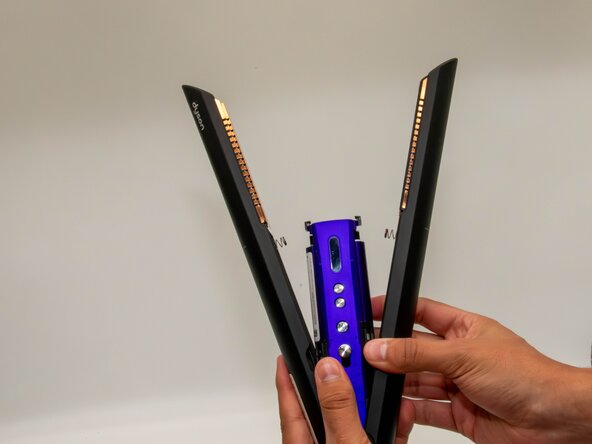
      • Hold the Dyson with the silver safety lock facing you and push it upward.

      • This opens the heating plates forming a "V."

      Спросите у FixBot

      Добавить комментарий

    2. Dyson Corrale HS03 Heating Elements Replacement: шаг 2, изображение 1 из 3 Dyson Corrale HS03 Heating Elements Replacement: шаг 2, изображение 2 из 3 Dyson Corrale HS03 Heating Elements Replacement: шаг 2, изображение 3 из 3
      • Use a TR6 Torx security screwdriver to remove the screw from the center of the purple hinge bracket on each side of the hinge.

      • Use a Jimmy or spudger to carefully pry up and remove the hinge brackets.

      Спросите у FixBot

      Добавить комментарий

    3. Dyson Corrale HS03 Heating Elements Replacement: шаг 3, изображение 1 из 3 Dyson Corrale HS03 Heating Elements Replacement: шаг 3, изображение 2 из 3 Dyson Corrale HS03 Heating Elements Replacement: шаг 3, изображение 3 из 3
      • Pull off the black cover from the base.

      • Use a TR7 Torx security screwdriver to remove the two screws from the base of the straightener.

      Спросите у FixBot

      Добавить комментарий

    4. Dyson Corrale HS03 Heating Elements Replacement: шаг 4, изображение 1 из 2 Dyson Corrale HS03 Heating Elements Replacement: шаг 4, изображение 2 из 2
      • With your thumb and index fingers, pull the black charging port cover off.

      Спросите у FixBot

      Добавить комментарий

    5. Dyson Corrale HS03 Heating Elements Replacement: шаг 5, изображение 1 из 3 Dyson Corrale HS03 Heating Elements Replacement: шаг 5, изображение 2 из 3 Dyson Corrale HS03 Heating Elements Replacement: шаг 5, изображение 3 из 3
      • Hold the Dyson firmly, supporting one side with one hand while using the other hand to open the opposite side.

      • Pull up on the side you want to open to release it, then repeat on the opposite side.

      Спросите у FixBot

      Добавить комментарий

    6. Dyson Corrale HS03 Heating Elements Replacement: шаг 6, изображение 1 из 2 Dyson Corrale HS03 Heating Elements Replacement: шаг 6, изображение 2 из 2
      • Use a T4 Torx screwdriver to remove the screws from the middle section.

      Спросите у FixBot

      Добавить комментарий

    7. Dyson Corrale HS03 Heating Elements Replacement: шаг 7, изображение 1 из 1
      • Use an opening tool to pop off the silver safety lock.

      Спросите у FixBot

      Добавить комментарий

    8. Dyson Corrale HS03 Heating Elements Replacement: шаг 8, изображение 1 из 3 Dyson Corrale HS03 Heating Elements Replacement: шаг 8, изображение 2 из 3 Dyson Corrale HS03 Heating Elements Replacement: шаг 8, изображение 3 из 3
      • Hold the Dyson firmly with one hand. With the other hand, push down under the black tab while pulling up at the same time to lift and remove the purple casing.

      Спросите у FixBot

      Добавить комментарий

    1. Dyson Corrale HS03 Heating Elements Replacement, Battery: шаг 9, изображение 1 из 3 Dyson Corrale HS03 Heating Elements Replacement, Battery: шаг 9, изображение 2 из 3 Dyson Corrale HS03 Heating Elements Replacement, Battery: шаг 9, изображение 3 из 3
      • Pull the purple casing upward to access and remove the battery.

      • Use a TR7 Torx security screwdriver to remove the screw securing the magnetic charging port.

      • Detach the charging port.

      • When removing it, avoid pulling as it is attached to the device by a white cable.

      Спросите у FixBot

      Добавить комментарий

    2. Dyson Corrale HS03 Heating Elements Replacement: шаг 10, изображение 1 из 3 Dyson Corrale HS03 Heating Elements Replacement: шаг 10, изображение 2 из 3 Dyson Corrale HS03 Heating Elements Replacement: шаг 10, изображение 3 из 3
      • With a TR6 Torx security screwdriver, you will take off a singular screw.

      • This will later be an advantage when removing the black cover of the control board.

      Спросите у FixBot

      Добавить комментарий

    3. Dyson Corrale HS03 Heating Elements Replacement: шаг 11, изображение 1 из 3 Dyson Corrale HS03 Heating Elements Replacement: шаг 11, изображение 2 из 3 Dyson Corrale HS03 Heating Elements Replacement: шаг 11, изображение 3 из 3
      • Use a spudger or a clean fingernail to flip up the black locking flap highlighted by the red circle—in the last photo, it is in the unlocked position.

      • Use tweezers or your fingers to gently pull the white ribbon cable from the socket on the board.

      Спросите у FixBot

      Добавить комментарий

    4. Dyson Corrale HS03 Heating Elements Replacement: шаг 12, изображение 1 из 3 Dyson Corrale HS03 Heating Elements Replacement: шаг 12, изображение 2 из 3 Dyson Corrale HS03 Heating Elements Replacement: шаг 12, изображение 3 из 3
      • Use an iFixit opening tool, to remove the black cover, which should pop right out.

      • Use the iFixit opening tool, to take off the plastic cover leading to the control panel.

      Спросите у FixBot

      Добавить комментарий

    5. Dyson Corrale HS03 Heating Elements Replacement: шаг 13, изображение 1 из 2 Dyson Corrale HS03 Heating Elements Replacement: шаг 13, изображение 2 из 2
      • Once again, with an iFixit opening tool, take the black cover off, revealing the side part of the battery.

      Спросите у FixBot

      Добавить комментарий

    6. Dyson Corrale HS03 Heating Elements Replacement: шаг 14, изображение 1 из 2 Dyson Corrale HS03 Heating Elements Replacement: шаг 14, изображение 2 из 2
      • The Control panel will be removed using a ifixit opening tool

      • The plastic cover should now come off by simply grabbing it from the top and taking it off.

      Спросите у FixBot

      Добавить комментарий

    7. Dyson Corrale HS03 Heating Elements Replacement: шаг 15, изображение 1 из 3 Dyson Corrale HS03 Heating Elements Replacement: шаг 15, изображение 2 из 3 Dyson Corrale HS03 Heating Elements Replacement: шаг 15, изображение 3 из 3
      • Use a TR7 Torx Security Screwdriver to remove the single screw shown in the picture.

      • This now gives you a clear view of the batteries and what you'll need for your next step.

      Спросите у FixBot

      Добавить комментарий

    8. Dyson Corrale HS03 Heating Elements Replacement: шаг 16, изображение 1 из 2 Dyson Corrale HS03 Heating Elements Replacement: шаг 16, изображение 2 из 2
      • Use a iFixit Opening Tool to remove the battery holder. Be careful, as this step can be a bit challenging.

      • Repeat this on all eight sides. Once you finish, the batteries should fall out on their own.

      • Replacing the 4-cell lithium-ion battery pack requires spot welding. For more information on this process, check out this article.

      Спросите у FixBot

      Добавить комментарий

    1. Dyson Corrale HS03 Heating Elements Replacement, Heating Elements: шаг 17, изображение 1 из 3 Dyson Corrale HS03 Heating Elements Replacement, Heating Elements: шаг 17, изображение 2 из 3 Dyson Corrale HS03 Heating Elements Replacement, Heating Elements: шаг 17, изображение 3 из 3
      • These next few steps will be really simple. Here, you can see the two heating elements.

      • Use an Tr7 Torx Security Screwdriver to remove all four nails on each plate.

      • The plates will now come off and are ready to be replaced.

      Спросите у FixBot

      Добавить комментарий

Заключение

To reassemble your device, follow these instructions in reverse order. Take your e-waste to an R2 or e-Stewards certified recycler.

Отменить: Я не выполнил это руководство.

Anahi Ramirez

Участник с: 09/10/25

600 Репутация

Автор 4 руководств

Команда

University of North Texas, Team 1-2, Kilpatrick Fall 2025 Участник University of North Texas, Team 1-2, Kilpatrick Fall 2025

UNT-KILPATRICK-F25S1G2

3 членов

Автор 10 руководств

0 Комментарии к руководству

Добавить комментарий

Статистика просмотров:

За последние 24 часов: 2

За последние 7 дней: 21

За последние 30 дней: 99

За всё время: 564