Введение
Use this guide to bring life back to your iPhone 5s with a new battery. If your battery is swollen, take appropriate precautions.
This guide instructs you to remove the front panel assembly; this is intended to prevent damage to the display cables. If you feel comfortable supporting the display carefully while peeling the battery out of the iPhone, skip the display removal and go directly to the battery removal steps.
For optimal performance, after completing this guide, calibrate your newly installed battery: Charge it to 100% and keep charging it for at least two more hours. Then use your iPhone until it shuts off due to low battery. Finally, charge it uninterrupted to 100%.
Выберете то, что вам нужно
Видео обзор
-
-
Power off your iPhone before beginning disassembly.
-
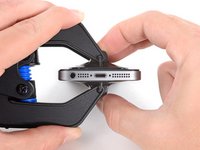
Remove the two 3.9 mm Pentalobe screws from either side of Lightning connector.
-
-
-
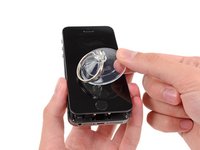
If your display glass is cracked, keep further breakage contained and prevent bodily harm during your repair by taping the glass.
-
Lay overlapping strips of clear packing tape over the iPhone's display until the whole face is covered.
-
-
-
Regardless of the tool you use, you need to be sure you pull up the entire display.
-
If the glass begins to separate from the plastic, as shown in the first image, slide a plastic opening tool between the plastic frame and the metal phone body to pry the metal clips out of the case.
-
-
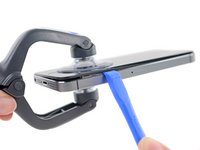
Инструмент, используемый на этом этапе:Clampy - Anti-Clamp$24.95
-
Pull the blue handle backwards to unlock the Anti-Clamp's arms.
-
Slide the arms over either the left or right edge of your iPhone.
-
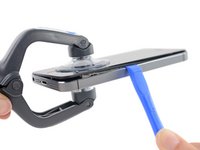
Position the suction cups near the bottom edge of the iPhone just above the home button—one on the front, and one on the back.
-
Squeeze the cups together to apply suction to the desired area.
-
-
-
Pull the blue handle forwards to lock the arms.
-
Turn the handle clockwise 360 degrees or until the cups start to stretch.
-
Insert an opening pick under the screen when the Anti-Clamp creates a large enough gap.
-
Skip the next two steps.
-
-
-
If you don't have an Anti-Clamp, use a single suction cup to lift the front panel:
-
Press a suction cup onto the screen, just above the home button.
-
-
-
While holding the iPhone down with one hand, pull up on the suction cup to slightly separate the home button end of the front panel from the rear case.
-
With a plastic opening tool, gently pry the edges of the rear case down, away from the front panel assembly, while you pull up with the suction cup.
-
-
-
Pull the plastic nub to release the vacuum seal on the suction cup.
-
Remove the suction cup from the screen.
-
-
Инструмент, используемый на этом этапе:Tweezers$4.99
-
Open the phone just enough to reveal the metal bracket covering the home button cable.
-
Only the phone's original home button assembly will be capable of using the Touch ID functionality. If you rip the cable, installing a new home button will only restore ordinary home button functions, not the Touch ID features.
-
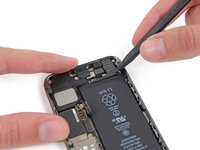
Use the tip of a spudger to push the bracket free and remove it with tweezers.
-
-
-
-
Use the tip of a spudger to pry the home button cable connector up out of its socket.
-
-
-
Once the connector has been released, pull the home button end of the assembly away from the rear case, using the top of the phone as a hinge.
-
Open the display to about a 90º angle, and lean it against something to keep it propped up while you're working on the phone.
-
Add a rubber band to keep the display securely in place while you work. This prevents undue strain on the display cables.
-
-
-
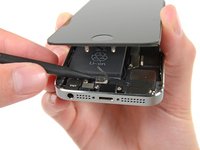
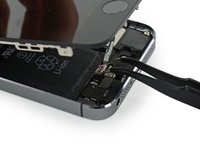
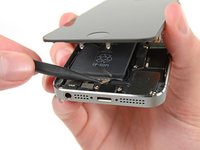
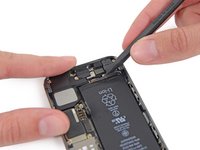
Remove the two 1.6 mm Phillips #000 screws securing the metal battery connector bracket to the logic board.
-
-
-
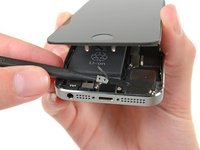
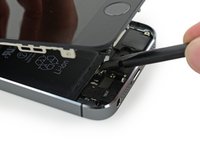
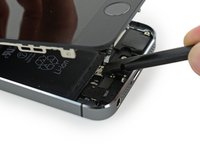
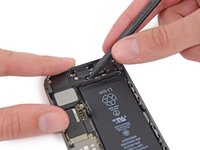
Use the flat end of a spudger to gently pry the battery connector up from its socket on the logic board.
-
-
-
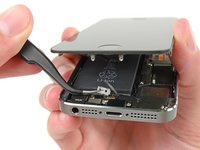
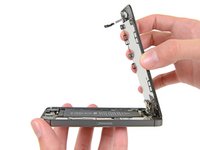
Remove the following screws securing the front panel assembly cable bracket to the logic board:
-
One 1.7 mm Phillips #000 screw
-
One 1.2 mm Phillips #000 screw
-
One 1.3 mm Phillips #000 screw
-
One more 1.7 mm Phillips #000 screw
-
-
-
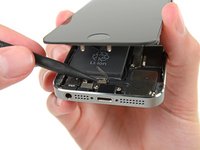
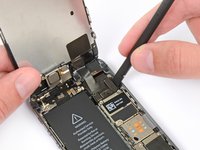
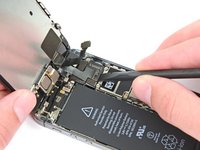
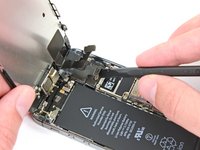
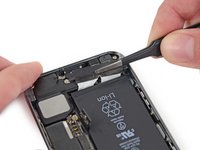
Use a spudger or a fingernail to disconnect the front-facing camera and sensor cable.
-
-
-
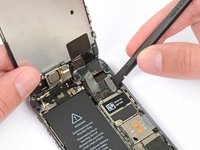
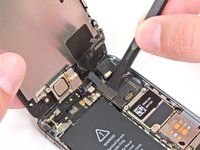
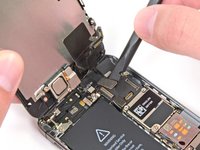
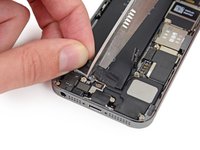
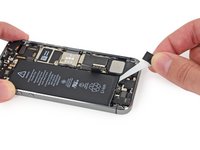
Run the tip of a spudger between the battery and the headphone jack to unfold the battery adhesive tab.
-
-
-
Pull the battery adhesive tab away from the phone.
-
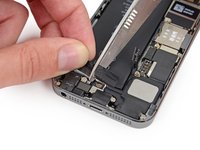
Cut the black battery adhesive tab between the two white adhesive strips, separating them.
-
-
-
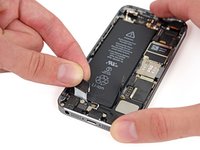
Slowly pull one of the battery adhesive strips away from the battery, toward the bottom of the iPhone. Pull the white portion of the strip when possible, the black tab may fall off.
-
Pull steadily, maintaining constant tension on the strip as it slips out from between the battery and the rear case. For best results, pull the strip at a 60º angle or less.
-
Be careful not to snag it on any of the other internal iPhone components.
-
-
-
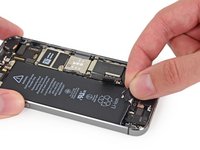
Repeat for the second strip.
-
If you removed both strips successfully, skip the next step.
-
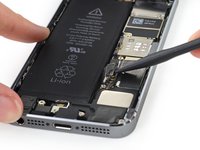
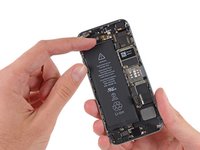
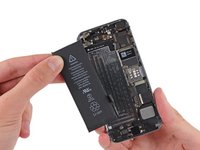
Wait about one minute for the alcohol solution to weaken the adhesive. Use the flat end of a spudger to gently lift the battery.
-
-
-
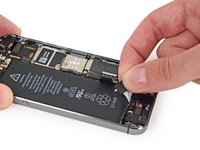
Thread the floss or string behind the upper battery corners, bring the ends together, wrap them around a folded cloth, and pull evenly.
-
-
-
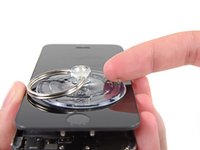
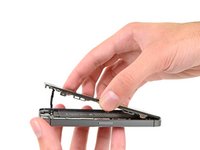
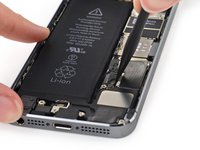
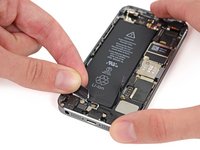
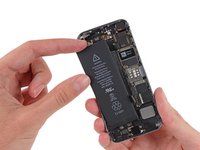
Pull the battery out of the rear case.
-
Adhere the battery, disconnect it, and continue reassembling your device.
-


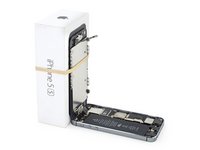


Compare your new replacement part to the original part—you may need to transfer remaining components or remove adhesive backings from the new part before installing.
To reassemble your device, follow the above steps in reverse order.
Take your e-waste to an R2 or e-Stewards certified recycler.
Repair didn’t go as planned? Check out our Answers community for troubleshooting help.
Отменить: Я не выполнил это руководство.
2088 человек успешно провели ремонт по этому руководству.


224 Комментариев
If the adhesive breaks without releasing, and you need to use a spudger or similiar to remove the battery, be VERY careful not to damage the Upper Component Cable.
This should've been included in the repair guide, as the adhesive tabs seemed designed to break. My phone is now in worse shape than it was and I'm facing what seems to be an extremely difficult repair, which I will probably not undertake.
A couple of additional pointers might be helpful...
1: I did not get all of the adhesive out from under the battery. As a result, I bent the heck out of the battery & ordered a new one, not trusting a bent one. A mention of whether it would be safe would be nice.
2: I found it impossible to get the clip from step 7 back on. I left it off. If there's a trick to this, it would be nice to have that extra instruction with the reassembly instructions, rather than "reverse order."
3: While this is always a good idea, in the process of trying to get something done, it's easy to forget that you need to remember which screws go back where, especially the 3 different-sized screws from step 10. What an evil thing Apple did there! I laid the bracket upside-down on a piece of tape, and oriented the screws around it so I'd know where they go back upon reassembly a week later. A suggestion of doing something like this might be helpful.
4: I love my iFixit toolkits! But including a pair of tweezers in it would be helpful.
2. I found this piece "snapped" into place reasonably easily, but I was careful to get the orientation correct & make sure the edge against the battery pull was "in under" (for lack of a better term) and not trying to squash the battery pull down.
Hope this helps.
Dave -
1. With regards to the bent battery, you were right to replace it. LiOn Batteries are very dangerous when the cells inside are compromised. Even though the good ones have circuit breakers built in to prevent fire, they can fail. A LiOn battery - even a small one in an iPhone - can go "high order" and cause a fire that is next to impossible to extinguish. A brief search on YouTube for Lithium Ion Battery fires will quickly convince even the skeptical.
2. The way I keep track of screws... Get a complete set of all colors of Sharpie pens. When disassembling, I touch the screw head with the same color pen as the circle in the iFixit Guide. Then when reassembling I know where the green, orange, red, & blue screws go!
Pete H -