Введение
The adjustment slider helps the headphones change their size to either tight or loose around the head depending on your preference. If your headband is not adjusting properly or is uncomfortable, try referring back to the HyperX Cloud Alpha Troubleshooting page. If our troubleshooting page is of no use, use our replacement guide to replace the slider.
Выберете то, что вам нужно
-
-
-
Remove the two Phillips #1 screws from the clips located on the headband.
-
Repeat on the other clip. (If you did the right side first, then do the left and vice-versa.)
 Спросите у FixBot
-
-
-
-
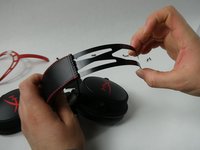
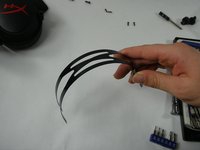
Remove the black plastic clips, freeing the metal sliding band inside.
-
-


To reassemble your device, follow these instructions in reverse order.
Отменить: Я не выполнил это руководство.
8 человек успешно провели ремонт по этому руководству.

Команда

UMass Dartmouth, Team 5-4, Sinclaire Fall 2022 Участник UMass Dartmouth, Team 5-4, Sinclaire Fall 2022
UMASSD-SINCLAIRE-F22S5G4
5 членов
Автор 18 руководств
3 Комментарии к руководству
¿Y qué hago con el cable que cruza dentro de la almohadilla? No puedo reemplazarlo si este está cruzado entre los dos extremos del auricular y dentro de la almohadilla misma.
This guide feels like it's missing several steps. I tried taking apart the HyperX Cloud 1 which is put together pretty much the same way. As you show in Step 2 there's a cable that runs through the headband that connects the left cup to the right cup. If your goal is to replace a worn headband, you would basically have to disconnect the cable from one of the cups which is a soldered connection, draw it out through the headband, thread it back through your replacement headband, and re-solder the cable to the cup, no? That seems like an important omission.
In my case I have no soldering skills so I opted to just cut the old headband open to get the cable free, then I put it back together with just the metal sliding band and no headband.
This is just full wrong and missleading. You need to solder things to replace headband
