Введение
Use this guide to replace the battery in your Lenovo ThinkPad X1 Carbon 7th Gen Laptop.
For your safety, discharge the battery below 25% before disassembling your device. This reduces the risk of fire if the battery is accidentally damaged during the repair. If your battery is swollen, take appropriate precautions.
Выберете то, что вам нужно
-
-
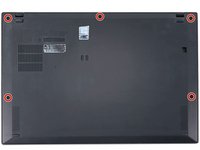
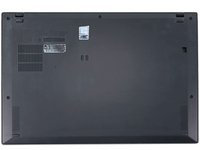
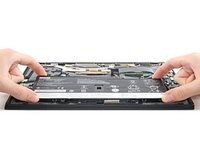
Use a Phillips #1 screwdriver to loosen the five captive screws securing the back cover.
-
-
-
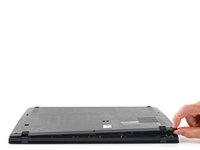
Insert an opening pick at a 45˚ angle between the back cover and frame near the rear middle screw.
-
Pry up on the pick to release the clips securing the back cover to the frame.
-
-
-
Инструмент, используемый на этом этапе:Tweezers$4.99
-
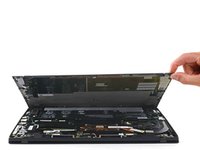
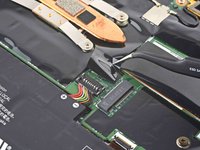
Use tweezers or your fingers to peel back the plastic shield covering the battery connector.
-
-
-
Use the flat end of a spudger to pry up on and disconnect the battery cable.
-
-
-
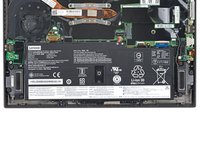
Use a Phillips #0 screwdriver to remove the six 4.9 mm-long screws securing the battery.
-
-
-
Lift the battery straight out of its recess and remove it.
There is a tab on the side toward the wires. Be sure to lift from the top edge in the picture, and slide the bottom edge (the side with the wires) in first when reconnecting the battery.
-


To reassemble your device, follow these instructions in reverse order.
For optimal performance, calibrate your newly installed battery after completing this guide.
Take your e-waste to an R2 or e-Stewards certified recycler.
Repair didn’t go as planned? Try some basic troubleshooting, or ask our Answers community for help.
Отменить: Я не выполнил это руководство.
20 человек успешно провели ремонт по этому руководству.


10 Комментариев
Thank you for the post! My laptop battery is totally dead, not charging at all at 0%, so I cannot disable the built-in battery. Since it immediately dies if unplugged, the built-in battery is automatically enabled while it’s turned on and plugged. Can I just let it unplugged and proceed?
You should still be able to access BIOS with the laptop plugged into its charger to disable the battery before unplugging it and removing it. However, if that does not work, just be careful not to bridge any of the pins the battery connects to on the motherboard and everything should still be fine.
The X1 g.7 has a known bug where internal battery stops working (won’t charge, or says battery not detected in windows). I have personally solved this problem on 4-5 laptops by disconnecting the battery (follow this guide until step 4) and then plugging it back in after ten seconds. In 90% of the cases this has solved the problem without battery replacement.
Yeah it's a hardware connection issue at least in my case. A light kick to the back of the laptop also works usually.
Thanks! This has been very helpful. Just followed the steps until removing the battery connector and putting it back. Issue sorted!
kj_only1 -
Just personally came across this issue on my son's laptop - your comment was a lifesaver
Opened up the X1 using the iFixit instructions and noted that the battery connector was not seated properly
I completely disconnected the connector, waited and then seated it back fully
Everything works now
We don't know how that connected would come loose like that though...not sure if it's going to happen again as the laptop gets jostled around in his backpack around campus
pinkoos -
After replacing battery in X1 Gen 7 battery indicator shows 100% (laptop plugged-in) and Lenovo recalibration function stays forever in Step 2 (drain battery down). If I unplug laptop, it immediately goes dark as if it has no battery and won’t boot. Plugging it in again and powering up everything works fine. In short, works when plugged in and doesn’t work when unplugged despite diagnostic saying battery is good. Any suggestions? Thanks.
You are my hero! I could not figure out how to disconnect the motherboard connector of the battery. After your instruction I could. Saved me $50 easily!!
I am trying to replace the keyboard which unlike some other x390 cannot be removed from the front. Do you have a video that explains this step by step like removing the battery, motherboard and then the keyboard?
Excellent guide, this made it easy.
The only thing I struggled with a bit was to reconnect the battery cable. You have to do exactly the reverse of step 5: first fasten the part of the battery cable connector that has the cables connected to it (= the part the closest to the battery), so the black cable connector is tilted slightly. Then gently push the other (titled) part down until it clicks. Ensure the connector is fixed before re-assembling the back cover.