Перейти к основному содержанию
Присоединяйся к сообществу ремонтников - Создай аккаунт

Logitech M100 Switch Replacement

Выберете то, что вам нужно

    1. Logitech M100 Switch Replacement, Switches: шаг 1, изображение 1 из 1
      • Disconnect the mouse from any devices before attempting to remove any parts or starting the repair.

      • Flip your mouse over so the bottom is facing up.

      Спросите у FixBot

      Добавить комментарий

    2. Logitech M100 Switch Replacement: шаг 2, изображение 1 из 1
      • Use a small Phillips #00 screwdriver to remove the single screw at the bottom of the mouse.

      Спросите у FixBot

      Добавить комментарий

    3. Logitech M100 Switch Replacement: шаг 3, изображение 1 из 2 Logitech M100 Switch Replacement: шаг 3, изображение 2 из 2
      • Turn your mouse over so it is facing right side up.

      • Use a spudger or your hands to carefully separate the top from the bottom housing.

      • It's important to remove the top housing while leaving the bottom in place, as the scroll wheel and other internal components may fall out otherwise.

      Спросите у FixBot

      Добавить комментарий

    4. Logitech M100 Switch Replacement: шаг 4, изображение 1 из 1
      • Remove the external cable from the slot at the front of the mouse.

      Спросите у FixBot

      Добавить комментарий

    5. Logitech M100 Switch Replacement: шаг 5, изображение 1 из 3 Logitech M100 Switch Replacement: шаг 5, изображение 2 из 3 Logitech M100 Switch Replacement: шаг 5, изображение 3 из 3
      • Remove the circuit board from the mouse by pushing down at the back and lifting up at the front.

      Спросите у FixBot

      Добавить комментарий

    6. Logitech M100 Switch Replacement: шаг 6, изображение 1 из 2 Logitech M100 Switch Replacement: шаг 6, изображение 2 из 2
      • Lift the scroll wheel from the board.

      • There should be a total of four parts that make up the scroll wheel.

      Спросите у FixBot

      Добавить комментарий

    7. Logitech M100 Switch Replacement: шаг 7, изображение 1 из 1
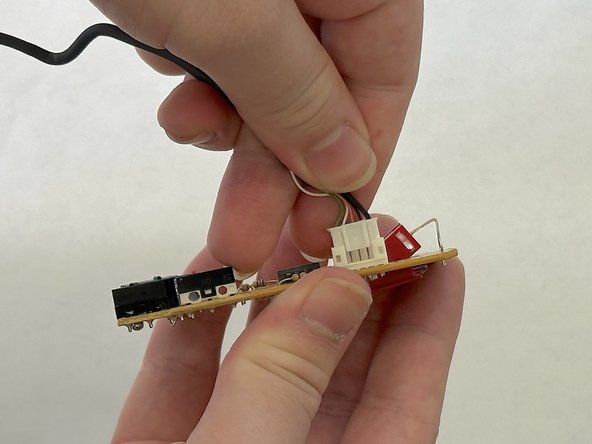
      • Pull the USB cable away from the connector in the same direction as the individual wires to remove it from the motherboard.

      • This step may prove difficult with just your hands. Use a spudger if you need to.

      • Pull evenly on the full width of the cable so that no individual wires are overly strained.

      Спросите у FixBot

      Добавить комментарий

    8. Logitech M100 Switch Replacement: шаг 8, изображение 1 из 1
      • Find a suitable method to hold the circuit board in place so you don't have to hold it in your hands.

      • Use a small vice to keep it in place or helping hands for this next step.

      Спросите у FixBot

      Добавить комментарий

    9. Logitech M100 Switch Replacement: шаг 9, изображение 1 из 3 Logitech M100 Switch Replacement: шаг 9, изображение 2 из 3 Logitech M100 Switch Replacement: шаг 9, изображение 3 из 3
      • Use a soldering iron to heat the solder points securing both switches, and remove the switches using tweezers.

      • The soldering iron and the solder holding the switch in place will be very hot and can burn you.

      Спросите у FixBot

      Добавить комментарий

    10. Logitech M100 Switch Replacement: шаг 10, изображение 1 из 3 Logitech M100 Switch Replacement: шаг 10, изображение 2 из 3 Logitech M100 Switch Replacement: шаг 10, изображение 3 из 3
      • Replace each switch and solder it to the circuit board.

      • The soldering wire may conduct heat up to the hand holding it.

      • Be sure to work in a well ventilated space as the solder may emit smoke.

      • You can use tape to hold the switch in place while soldering.

      Спросите у FixBot

      Добавить комментарий

    11. Logitech M100 Switch Replacement: шаг 11, изображение 1 из 2 Logitech M100 Switch Replacement: шаг 11, изображение 2 из 2
      • Reassemble the mouse by following steps 2-7 in reverse order.

      Спросите у FixBot

      Добавить комментарий

Заключение

Congratulations, you have now replaced the clickers on your mouse and can continue using it!

Отменить: Я не выполнил это руководство.

2 человек успешно провели ремонт по этому руководству.

Diego De La Fuente

Участник с: 03/05/24

211 Репутация

1 руководство автора

Команда

CSU Los Angeles, Team 7-2, Grodsky Spring 2024 Участник CSU Los Angeles, Team 7-2, Grodsky Spring 2024

CSULA-GRODSKY-S24S7G2

3 членов

Автор 1 руководств

0 Комментарии к руководству

Добавить комментарий

Статистика просмотров:

За последние 24 часов: 2

За последние 7 дней: 15

За последние 30 дней: 62

За всё время: 1,160