Введение
Use this guide to upgrade or replace the solid-state drive in a MacBook Air 11” Mid 2011. This MacBook Air uses a proprietary storage drive connector, and is therefore not compatible with common M.2 drives without the use of an adapter.
Before you perform this repair, if at all possible, back up your existing SSD. Then, either familiarize yourself with internet recovery or create a bootable external drive so you’ll be ready to install macOS onto your new drive and migrate your data to the new SSD.
Finally, we strongly recommend installing macOS 10.13 High Sierra (or a later macOS) before replacing the original SSD from your MacBook Air. Most new SSDs require updated storage drivers not found in versions of macOS prior to High Sierra.
Выберете то, что вам нужно
-
-
Инструмент, используемый на этом этапе:P5 Pentalobe Screwdriver Retina MacBook Pro and Air$5.99
-
Remove the following ten screws:
-
Two 8 mm 5-point Pentalobe screws
-
Eight 2.5 mm 5-point Pentalobe screws
 Спросите у FixBot
-
-
-
Wedge your fingers between the display and the lower case and pull upward to pop the lower case off the Air.
-
Remove the lower case and set it aside.
-
-
-
-
-
-
Use the flat end of a spudger to pry both short sides of the battery connector upward to disconnect it from its socket on the logic board.
-
Bend the battery cable slightly away from the logic board so the connector will not accidentally contact its socket.
-
-
-
-
-
Remove the single 2.9 mm T5 Torx screw securing the SSD to the logic board.
-
-
-
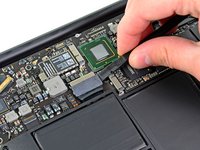
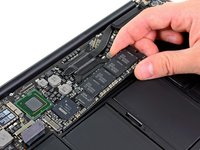
Use a spudger to help lift the free end of the SSD just enough to grab it with your other hand.
-
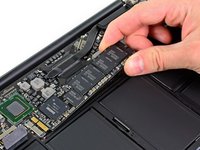
Pull the drive straight out of its socket and remove it from the logic board.
-
-




To reassemble your device, follow these instructions in reverse order.
Отменить: Я не выполнил это руководство.
117 человек успешно провели ремонт по этому руководству.

16 Комментарии к руководству
Note: if you're installing a blank SSD, you'll want to format it with Disk Utilities) before the OS X installer will recognize it.
Could not have been any easier, with this guide.
Thank you very much!
is it possible to replace an 128 GB Solid State Drive with an 240 GB? (MacBook Air, 11", Mid 2011)
Does anyone know if the Samsung 960 pro 512gb m.2 drive is compatible with this machine?
No, is not, I just bought a 1TB Samsung 960 EVO m.2 and had to return it, for not being compatible. (is smaller and the pin-out is not the same)
