Этот перевод был сделан машиной и пока не проверен человеком. Говорите на этом языке? Просмотрите его.
Введение
Используйте это руководство для обновления или замены твердотельного накопителя (SSD) в MacBook Air 13" модели начала 2014 года. В этом MacBook Air используется проприетарный разъем для накопителя, поэтому он несовместим с обычными накопителями M.2 без использования специального адаптера.
Перед выполнением этого ремонта, если это возможно, создайте резервную копию вашего текущего SSD. Затем ознакомьтесь с процедурой интернет-восстановления или создайте загрузочный внешний накопитель, чтобы быть готовыми установить macOS на новый SSD и перенести на него свои данные.
Настоятельно рекомендуем обновить macOS до версии 10.13 High Sierra (или более поздней) перед заменой оригинального SSD в вашем MacBook Air. Большинству новых SSD требуются обновленные драйверы накопителей, которые отсутствуют в версиях macOS до High Sierra.
Выберете то, что вам нужно
-
-
Инструмент, используемый на этом этапе:P5 Pentalobe Screwdriver Retina MacBook Pro and Air$5.99
-
Используйте отвертку P5 Pentalobe для того, чтобы открутить десять винтов, удерживающих нижнюю крышку. Винты имеют следующую длину:
-
Два винта длиной 9 мм
-
Восемь винтов длиной 2,6 мм
 Спросите у FixBot
-
-
-
Просуньте пальцы между дисплеем и нижней крышкой и потяните вверх, чтобы отсоединить нижнюю крышку от MacBook Air.
-
Снимите нижнюю крышку и отложите её в сторону.
-
-
-
-
-
-
Возьмитесь за прозрачный пластиковый язычок, прикрепленный к разъему аккумулятора, и потяните его параллельно плате по направлению к переднему краю Air.
-
-
-
-
-
Открутите один винт T5 Torx длиной 2,9 мм, удерживающий SSD на логической плате.
-
-
-
Аккуратно приподнимите край SSD примерно на 1,5 см и вытяните его прямо из разъема на логической плате.
-
-


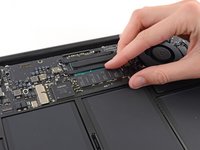
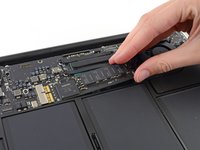
Для сборки устройства выполните эти инструкции в обратном порядке.
Отменить: Я не выполнил это руководство.
94 человек успешно провели ремонт по этому руководству.


26 Комментарии к руководству
Fairly straight forward once you get the right screwdrivers. Took me less than 10 minutes.
Very simple and straight forward replacement. First-party SSD replacement can be found on ebay (typically removed from parted-out MacBook Airs). Currently they're aren't any third-party parts available.
Don't forget to re-attach the battery cable before closing up the underside... not that I did or anything ;-/
The Relevant Parts list all has incorrect links. Bait & Switch??
Examples:
"$199.95 Macbook Air 11" and 13" (Mid 2013/Early 2014) SSD, 256 GB"
Actually supplies: 128GB USED
"$349.95 Macbook Air 11" and 13" (Mid 2013/Early 2014) SSD, 512 GB"
Actually supplies: 256GB USED
Whoops! Looks like we didn't update the details on those parts when we updated the part itself, sorry about that!
