Введение
Это руководство описывает процесс замены передних кнопок устройства. Чтобы получить доступ к передним кнопкам, необходимо открыть корпус устройства. Процесс вскрытия устройства поначалу может показаться пугающим, но в руководстве приведены необходимые меры предосторожности. Если следовать шагам руководства, устройство не будет повреждено. Дополнительную информацию можно найти на нашей странице устранения неполадок.
Выберете то, что вам нужно
-
-
-
Перед началом работы выключите консоль и извлеките:
-
стилус
-
любой игровой картридж
-
карту microSD
 Спросите у FixBot
-
-
-
Используйте трехлепестковую отвертку Y00, чтобы открутить четыре винта длиной 6 мм, расположенные по углам нижней панели.
-
-
-
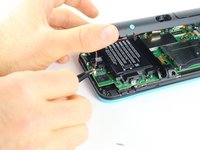
Используйте пластиковую лопатку (spudger), чтобы аккуратно поддеть крышку вдоль двух коротких сторон и переднего края (с вырезом под стилус), чтобы освободить защелки, удерживающие заднюю крышку.
-
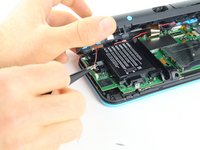
Откиньте заднюю крышку, потянув за передний край, чтобы освободить защелки вдоль края с петлями. Не снимайте крышку полностью — она соединена с материнской платой тремя шлейфами (по одному с каждой стороны и один сзади).
-
-
Инструмент, используемый на этом этапе:Tweezers$4.99
-
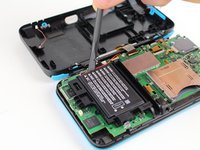
Используйте пинцет, чтобы отсоединить два шлейфа, соединяющих кнопки на задней панели с обеих сторон с материнской платой, аккуратно потянув их вверх.
-
Откиньте заднюю крышку через край петли, не отсоединяя шлейф. Не натягивайте шлейф.
-
-
-
-
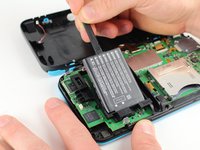
Используйте плоский конец лопатки (spudger), чтобы аккуратно поддеть аккумулятор и извлечь его из пластикового корпуса.
-
-
-
-
Инструмент, используемый на этом этапе:Tweezers$4.99
-
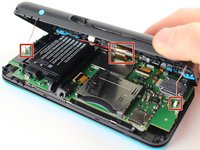
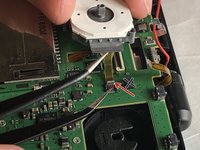
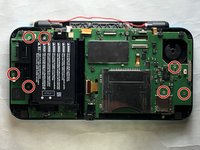
Нужно отсоединить 8 шлейфов, как показано на изображении.
-
Для остальных 6 (выделены красным) используйте пинцет, чтобы откинуть фиксаторы вверх и извлечь шлейф.
-
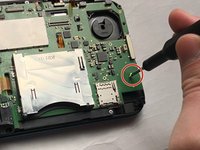
Обратите внимание: на втором изображении показан сломанный разъем шлейфа рядом с разъемом шлейфа джойстика (справа от красной стрелки). Не пытайтесь отщелкнуть этот разъем, как показано на картинке!
-
-
-
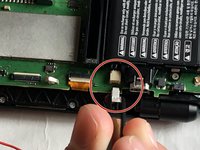
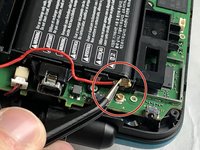
Отсоедините следующие провода от материнской платы с помощью пинцета.
-
-
-
Выкрутите семь винтов длиной 4,4 мм с помощью отвертки J00 (или биты Phillips #00 от iFixit).
-
Извлеките материнскую плату из устройства.
-
-
-
-
Инструмент, используемый на этом этапе:Tweezers$4.99
-
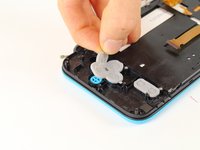
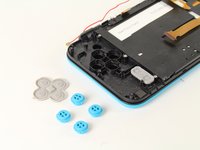
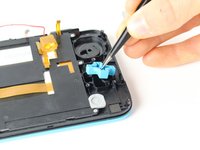
Снимите резиновую накладку с кнопок A, B, X и Y.
-
С помощью пинцета извлеките кнопки.
-
-
-
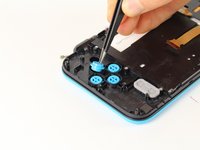
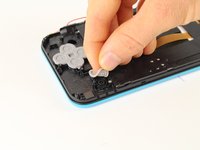
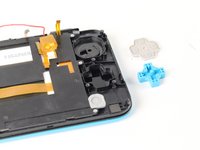
Снимите серую резиновую накладку с кнопок «start» и «select».
-
С помощью пинцета извлеките кнопки.
-
-
-
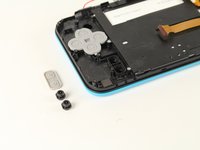
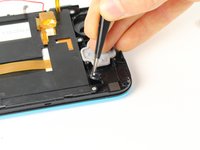
Снимите серую резиновую мембрану с крестовины (D-pad).
-
С помощью пинцета извлеките крестовину (D-pad).
-
-
-
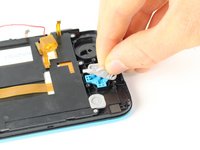
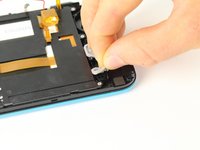
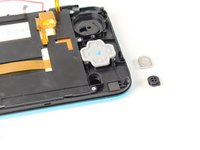
Снимите серую резиновую мембрану, закрывающую кнопку «Домой».
-
С помощью пинцета извлеките кнопку.
-
-


Для сборки устройства выполните эти инструкции в обратном порядке.
Отменить: Я не выполнил это руководство.
6 человек успешно провели ремонт по этому руководству.
Особая благодарность этим переводчикам:
100%

Translation Bot помогает нам починить мир! Хотите внести свой вклад?
Начните переводить ›

Команда

Cal Poly, Team S18-G6, Forte Fall 2017 Участник Cal Poly, Team S18-G6, Forte Fall 2017
CPSU-FORTE-F17S18G6
5 членов
Автор 46 руководств
4 Комментарии к руководству
after assembly, pressing ZL causes some kind of an electric short, and the console turns off immediately, help !
This usually occurs when you break the lower screen's power ribbon cable connector. It is not a ZIF connector and "unlatching" it will break it causing a loose fit. The shoulder button presses against the ribbon cable causing it to shift in the connector resulting in the speakers popping and the device turning off.
OK. Lets say I can now change the buttons for replacement purposes only. My question is :where on the earth i can find buttons to replace??????
Now there is a full set of keys for 2dsxl. If you can't find it, you can google kasynparts