Перейти к основному содержанию

Nintendo 3DS Upper Display Front Panel Replacement

Выберете то, что вам нужно

  1. Nintendo 3DS Upper Display Front Panel Replacement, Back Cover: шаг 1, изображение 1 из 1
    • Unscrew the four Phillips #00 screws along the top of the back cover.

    • The screws are held in place by locking washers, and will not come out of the back cover.

    • The comments section is full of unlucky souls who will tell you that the screws here through step 4 will strip incredibly easily. Press down fairly hard, and go slow.

  2. Nintendo 3DS Upper Display Front Panel Replacement: шаг 2, изображение 1 из 2 Nintendo 3DS Upper Display Front Panel Replacement: шаг 2, изображение 2 из 2
    • Hold the device in one hand and turn it over.

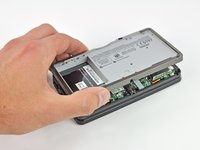
    • Grab the top edge of the back cover with your opposite hand so that the cover does not fall back into place.

    • Flip the 3DS over again so that the back cover is facing up.

    • Pull the back cover up and away from the rest of the device to remove it.

  3. Nintendo 3DS Upper Display Front Panel Replacement, Battery: шаг 3, изображение 1 из 3 Nintendo 3DS Upper Display Front Panel Replacement, Battery: шаг 3, изображение 2 из 3 Nintendo 3DS Upper Display Front Panel Replacement, Battery: шаг 3, изображение 3 из 3
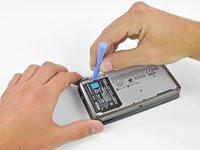
    • Insert a plastic opening tool into the notch in the lower case above the battery.

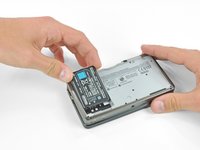
    • Pry the battery up with the plastic opening tool.

    • Grab the top edge of the battery and lift it out of the lower case.

  4. Nintendo 3DS Upper Display Front Panel Replacement, Lower Case: шаг 4, изображение 1 из 1
    • Remove the nine 6.3 mm black Phillips screws from the lower case.

    • These screws will strip very easily unless you use the correct size bit. Apply pressure to the screws while turning to avoid stripping them.

    • Remove the 2.4 mm silver Phillips screw above the game cartridge slot.

  5. Nintendo 3DS Upper Display Front Panel Replacement: шаг 5, изображение 1 из 3 Nintendo 3DS Upper Display Front Panel Replacement: шаг 5, изображение 2 из 3 Nintendo 3DS Upper Display Front Panel Replacement: шаг 5, изображение 3 из 3
    • Lift the bottom edge of the lower case off the rest of the 3DS.

    • There are still two ribbon cables connecting the mother board to the case, so be sure not to pull the lower case all the way off.

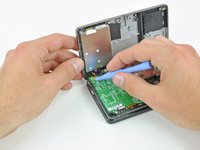
    • Use a plastic opening tool to pry the shoulder button ribbon cables off their sockets on the motherboard.

    • Remove the lower case from the device.

  6. Nintendo 3DS Upper Display Front Panel Replacement, Circle Pad Joystick: шаг 6, изображение 1 из 1
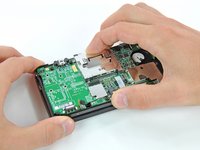
    • Remove the two 7.7 mm Phillips screws securing the back of the Circle Pad to the motherboard.

  7. Nintendo 3DS Upper Display Front Panel Replacement: шаг 7, изображение 1 из 3 Nintendo 3DS Upper Display Front Panel Replacement: шаг 7, изображение 2 из 3 Nintendo 3DS Upper Display Front Panel Replacement: шаг 7, изображение 3 из 3
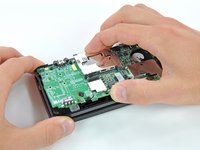
    • Use the flat end of a spudger to pry the back of the Circle Pad off the motherboard.

    • Lift the Circle Pad joystick off the motherboard and lay it on its back so that the ribbon cable connector is accessible.

  8. Nintendo 3DS Upper Display Front Panel Replacement: шаг 8, изображение 1 из 3 Nintendo 3DS Upper Display Front Panel Replacement: шаг 8, изображение 2 из 3 Nintendo 3DS Upper Display Front Panel Replacement: шаг 8, изображение 3 из 3
    • Use the flat end of a spudger or your fingernail to flip up the retaining flap on the Circle Pad ribbon cable ZIF socket.

    • Be sure you are prying up on the hinged retaining flap, not the socket itself.

    • Lift the Circle Pad joystick off the motherboard.

  9. Nintendo 3DS Upper Display Front Panel Replacement: шаг 9, изображение 1 из 2 Nintendo 3DS Upper Display Front Panel Replacement: шаг 9, изображение 2 из 2
    • To decrease the chance of losing it during repairs, you may want to remove the two thin pads underneath the Circle Pad joystick.

    • Use a spudger or screwdriver to lift the pads up and remove them from the device.

  10. Nintendo 3DS Upper Display Front Panel Replacement, SD Board: шаг 10, изображение 1 из 1
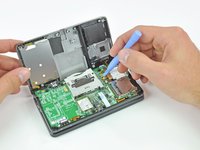
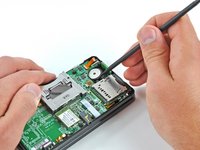
    • Remove the two 4.5 mm Phillips screws securing the SD board to the motherboard.

  11. Nintendo 3DS Upper Display Front Panel Replacement: шаг 11, изображение 1 из 2 Nintendo 3DS Upper Display Front Panel Replacement: шаг 11, изображение 2 из 2
    • Use the flat end of a spudger to pry the SD board ribbon cable connector off its socket on the motherboard.

  12. Nintendo 3DS Upper Display Front Panel Replacement: шаг 12, изображение 1 из 3 Nintendo 3DS Upper Display Front Panel Replacement: шаг 12, изображение 2 из 3 Nintendo 3DS Upper Display Front Panel Replacement: шаг 12, изображение 3 из 3
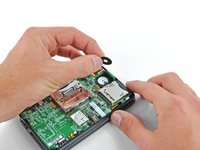
    • Insert the flat end of a spudger between the SD board and the motherboard.

    • Pry up slowly to loosen the SD board from the RF shield underneath it. If you pry too quickly, you may tear the shield or break its solder points.

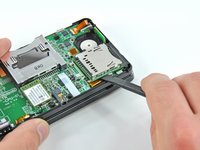
    • Run the spudger along the sides of the SD board to free it from the adhesive holding it in place.

    • Once completely freed, lift the SD board straight off the motherboard.

  13. Nintendo 3DS Upper Display Front Panel Replacement, Wi-Fi Board: шаг 13, изображение 1 из 2 Nintendo 3DS Upper Display Front Panel Replacement, Wi-Fi Board: шаг 13, изображение 2 из 2
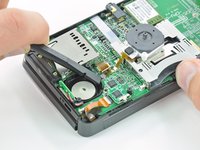
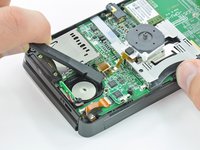
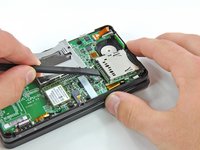
    • Slide the flat end of a spudger under the corner of the Wi-Fi board, and lift it away from the motherboard.

    • The Wi-Fi antenna cable is still connected to the Wi-Fi board, so you cannot completely remove the Wi-Fi board yet.

  14. Nintendo 3DS Upper Display Front Panel Replacement: шаг 14, изображение 1 из 3 Nintendo 3DS Upper Display Front Panel Replacement: шаг 14, изображение 2 из 3 Nintendo 3DS Upper Display Front Panel Replacement: шаг 14, изображение 3 из 3
    • Lift the Wi-Fi board off the motherboard and rotate it so that the bottom side is facing up.

    • Use the flat end of a spudger to pry the Wi-Fi antenna cable connector off its socket on the Wi-Fi board.

    • Remove the Wi-Fi board from the device.

  15. Nintendo 3DS Upper Display Front Panel Replacement, Motherboard Assembly: шаг 15, изображение 1 из 2 Nintendo 3DS Upper Display Front Panel Replacement, Motherboard Assembly: шаг 15, изображение 2 из 2
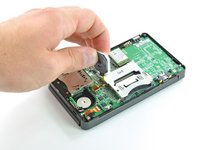
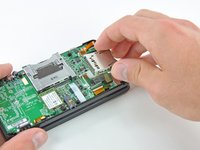
    • Grasp the microphone ribbon cable near the microphone with a pair of tweezers.

    • Pull the microphone straight up out of the upper case.

  16. Nintendo 3DS Upper Display Front Panel Replacement: шаг 16, изображение 1 из 3 Nintendo 3DS Upper Display Front Panel Replacement: шаг 16, изображение 2 из 3 Nintendo 3DS Upper Display Front Panel Replacement: шаг 16, изображение 3 из 3
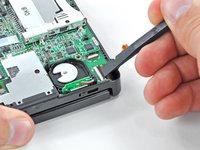
    • Use the flat end of a spudger or your fingernail to flip up the retaining flap on the speaker assembly ribbon cable ZIF socket.

    • Be sure you are prying up on the hinged retaining flap, NOT the socket itself. Damaging the socket or cable will result in a 3DS that will blink its power LED when you press the power button - and do nothing else.

    • Disconnect the speaker assembly ribbon cable with a pair of tweezers.

  17. Nintendo 3DS Upper Display Front Panel Replacement: шаг 17, изображение 1 из 2 Nintendo 3DS Upper Display Front Panel Replacement: шаг 17, изображение 2 из 2
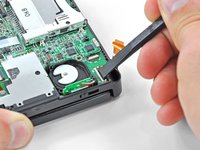
    • Use the flat end of a spudger or your fingernail to flip up the retaining flap on the camera ribbon cable ZIF socket.

    • Be sure you are prying up on the hinged retaining flap, not the socket itself.

    • When reassembling, note that the gold contacts face toward the motherboard (as opposed to the camera cable's gold contacts facing away).

  18. Nintendo 3DS Upper Display Front Panel Replacement: шаг 18, изображение 1 из 3 Nintendo 3DS Upper Display Front Panel Replacement: шаг 18, изображение 2 из 3 Nintendo 3DS Upper Display Front Panel Replacement: шаг 18, изображение 3 из 3
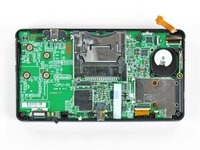
    • Remove seven Phillips screws securing the motherboard to the upper case:

    • Four 2.5 mm gold screws

    • Two 3.5 mm black screws

    • One 2.5 mm silver screw

    • When you remove this screw the volume slider can fall out.

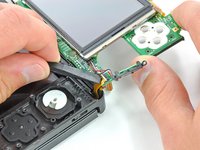
    • Lift the side of the motherboard that sits along the bottom edge of the 3DS.

  19. Nintendo 3DS Upper Display Front Panel Replacement: шаг 19, изображение 1 из 3 Nintendo 3DS Upper Display Front Panel Replacement: шаг 19, изображение 2 из 3 Nintendo 3DS Upper Display Front Panel Replacement: шаг 19, изображение 3 из 3
    • Continue lifting the motherboard assembly and rotate it until it is resting next to the rest of the device.

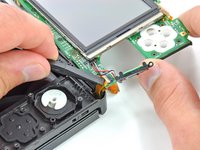
    • Use the flat end of a spudger or your fingernail to flip up the retaining flap on the LCD ribbon cable ZIF socket.

    • Be sure you are prying up on the hinged retaining flap, not the socket itself. Damaging the socket or cable will result in a 3DS that won't have a functional top screen.

  20. Nintendo 3DS Upper Display Front Panel Replacement: шаг 20, изображение 1 из 1
    • Remove the motherboard assembly from the rest of the device.

  21. Nintendo 3DS Upper Display Front Panel Replacement, Upper Display Front Panel: шаг 21, изображение 1 из 1
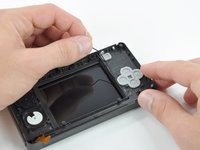
    • Before continuing with disassembly, use a pair of tweezers to remove the clear plastic diffuser for the wireless notification LED. The small piece is likely to fall out on its own, and may be difficult to find if it lands on the floor.

  22. Nintendo 3DS Upper Display Front Panel Replacement: шаг 22, изображение 1 из 2 Nintendo 3DS Upper Display Front Panel Replacement: шаг 22, изображение 2 из 2
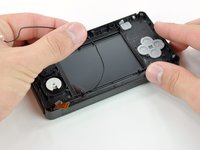
    • De-route the Wi-Fi antenna cable from the bottom of the upper case.

    • This step is not necessary if you are only replacing the front panel; however, the replacement of the upper screen, speakers, cameras, and Wi-Fi antenna require it.

  23. Nintendo 3DS Upper Display Front Panel Replacement: шаг 23, изображение 1 из 2 Nintendo 3DS Upper Display Front Panel Replacement: шаг 23, изображение 2 из 2
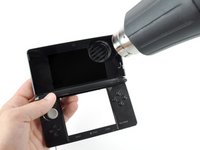
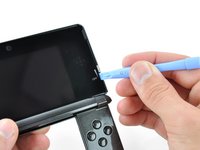
    • Heat the edges of the upper display front panel with a hair dryer or heat gun to soften the adhesive holding it to the display bezel.

    • Begin prying the edges of the front panel off with a plastic opening tool.

    • If it is difficult to pry the front panel off, reheat the area you are working on with the heat gun, and then return to prying. Applying excessive force could crack the front panel.

  24. Nintendo 3DS Upper Display Front Panel Replacement: шаг 24, изображение 1 из 2 Nintendo 3DS Upper Display Front Panel Replacement: шаг 24, изображение 2 из 2
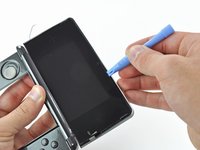
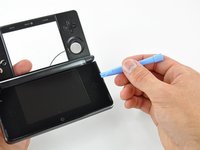
    • Continue prying the remaining sides of the front panel by sliding the plastic opening tool down each edge.

    • Too little heat will result in excessive bending/breaking of the front panel, and too much will melt and destroy the LCD underneath. Take your time.

  25. Nintendo 3DS Upper Display Front Panel Replacement: шаг 25, изображение 1 из 2 Nintendo 3DS Upper Display Front Panel Replacement: шаг 25, изображение 2 из 2
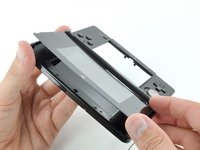
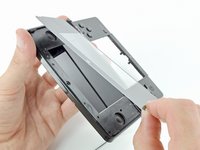
    • With all of the sides free, lift the upper display front panel off the display bezel.

Заключение

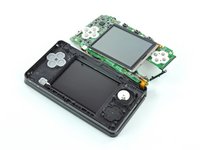
To reassemble your device, follow these instructions in reverse order.

13 участников успешно повторили данное руководство.

David Hodson

Участник с: 04/13/10

150 318 Репутация

Автор 127 руководств

4 Комментариев

Why remove the entire motherboard just for the upper screen? That seems completely unnecessary; just be careful with the heat gun.

Bryan Haley - Ответить

Tehy remove the whole motherboard because if you pay attention ribbon cables attaching things from the top to the bottom, like the ribbon cable for the lcd that you cant remove from its socket without removing the other parts. They even have pictures on these guides… just focus a little more on paying attention and you will be alright

Johnny Blaze - Ответить

Just to replace the front panel you don’t need to remove anything else, its just held down with adhesive, only reason to take apart is to replace the lcd itself which isn’t what this is about.

Sam Jordan - Ответить

can i use a hair dryer

Sqwerks - Ответить

Добавить комментарий

Просмотр статистики:

За последние 24часов: 18

За последние 7 дней: 129

За последние 30 дней: 398

За всё время: 24,924