Введение
Follow this guide to replace a damaged or faulty microSD card reader on your Nintendo Switch game console.
The Nintendo Switch uses JIS screws, which are slightly different than Phillips. We don’t recommend using Phillips drivers for JIS screws; however, iFixit Phillips bits are specifically designed to be compatible with JIS screws. If you use a non-iFixit Phillips driver, you risk stripping the screws.
WARNING: The battery cannot be disconnected during this repair, so make sure to only use ESD-safe tools and be extra careful when using any metal tools. Not doing so could short a connection and damage the device.
Note: This guide, and the part we sell, are compatible with the original Nintendo Switch model released in 2017, as well as the newer refreshed model released in 2019 (model numbers HAC-001 and HAC-001(-01), respectively).
Выберете то, что вам нужно
-
-
Press and hold down the small round button on the back of the Joy Con controller.
-
While you hold down the button, slide the controller upward.
-
-
-
Continue sliding the Joy Con upward until it's completely removed from the console.
-
-
Инструмент, используемый на этом этапе:Magnetic Project Mat$16.96
-
Use a Y00 screwdriver to remove the four 6.3 mm-long screws securing the rear panel.
-
-
-
Use a JIS 00 driver to remove the following screws securing the rear panel:
-
One 2.5 mm-long screw on the top edge of the device
-
Two 2.5 mm-long screws on the bottom edge of the device
-
-
-
-
Use a JIS 00 driver to remove the two 3.8 mm center screws on the sides of the device (one on each side).
-
-
-
Use a JIS 00 driver to remove the 1.6 mm screw in the kickstand well.
-
Close the kickstand.
-
-
-
Open the game card cartridge flap.
-
Lift the rear panel up from the bottom of the device and remove it.
-
-
-
Use a JIS 00 driver to remove the 3.1 mm screw securing the microSD card reader to the device.
-
-
Инструмент, используемый на этом этапе:Tweezers$4.99
-
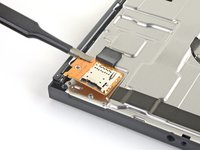
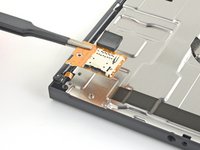
Use your fingers or a pair of tweezers to lift the microSD card reader straight up from the device to disconnect and remove it.
-


Compare your new replacement part to the original part. You may need to transfer remaining components or remove adhesive backings from the new part before installing.
To reassemble your device, follow these instructions in reverse order.
Take your e-waste to an R2 or e-Stewards certified recycler.
Repair didn’t go as planned? Try some basic troubleshooting, or ask our Nintendo Switch Answers community for help.
Отменить: Я не выполнил это руководство.
168 человек успешно провели ремонт по этому руководству.

64 Комментарии к руководству
My SD reader never worked.
Used this guide to find that it was never seated correctly. Reseated and now works perfectly. THANK YOU!
My console won’t boot if I have an SD card inserted after reseating it. What should I do?
Easy guide, fixed my problem. Changed the SD card reader cause I was abusing of it by putting SD in and out constantly.
Some one can help me, when I tried to put the connector again I damage the fpc connector of the motherboard so I try to find out again can any one know the kind of model of this connector I really appreciate the help
Best regards