Перейти к основному содержанию

Nintendo WaveBird Wireless Controller Motherboard Replacement

Выберете то, что вам нужно

  1. Nintendo WaveBird Wireless Controller Motherboard Replacement, Batteries: шаг 1, изображение 1 из 2 Nintendo WaveBird Wireless Controller Motherboard Replacement, Batteries: шаг 1, изображение 2 из 2
    • Pull down on the battery cover release lever and pull back to remove the cover.

  2. Nintendo WaveBird Wireless Controller Motherboard Replacement: шаг 2, изображение 1 из 1
    • Remove both batteries from the device.

  3. Nintendo WaveBird Wireless Controller Motherboard Replacement, Front Panel: шаг 3, изображение 1 из 2 Nintendo WaveBird Wireless Controller Motherboard Replacement, Front Panel: шаг 3, изображение 2 из 2
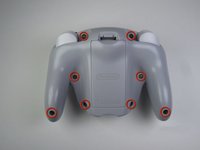
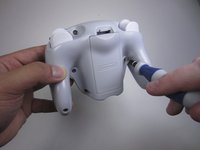
    • Remove the eight 9 mm screws from the back panel using the Tri-point Y1 screwdriver.

    • During reassembly, firmly hold the panels of the controller together while replacing the screws so the panels do not separate.

  4. Nintendo WaveBird Wireless Controller Motherboard Replacement: шаг 4, изображение 1 из 2 Nintendo WaveBird Wireless Controller Motherboard Replacement: шаг 4, изображение 2 из 2
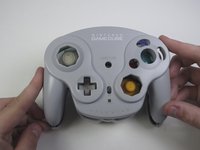
    • Carefully turn over the controller and place it on a flat surface.

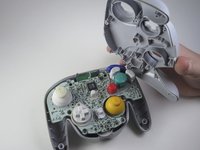
    • Slowly separate the top panel from the bottom panel.

    • The buttons are loose and may fall off the motherboard.

    • Once separated, set aside the top panel.
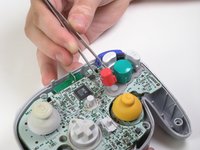
    • During reassembly, make sure the front panel lines up with the buttons so they slide back into place.

  5. Nintendo WaveBird Wireless Controller Motherboard Replacement, Buttons: шаг 5, изображение 1 из 3 Nintendo WaveBird Wireless Controller Motherboard Replacement, Buttons: шаг 5, изображение 2 из 3 Nintendo WaveBird Wireless Controller Motherboard Replacement, Buttons: шаг 5, изображение 3 из 3
    • Use tweezers to remove the buttons.
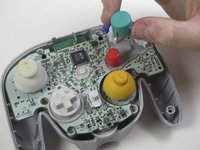
    • It may be easier to remove the A button off of the pad by lifting it with your fingers.

    • During reassembly, make sure all buttons are in their respective sockets so they match up with the front panel.

  6. Nintendo WaveBird Wireless Controller Motherboard Replacement, Motherboard: шаг 6, изображение 1 из 1
    • Using tweezers remove the three grey button pads from the motherboard.

  7. Nintendo WaveBird Wireless Controller Motherboard Replacement: шаг 7, изображение 1 из 1
    • With your fingers gently grip the motherboard on both sides and lift it away from the back panel.

    • To put the motherboard back into place, align the two metal clips under the motherboard with the slots in the back panel. The motherboard should fall into place.

Заключение

To reassemble your device, follow these instructions in reverse order.

6 участников успешно повторили данное руководство.

Travis Taylor

Участник с: 04/12/13

464 Репутация

Автор 5 руководств

Команда

Cal Poly, Team 10-40, Amido Spring 2013 Участник Cal Poly, Team 10-40, Amido Spring 2013

CPSU-AMIDO-S13S10G40

4 членов

Автор 37 руководств

0 Комментариев

Добавить комментарий

Просмотр статистики:

За последние 24часов: 0

За последние 7 дней: 10

За последние 30 дней: 58

За всё время: 8,111