Эта версия возможно содержит некорректные исправления. Переключить на последнюю проверенную версию.
Выберете то, что вам нужно
-
Этот шаг не переведен. Помогите перевести
-
Switch off your phone.
-
Prepare an iOpener for softening the adhesive on the back of the Note8.
-
Apply the iOpener on the back of the Note8 along the side with the power button.
-
-
Этот шаг не переведен. Помогите перевести
-
Use a suction handle to lift the back cover and create an opening pick to get in the gap.
-
Start at the middle of the side and cut the adhesive while pulling up with the suction handle.
-
Move the pick towards the bottom corner and leave it there to keep the adhesive from resealing to the case.
-
Use another pick and move it to the top corner.
-
-
Этот шаг не переведен. Помогите перевести
-
Again take another opening pick and carefully move it around the corner and along the top edge.
-
Reheat with an iOpener if necessary.
-
Leave the pick at the top right corner to keep the adhesive from resealing.
-
-
Этот шаг не переведен. Помогите перевести
-
Rotate the device and start to separate the adhesive at the bottom with another opening pick.
-
Leave the pick at the bottom right corner to keep the adhesive from resealing.
-
-
Этот шаг не переведен. Помогите перевести
-
When the adhesive has been separated on all three sides properly you will be able to slowly lift the back cover.
-
Pay attention to the fingerprint sensor connector when flipping the back cover open. You might need to disconnect it as described in the next step.
-
-
Этот шаг не переведен. Помогите перевести
-
Use a pair of tweezers to disconnect the fingerprint sensor.
-
-
-
Этот шаг не переведен. Помогите перевести
-
Use an opening pick at the top edge to get between the NFC antenna and charging coil assembly and the case.
-
Lever the top of the assembly out of the case.
-
-
Этот шаг не переведен. Помогите перевести
-
Carefully pull up the complete charging coil and NFC antenna assembly.
-
-
Этот шаг не переведен. Помогите перевести
-
Use the flat end of a spudger to disconnect the battery connector.
-
-
Этот шаг не переведен. Помогите перевести
-
Remove the six Phillips #00 screws on the loudspeaker assembly at the bottom of the phone.
-
-
Этот шаг не переведен. Помогите перевести
-
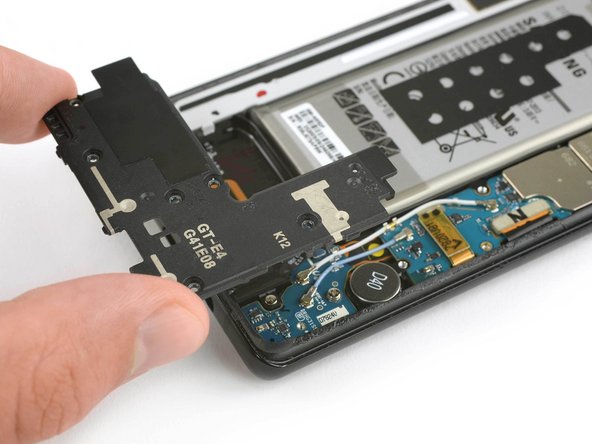
Use the flat end of a spudger to pry up the loudspeaker assembly.
-
Remove the loudspeaker assembly.
-
-
Этот шаг не переведен. Помогите перевести
-
Use the flat end of a spudger to disconnect both the display and the touchscreen cables.
-
-
Этот шаг не переведен. Помогите перевести
-
Prepare an iOpener and apply it to the display for at least two minutes to loosen the adhesive beneath.
-
Lay overlapping strips of clear packing tape over the Note8's display until the whole face is covered.
-
This will keep glass shards contained and provide structural integrity when prying and lifting the display.
-
-
Этот шаг не переведен. Помогите перевести
-
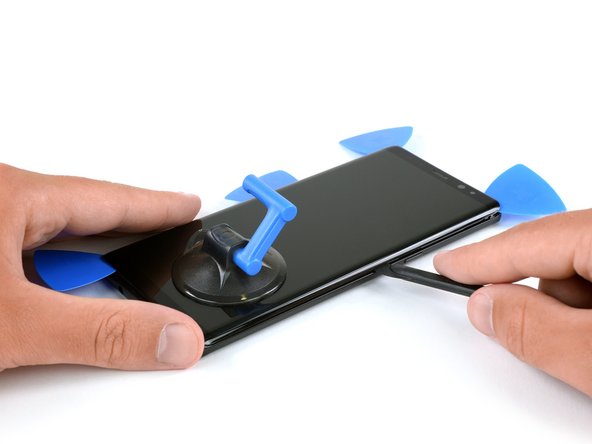
Once the screen is warm to the touch, apply a suction cup to the lower edge of the phone.
-
If the phone's screen is cracked, the suction cup may not stick. Try lifting it with strong tape, or superglue the suction cup in place and allow it to cure so you can proceed.
-
Lift on the suction cup, and insert a halberd spudger or an opening pick under the display assembly.
-
Start to slide the halberd spudger/opening pick along the lower edge of the phone to cut the adhesive. Leave an opening pick at the corner to prevent the adhesive from resealing.
-
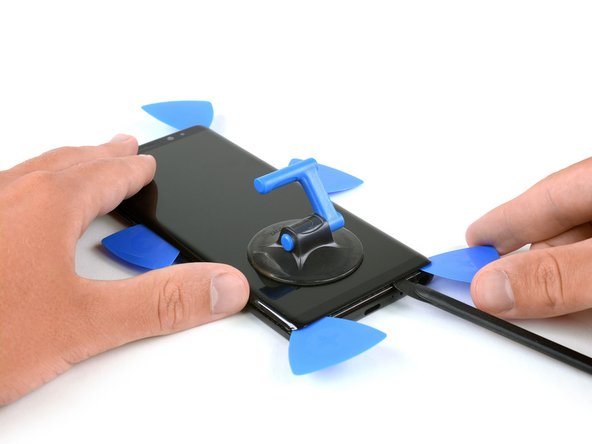
Continue to slide the halberd spudger/opening pick along the side of the phone and insert another opening pick.
-
-
Этот шаг не переведен. Помогите перевести
-
Slide the halberd spudger/opening pick to the upper corner of the phone to cut the adhesive and insert and opening pick to prevent the adhesive from sticking to the display.
-
Repeat the previous heating and cutting procedure for the remaining sides of the phone. Insert an opening pick on every corner and on both sides of the Note8.
-
-
Этот шаг не переведен. Помогите перевести
-
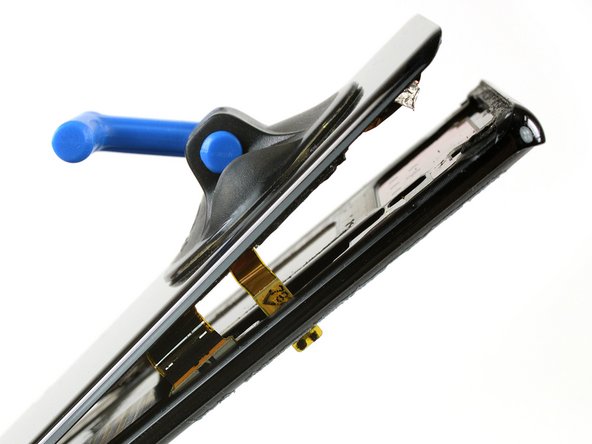
Once you cut the adhesive on all sides of the phone you can use the small suction cup to slowly lift it upwards.
-
-
Этот шаг не переведен. Помогите перевести
-
Remove any remaining adhesive from the phone, and clean the glued areas with isopropyl alcohol (90+%) and a lint-free cloth.
-


Отменить: Я не выполнил это руководство.
99 участников успешно повторили данное руководство.


21 Комментариев
I’m sorry, but this is just a preview question. When the guide says display, does it mean only the glass screen or the LCD and digetizer as well?
Hello Adrian Gomez. Here “display” refers to the glass, digitizer and LCD combo—those are fused together.
For this repair, do I need to buy the 230 dollar screen part as well?
This guide here is for replacing only the screen without the frame (which we currently don’t have in store). The 230 dollar part includes the frame and the according guide can be found here: Samsung Galaxy Note8 Display Assembly with Frame Replacement
Hi
I replace the new disply the camera ( front is working ) is not working I tried many things such as factory settings put it didn’t work
now I orderd a new camera hope it works or there is another way to solve it
nasser