Введение
Use this guide to replace the display assembly including the frame of your Galaxy Note8.
Before disassembling your phone, discharge the battery below 25%. The battery can catch fire and/or explode if accidentally punctured, but the chances of that happening are much lower if discharged.
This guide involves removing the rear glass cover; you will need replacement adhesive to reattach the back cover to the phone.
Opening the Samsung Galaxy Note8 will damage the waterproof seals on the device. If you do not replace the adhesive seals, your phone will function normally, but will lose its water resistance.
Выберете то, что вам нужно
-
-
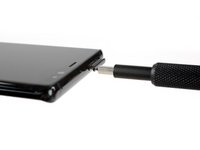
Switch off your phone.
-
Prepare an iOpener for softening the adhesive on the back of the Note8.
-
Apply the iOpener on the back of the Note8 along the side with the power button.
 Спросите у FixBot
-
-
-
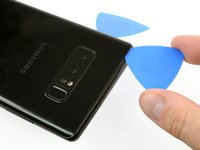
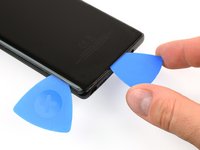
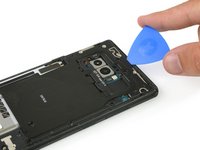
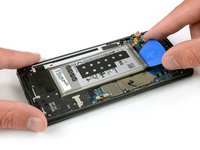
Use a suction handle to lift the back cover and create an opening pick to get in the gap.
-
Start at the middle of the side and cut the adhesive while pulling up with the suction handle.
-
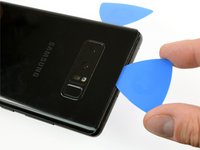
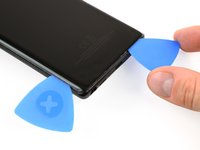
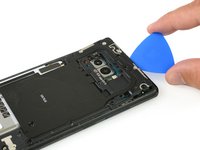
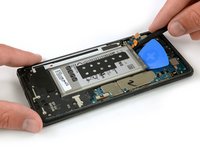
Move the pick towards the bottom corner and leave it there to keep the adhesive from resealing to the case.
-
Use another pick and move it to the top corner.
-
-
-
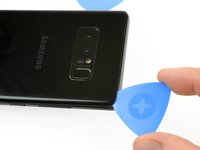
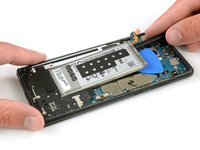
Again take another opening pick and carefully move it around the corner and along the top edge.
-
Reheat with an iOpener if necessary.
-
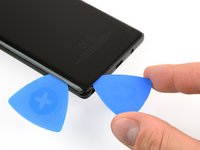
Leave the pick at the top right corner to keep the adhesive from resealing.
-
-
-
Rotate the device and start to separate the adhesive at the bottom with another opening pick.
-
Leave the pick at the bottom right corner to keep the adhesive from resealing.
-
-
-
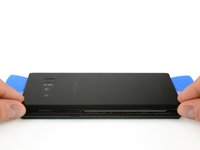
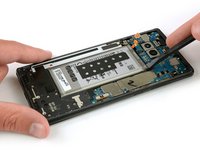
When the adhesive has been separated on all three sides properly you will be able to slowly lift the back cover.
-
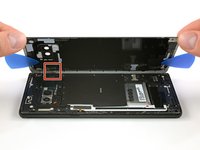
Pay attention to the fingerprint sensor connector when flipping the back cover open. You might need to disconnect it as described in the next step.
-
-
Инструмент, используемый на этом этапе:Tweezers$4.99
-
Use a pair of tweezers to disconnect the fingerprint sensor.
-
-
-
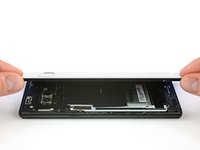
Remove the ten Phillips #00 screws.
-
-
-
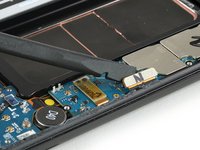
Use an opening pick at the top edge to get between the NFC antenna and charging coil assembly and the case.
-
Lever the top of the assembly out of the case.
-
-
-
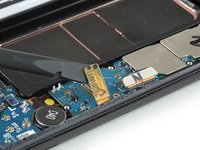
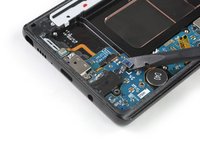
Carefully pull up the complete charging coil and NFC antenna assembly.
-
-
-
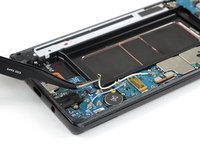
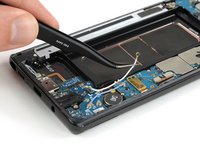
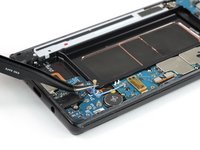
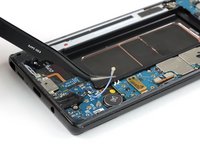
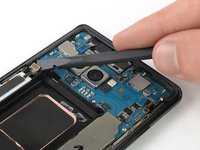
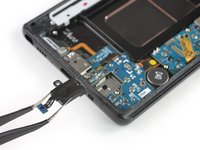
Use the flat end of a spudger to disconnect the battery connector.
-
-
-
-
Prepare an iOpener and apply it to the display for at least two minutes to loosen the adhesive beneath the battery. Reheat and reapply the iOpener as needed.
-
Alternatively or when the battery is blown up, you can apply some isopropyl alcohol under each corner of the battery and allow it to penetrate for several minutes to help weaken the adhesive.
-
-
-
Use the flat end of a spudger to pry up the battery from the top right corner.
-
Use the spudger to pry up the battery until you can insert an opening pick to prevent the adhesive from resealing.
-
-
-
Use the flat end of the spudger to pry up the top left corner of the battery where the flex cable is located.
-
Slide the spudger along the side of the battery to break apart remaining adhesive.
-
-
-
Lift the battery out of the case.
-
Remove any remaining adhesive from the phone, and clean the glued areas with isopropyl alcohol and a lint-free cloth.
-
-
-
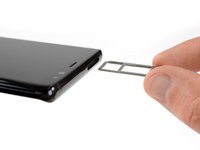
Insert a SIM card opening tool into the small hole on the left side of the top edge of the phone.
-
Press to eject the tray.
-
Remove the SIM card tray from the phone.
-
-
-
Remove the six Phillips #00 screws on the loudspeaker assembly at the bottom of the phone.
-
-
-
Use the flat end of a spudger to pry up the loudspeaker assembly.
-
Remove the loudspeaker assembly.
-
-
Инструмент, используемый на этом этапе:Tweezers$4.99
-
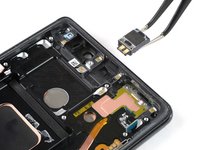
Remove the two coax cables running from the daughterboard to the motherboard.
-
Use a pair of tweezers to carefully disconnect both ends of the white coax cable and remove it.
-
-
-
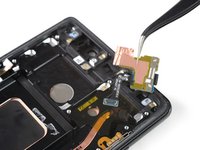
Use a pair of tweezers to carefully disconnect both ends of the blue coax cable and remove it.
-
-
-
Use the flat end of a spudger to disconnect both the display and the touchscreen cables.
-
-
-
Use the flat end of a spudger to disconnect the power button flex cable.
-
Disconnect the flash and proximity sensor cable.
-
-
-
Use the flat end of a spudger to disconnect the flex connector of the front facing camera.
-
Carefully remove the front facing camera with a pair of tweezers.
-
-
-
Use the flat end of a spudger to disconnect the flex connector of the iris scanner.
-
Carefully remove the iris scanner with a pair of tweezers.
-
-
-
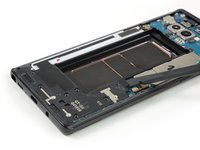
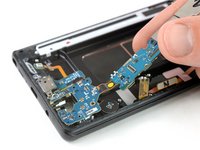
Remove the five Phillips #00 screws that hold down the motherboard, daughterboard, headphone jack and the charging port.
-
-
-
Use the flat end of a spudger to disconnect the headphone jack flex connector.
-
Carefully remove the headphone jack with a pair of tweezers.
-
-
-
Prepare an iOpener and apply it to the bottom part of the phone to loosen the adhesive beneath the microphone flex cable.
-
Use a pair of tweezers to carefully lift the microphone out of its recess and loosen it from the mid frame.
-
-
-
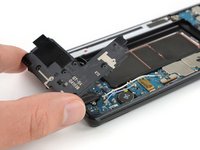
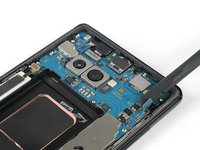
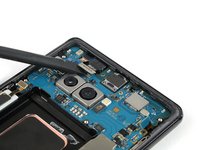
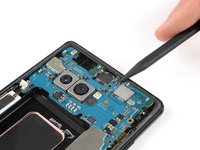
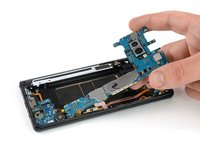
Use the pointed end of a spudger to pry up the motherboard until you can get a good grip.
-
-
-
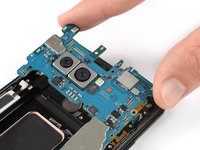
Carefully lift up the motherboard.
-
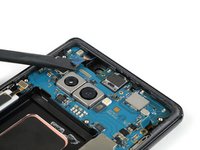
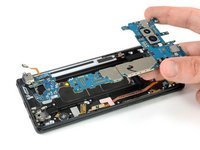
To lift the daughterboard out of its recess pull both components slowly towards the upper end of the phone whilst lifting upwards.
-
-
-
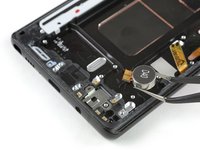
Prepare an iOpener and apply it across the phone to loosen the adhesive beneath the vibration motor at the bottom and the earpiece speaker at the top.
-
-
Инструмент, используемый на этом этапе:Tweezers$4.99
-
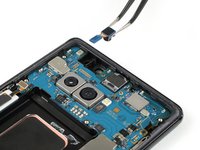
Carefully remove the vibration motor with a pair of tweezers. Keep an eye on its cable to not accidentally rip it.
-
Remove the earpiece speaker with a pair of tweezers.
-
-
-
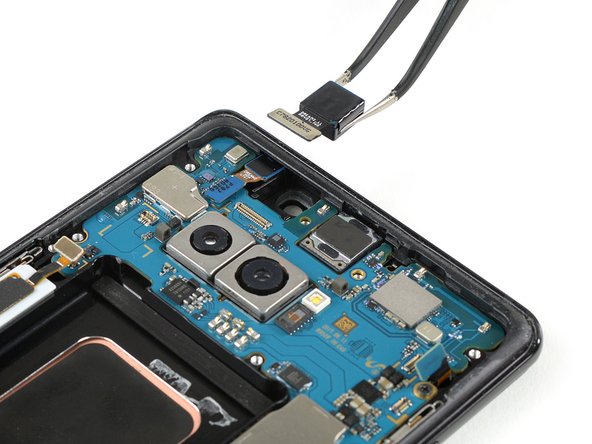
Use a pair of tweezers to lift up the flash and proximity sensor cable and carefully loosen the tape holding it down to the mid frame.
-
Remove the flash and proximity sensor assembly.
-
-
-
To reassemble your phone transfer all components you removed to the new display assembly with frame. Reapply adhesive where it's necessary.
-


If possible, turn on your phone and test your repair before installing new adhesive and resealing the phone.
Follow these instructions in reverse order to reassemble your device. Apply new adhesive where necessary.
Отменить: Я не выполнил это руководство.
45 человек успешно провели ремонт по этому руководству.


10 Комментарии к руководству
i would like to suggest a time of (52) Minutes and (36) Seconds plus thanks for the guide
check, plus you’re welcome :)
great guide!
Very excellent guide. Great pictures. Pictures must have been done in some sorta studio setting or edited for only what is needed for the illustration of every step. This was my first attempt at self repair on a cellphone, but I’m no slouch. I repair and refurbish all sorts of electromechanical devices and was once employed to do brain surgery on massive water cooled mainframe computers. Some of the same rules apply; have proven procedures, follow instructions, control your work space, and invest in the best tools. Since this was my first, I was not in a hurry. It took me all of 6 hours, but I was meticulous, repeated many steps to increase my confidence, and had all the time needed to do what I needed to do. Grateful for no longer being a slave to phone repair/insurance scams!! DIY forever!
Thanks for the great guide. Unfortunately, ifixit does not stock Note 8 parts in Australia. When I went to purchase the display assembly with frame from a parts supplier, they refused to sell me the part as they said that a number of customers have experienced the LCD not working on the new assembly after repairing their phone. The wholesaler would not honour the warranty as all screens are tested before dispatch, therefore, the LCD must have been damaged in the repair process. I could understand if the repair included installing a new screen into an existing frame but because all parts are being transferred into the new assembly and the parts available for sale all come with adhesive, is there any step where it is likely that the LCD could be damaged even if extremely careful?