Введение
If your keys appear to be broken, replacing the keyboard may be necessary.
To make sure the problem is with the keyboard, follow the troubleshooting guide.
When buying a new keyboard make sure it is compatible with PCG-F420.
CAUTION: Static electricity in your body can ruin your computer. Use an anti-static wristband.
Before you begin the repair, turn off your laptop and unplug the charger.
Выберете то, что вам нужно
-
-
The battery is located on the left side of the laptop, as shown by the red circle.
-
Make sure the laptop is disconnected and turned completely off.
 Спросите у FixBot
-
-
-
Pull the plastic cover down (indicated by the arrow on the cover) and then swing it upwards to reveal the battery compartment.
-
The battery can now be removed by pulling it.
-
-
-
Use your Philips #00 screwdriver to unscrew the small screw counterclockwise. This screw is for the audio/visual jacks on the left side of the laptop.
-
-
-
-
Unlock the cover between the keyboard and screen.
-
Gently slide it to the right and lift it up.
-
Exercise caution to avoid excessive force, as wires are connected.
-
-
-
Lift up the cover and lean it against the display so it is out of the way for the rest of the process.
-
Remove the small screw above the F6 key on the keyboard. Place screw in container to ensure it wont be lost.
-
-
-
Find the green ribbon as indicated in the picture by the red circle. This is what connects the keyboard to the motherboard.
-
-
Инструмент, используемый на этом этапе:Tweezers$4.99
-
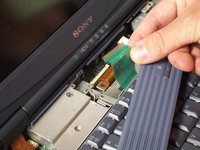
Carefully unplug the ribbon cable using a pair of tweezers.
-
Lift up the white bar near the connection to the motherboard, and lightly lift the ribbon to release it from the motherboard.
-
-
-
Now, pull on the ribbon cable, and it will detach from the motherboard.
-
-
-
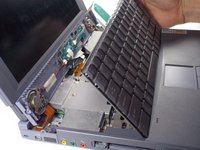
Your keyboard is now safety detached. Necessary repairs or replacements can be made from here.
-



To reassemble your device, follow these instructions in reverse order.
Отменить: Я не выполнил это руководство.
Еще один человек закончил это руководство.

Команда

Cal Poly, Team 29-77, Johann Spring 2010 Участник Cal Poly, Team 29-77, Johann Spring 2010
CPSU-JOHANN-S10S29G77
5 членов
Автор 12 руководств
