Перейти к основному содержанию

Steam Deck Right Touchpad Replacement

Выберете то, что вам нужно

  1. Steam Deck Right Touchpad Replacement, Prepare your device: шаг 1, изображение 1 из 3 Steam Deck Right Touchpad Replacement, Prepare your device: шаг 1, изображение 2 из 3 Steam Deck Right Touchpad Replacement, Prepare your device: шаг 1, изображение 3 из 3
    • Turn on your Steam Deck and allow the battery to discharge below 25% before starting your repairs, as a charged lithium-ion polymer battery can be dangerous if accidentally punctured.

    • As an extra precaution, Valve recommends putting your Steam Deck into battery storage mode within the BIOS before starting any internal repairs. Read how to do that here.

    • Power down your Steam Deck and unplug any cables.

    • If you have a microSD card installed, make sure to remove it before opening the Steam Deck. If you attempt to remove the back cover with it still installed, it could snap right in half.

    • During your repair, it can be helpful at times to lay the Steam Deck face-down into its case to protect the thumbsticks and prevent wobble.

    • Use a Phillips driver to remove the eight screws securing the back cover:

    • Four 9.5 mm screws

    • Four 5.8 mm screws

    • Despite the standards, Phillips screwdrivers can vary in size and shape—two drivers labeled as the same size may fit differently in the same screw. Use the size that fits the snuggest into the screw head.

    • Throughout this repair, keep track of each screw and make sure it goes back exactly where it came from to avoid damaging your Steam Deck.

  2. Steam Deck Right Touchpad Replacement, Unclip the back cover: шаг 3, изображение 1 из 2 Steam Deck Right Touchpad Replacement, Unclip the back cover: шаг 3, изображение 2 из 2
    • Insert an opening pick into the thin gap between the back cover and the front shell, along the edge of the right grip.

    • If you're having trouble inserting your pick at the grip seam, try starting at either the top or bottom long edges first, then slide the pick towards the grip.

    • Pry up on the back cover to release it from the locking clips.

  3. Steam Deck Right Touchpad Replacement, Remove the back cover: шаг 4, изображение 1 из 3 Steam Deck Right Touchpad Replacement, Remove the back cover: шаг 4, изображение 2 из 3 Steam Deck Right Touchpad Replacement, Remove the back cover: шаг 4, изображение 3 из 3
    • Once the clips are disconnected from one edge, the rest disconnect easily.

    • Grip the back cover at the opening you just created and pull it up and away from the device to unclip the long edges.

    • Remove the back cover.

  4. Steam Deck Right Touchpad Replacement, Uncover the hidden shield screw: шаг 5, изображение 1 из 2 Steam Deck Right Touchpad Replacement, Uncover the hidden shield screw: шаг 5, изображение 2 из 2
    • Use a pair of tweezers to remove the piece of foil tape covering the hidden screw on the board shield.

    • If possible, try not to rip or tear this tape so it can be reused. If necessary, you can fashion a replacement by cutting a piece of aluminum foil tape to fit.

  5. Steam Deck Right Touchpad Replacement, Remove the shield screws: шаг 6, изображение 1 из 1
    • Use a Phillips driver to remove the three screws securing the board shield:

    • One 3.4 mm screw

    • Two 3.7 mm screws

  6. Steam Deck Right Touchpad Replacement, Remove the shield: шаг 7, изображение 1 из 2 Steam Deck Right Touchpad Replacement, Remove the shield: шаг 7, изображение 2 из 2
  7. Steam Deck Right Touchpad Replacement, Disconnect the battery: шаг 8, изображение 1 из 3 Steam Deck Right Touchpad Replacement, Disconnect the battery: шаг 8, изображение 2 из 3 Steam Deck Right Touchpad Replacement, Disconnect the battery: шаг 8, изображение 3 из 3
    • Grip the battery cable by its pull tab and pull it directly away from the motherboard to disconnect it.

    • Alternatively, use the flat end of a spudger or a clean fingernail to gently push the connector out of its socket, then disconnect it completely by hand.

  8. Steam Deck Right Touchpad Replacement, Unclip the right trigger: шаг 9, изображение 1 из 2 Steam Deck Right Touchpad Replacement, Unclip the right trigger: шаг 9, изображение 2 из 2
    • The right trigger will be on your lefthand side when working on the Steam Deck, as it's laying upside down.

    • The Steam Deck's triggers clip into place on two pegs on the trigger bracket, which doubles as the hinge.

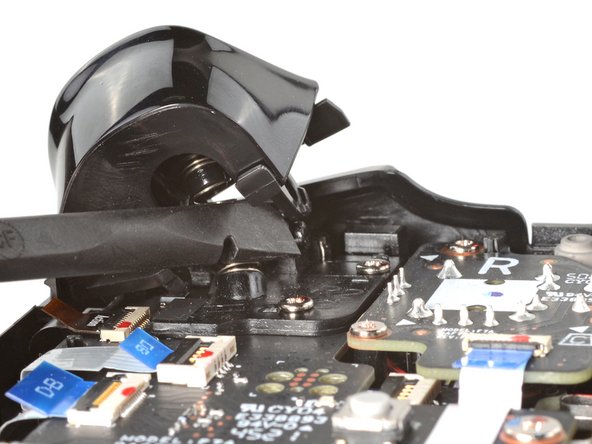
    • Place the flat end of a spudger onto the inside edge of the trigger's right clip.

    • Pivot the trigger clip out, away, and up from the peg to unlatch it.

    • During reassembly, latch the outermost peg first. Once in place, push down on the trigger to latch the innermost peg, producing an audible "click" sound.

    • Check to make sure that the trigger spring is properly aligned. Test the trigger action before continuing reassembly.

  9. Steam Deck Right Touchpad Replacement, Remove the right trigger: шаг 10, изображение 1 из 2 Steam Deck Right Touchpad Replacement, Remove the right trigger: шаг 10, изображение 2 из 2
    • Remove the right trigger.

    • Take care to not lose the trigger spring. It press-fits onto a peg on the trigger's underside.

  10. Steam Deck Right Touchpad Replacement, Remove the trigger bracket screws: шаг 11, изображение 1 из 1
    • Use a Phillips driver to remove the three 5.2 mm screws securing the right trigger bracket.

  11. Steam Deck Right Touchpad Replacement, Remove the trigger bracket: шаг 12, изображение 1 из 1
    • Remove the right trigger bracket.

    • Replacement triggers require calibration to work as expected. To calibrate new triggers, follow this calibration guide.

  12. Steam Deck Right Touchpad Replacement, Disconnect the right thumbstick: шаг 13, изображение 1 из 3 Steam Deck Right Touchpad Replacement, Disconnect the right thumbstick: шаг 13, изображение 2 из 3 Steam Deck Right Touchpad Replacement, Disconnect the right thumbstick: шаг 13, изображение 3 из 3
    • Use the pointed end of a spudger to lift up the small locking flap on the thumbstick cable's ZIF connector.

    • Use a pair of tweezers to slide the cable out of its connector.

    • Grip the cable by the blue pull tab, not by the cable itself.

  13. Steam Deck Right Touchpad Replacement, Remove the thumbstick screws: шаг 14, изображение 1 из 2 Steam Deck Right Touchpad Replacement, Remove the thumbstick screws: шаг 14, изображение 2 из 2
    • Use a Phillips driver to remove the three 5.2 mm screws securing the thumbstick.

    • During reassembly, you may need to hold the Steam Deck off of the work surface so it isn't resting on the new thumbstick while you tighten down the screws.

  14. Steam Deck Right Touchpad Replacement, Remove the right thumbstick: шаг 15, изображение 1 из 2 Steam Deck Right Touchpad Replacement, Remove the right thumbstick: шаг 15, изображение 2 из 2
    • Remove the right thumbstick.

  15. Steam Deck Right Touchpad Replacement, Disconnect the button board cable: шаг 16, изображение 1 из 3 Steam Deck Right Touchpad Replacement, Disconnect the button board cable: шаг 16, изображение 2 из 3 Steam Deck Right Touchpad Replacement, Disconnect the button board cable: шаг 16, изображение 3 из 3
    • Use the pointed end of a spudger to lift up the small locking flap on the button board cable's ZIF connector.

    • Use a pair of tweezers to slide the cable out of its connector.

    • Grip the cable by the blue pull tab, not by the cable itself.

  16. Steam Deck Right Touchpad Replacement, Disconnect the interconnect cable: шаг 17, изображение 1 из 3 Steam Deck Right Touchpad Replacement, Disconnect the interconnect cable: шаг 17, изображение 2 из 3 Steam Deck Right Touchpad Replacement, Disconnect the interconnect cable: шаг 17, изображение 3 из 3
    • Use the pointed end of a spudger to lift up the small locking flap on the button board interconnect cable's ZIF connector.

    • Use a pair of tweezers to slide the cable out of its connector.

    • Grip the cable by the blue pull tab, not by the cable itself.

  17. Steam Deck Right Touchpad Replacement, Disconnect the remaining button board cables: шаг 18, изображение 1 из 3 Steam Deck Right Touchpad Replacement, Disconnect the remaining button board cables: шаг 18, изображение 2 из 3 Steam Deck Right Touchpad Replacement, Disconnect the remaining button board cables: шаг 18, изображение 3 из 3
    • Use the pointed end of a spudger to lift up the small locking flaps on the rest of the button board ZIF connectors. Use a pair of tweezers to slide the cables out of their connectors:

    • Disconnect the action buttons cable.

    • Disconnect the touchpad board cable.

    • Disconnect the touchpad cable.

  18. Steam Deck Right Touchpad Replacement, Disconnect the right haptics: шаг 19, изображение 1 из 3 Steam Deck Right Touchpad Replacement, Disconnect the right haptics: шаг 19, изображение 2 из 3 Steam Deck Right Touchpad Replacement, Disconnect the right haptics: шаг 19, изображение 3 из 3
    • Use the pointed end of a spudger to lift up on the haptics cable to disconnect it.

  19. Steam Deck Right Touchpad Replacement, Remove the button board screws: шаг 20, изображение 1 из 1
    • Use a Phillips driver to disconnect the four screws securing the right button board:

    • Three 5.2 mm screws

    • One 3.9 mm screw

  20. Steam Deck Right Touchpad Replacement, Remove the button board: шаг 21, изображение 1 из 2 Steam Deck Right Touchpad Replacement, Remove the button board: шаг 21, изображение 2 из 2
    • Remove the right button board.

    • Keep track of the quick access button and its membrane, as once the right button board is removed, they're no longer secured in place.

  21. Steam Deck Right Touchpad Replacement, Remove the touchpad board screws: шаг 22, изображение 1 из 1
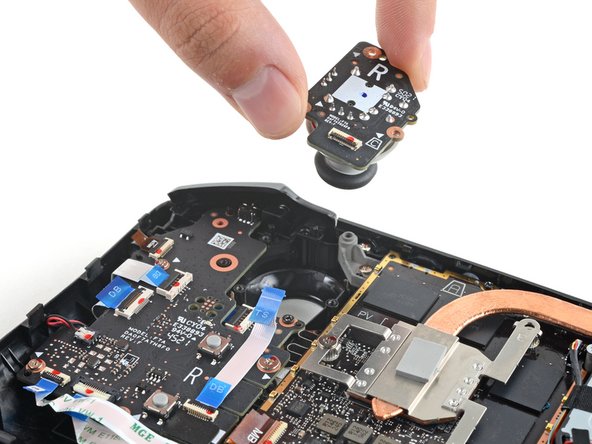
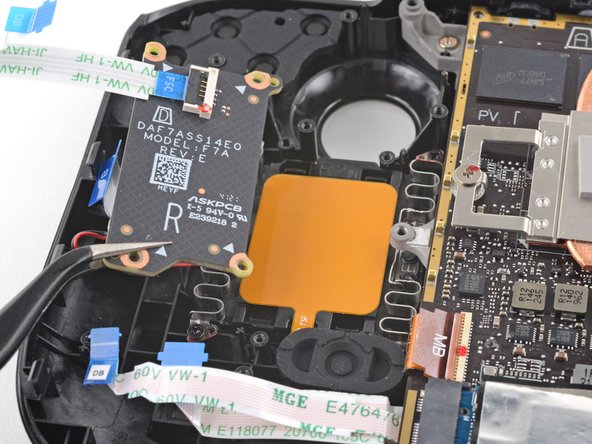
    • Use a Phillips driver to remove the four 4.7 mm screws securing the touchpad board.

  22. Steam Deck Right Touchpad Replacement, Remove the touchpad board: шаг 23, изображение 1 из 2 Steam Deck Right Touchpad Replacement, Remove the touchpad board: шаг 23, изображение 2 из 2
    • Remove the touchpad board.

  23. Steam Deck Right Touchpad Replacement, Remove the touchpad screws: шаг 24, изображение 1 из 2 Steam Deck Right Touchpad Replacement, Remove the touchpad screws: шаг 24, изображение 2 из 2
    • Use a Phillips driver to remove the four 4.7 mm screws securing the touchpad.

    • You may need to temporarily remove the quick access button membrane for easier access to the bottom right screw.

    • Each of the touchpad's four mounting corners have a locating peg. During reassembly, ensure each is properly seated.

  24. Steam Deck Right Touchpad Replacement, Remove the right touchpad: шаг 25, изображение 1 из 3 Steam Deck Right Touchpad Replacement, Remove the right touchpad: шаг 25, изображение 2 из 3 Steam Deck Right Touchpad Replacement, Remove the right touchpad: шаг 25, изображение 3 из 3
    • The touchpad's springs are very delicate and are precisely positioned. If bent, the touchpad may rattle or not work as intended.

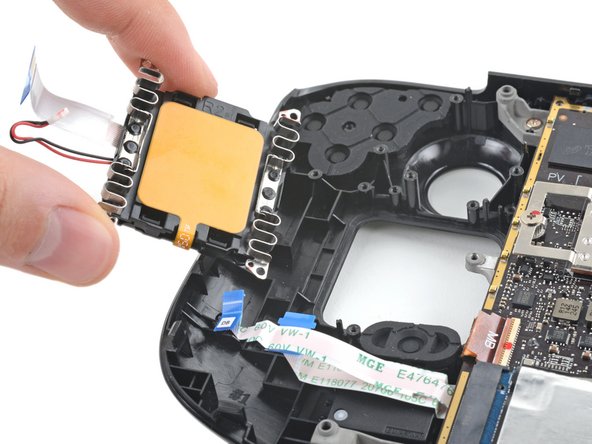
    • From the front of the Steam Deck, use your finger to push the right touchpad partway through the front shell to unseat it.

    • Lift the touchpad out from underneath the overhanging section of the midframe.

    • Remove the touchpad.

Заключение

To reassemble your device, follow these instructions in reverse order.

Take your e-waste to an R2 or e-Stewards certified recycler.

Repair didn’t go as planned? Try some basic troubleshooting, or ask our Steam Deck answers community for help.

3 участников успешно повторили данное руководство.

Carsten Frauenheim

Участник с: 03/10/20

92 688 Репутация

Автор 337 руководств

Команда

iFixit Участник iFixit

Community

141 членов

Автор 17 757 руководств

5 Комментариев

Can I buy the right-side trackpad? I don't see it listed and need to replace it.

Robert Everette - Ответить

where do I buy the track pad?? I can not find it.

Marius Todea - Ответить

Seriously. Update or reply to us about the state of when these parts will be available!!

Marius Todea - Ответить

Marius,

Replacement touchpads require special calibration from Valve that isn't currently publicly available. As of right now we don't know if/when these could be available for purchase.

Carsten Frauenheim -

Добавить комментарий

Просмотр статистики:

За последние 24часов: 14

За последние 7 дней: 116

За последние 30 дней: 557

За всё время: 7,730