Перейти к основному содержанию
/
Мой рабочий стол для верстки руководств

Получите быстрый доступ к руководствам, запчастям и ответам касательно ваших устройств

iMac 2011 SSD Upgrade (IcyDock)

iMac 2011 SSD Upgrade (IcyDock)

Arthur Shi

Arthur Shi и 2 другие участники

Последнее обновление December 1, 2020

40 мин. - 2 час(ов)
Средне
Абсолютно необходимое руководство
Это руководство предназначено только для использования в качестве обязательного условия для других руководств. Оно не полностью само по себе.

Follow this guide to upgrade your iMac's hard drive with an SSD. It includes steps on installing the SSD's temperature sensor so that the Mac's fans will operate at the correct speed.

Prerequisite-only guide. SSD upgrade with temperature sensor for mid 2011 iMacs.

Выберете то, что вам нужно

Ремонтный комплект

Этот комплект содержит все детали и инструменты, используемые в руководстве.

Инструменты

Показать больше…

  1. iMac 2011 SSD Upgrade (IcyDock), SSD (2011 IcyDock): шаг 1, изображение 1 из 3 iMac 2011 SSD Upgrade (IcyDock), SSD (2011 IcyDock): шаг 1, изображение 2 из 3 iMac 2011 SSD Upgrade (IcyDock), SSD (2011 IcyDock): шаг 1, изображение 3 из 3
    • Only follow the next 9 steps if you are replacing your hard drive with an SSD kit.

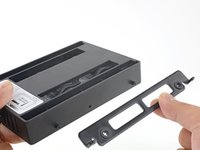
    • Depress the enclosure's front plate latch with your finger. While holding the latch down, swing the plate out.

    • Remove the front plate.

  2. iMac 2011 SSD Upgrade (IcyDock): шаг 2, изображение 1 из 3 iMac 2011 SSD Upgrade (IcyDock): шаг 2, изображение 2 из 3 iMac 2011 SSD Upgrade (IcyDock): шаг 2, изображение 3 из 3
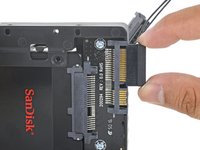
    • Line up the small SATA connectors so that the narrow side of the connector on the SSD matches the narrow side on the enclosure connector.

    • Slide the drive in through the front of the enclosure until the SATA connector is fully seated.

    • The SSD's ports connect with the enclosure in only one way. If the ports are not lining up, rotate the SSD and try again.

  3. iMac 2011 SSD Upgrade (IcyDock): шаг 3, изображение 1 из 1
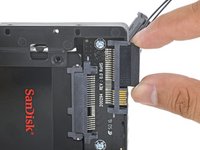
    • You may optionally install two Philips #1 screws that came with the enclosure kit to secure the SSD in the enclosure.

  4. iMac 2011 SSD Upgrade (IcyDock): шаг 4, изображение 1 из 2 iMac 2011 SSD Upgrade (IcyDock): шаг 4, изображение 2 из 2
    • Plug the included sensor-enabled SATA power cable into the wide side of the enclosure's SATA connector.

    • The cable is keyed to connect in only one way. If you can't connect the cable, rotate it 180°, and try again.

  5. iMac 2011 SSD Upgrade (IcyDock): шаг 5, изображение 1 из 3 iMac 2011 SSD Upgrade (IcyDock): шаг 5, изображение 2 из 3 iMac 2011 SSD Upgrade (IcyDock): шаг 5, изображение 3 из 3
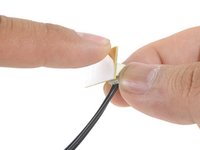
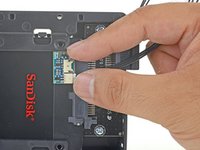
    • Peel the backing off of the adhesive back of the small temperature sensor board.

    • Adhere the temperature sensor board to an exposed, metal area of the surface of the SSD, as close as possible to the SATA connector.

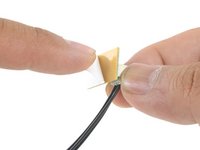
    • Fold the excess temperature sensor wires so that they are out of the way while you install the enclosure.

  6. iMac 2011 SSD Upgrade (IcyDock): шаг 6, изображение 1 из 1
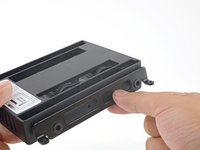
    • Install the mounting pins from the old hard drive onto the sides of the enclosure.

    • The holes on the enclosure may not be threaded, so screwing the mounting pins into them may require extra effort. Take your time and screw them in slowly, making sure they go in straight.

  7. iMac 2011 SSD Upgrade (IcyDock): шаг 7, изображение 1 из 2 iMac 2011 SSD Upgrade (IcyDock): шаг 7, изображение 2 из 2
    • Attach any mounting brackets removed from the old hard drive onto the enclosure.

  8. iMac 2011 SSD Upgrade (IcyDock): шаг 8, изображение 1 из 2 iMac 2011 SSD Upgrade (IcyDock): шаг 8, изображение 2 из 2
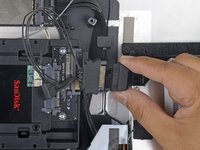
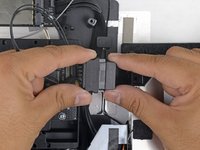
    • Connect the iMac's SATA power cable to the new temperature-capable SATA power cable.

    • Route the SATA cables where they will not interfere with any other components.

  9. iMac 2011 SSD Upgrade (IcyDock): шаг 9, изображение 1 из 2 iMac 2011 SSD Upgrade (IcyDock): шаг 9, изображение 2 из 2
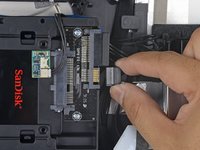
    • Connect the iMac's SATA data cable to the enclosure's SATA data connector.

Заключение

To reassemble your device, follow these instructions in reverse order.

8 человек успешно провели ремонт по этому руководству.

Arthur Shi

Участник с: 01/03/18

282 239 Репутация

Автор 585 руководств

Команду

iFixit Участник iFixit

Staff

118 членов

Автор 19 450 руководств

0 Комментариев

Добавить комментарий

Статистика просмотров:

За последние 24 час(ов): 4

За последние 7 дней: 32

За последние 30 дней: 98

За всё время: 8,698