Перейти к основному содержанию

iPhone 6 Front Panel Assembly Replacement

Абсолютно необходимое руководство
Это руководство предназначено только для использования в качестве обязательного условия для других руководств. Оно не полностью само по себе.

Выберете то, что вам нужно

  1. iPhone 6 Front Panel Assembly Replacement, Manual Opening Procedure: шаг 1, изображение 1 из 1
    Инструмент, используемый на этом этапе:
    Anti-Clamp
    $24.95
    Купить
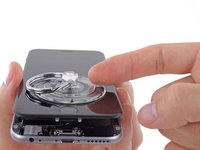
    • If you don't have an Anti-Clamp, use a single suction cup to lift the front panel:

    • Press a suction cup onto the screen, just above the home button.

    • Be sure the cup is pressed securely onto the screen to get a tight seal.

    • If your display is badly cracked, covering it with a layer of clear packing tape may allow the suction cup to adhere. Alternatively, very strong tape may be used instead of the suction cup. If all else fails, you can superglue the suction cup to the broken screen.

  2. iPhone 6 Front Panel Assembly Replacement: шаг 2, изображение 1 из 1
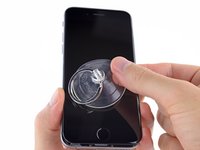
    • While holding the iPhone down with one hand, pull up on the suction cup to slightly separate the front panel assembly from the rear case.

    • Take your time and apply firm, constant force. The display assembly is a much tighter fit than most devices.

    • Using a plastic opening tool, begin to gently pry the rear case down, away from the display assembly, while continuing to pull up with the suction cup.

    • There are several clips holding the front panel assembly to the rear case, so you may need to use a combination of the suction cup and plastic opening tool to free the front panel assembly.

  3. iPhone 6 Front Panel Assembly Replacement: шаг 3, изображение 1 из 2 iPhone 6 Front Panel Assembly Replacement: шаг 3, изображение 2 из 2
    • Pull the plastic nub to release the vacuum seal on the suction cup.

    • Remove the suction cup from the display assembly.

  4. iPhone 6 Front Panel Assembly Replacement, Opening up the phone: шаг 4, изображение 1 из 3 iPhone 6 Front Panel Assembly Replacement, Opening up the phone: шаг 4, изображение 2 из 3 iPhone 6 Front Panel Assembly Replacement, Opening up the phone: шаг 4, изображение 3 из 3
    • Open the iPhone by swinging the home button end of the front panel assembly away from the rear case, using the top of the phone as a hinge.

    • Several clips along the top edge of the front panel form a partial hinge.

    • During reassembly, align the clips just below the top edge of the rear case. Then, slide the front panel upward until its top edge is flush with that of the rear case.

  5. iPhone 6 Front Panel Assembly Replacement: шаг 5, изображение 1 из 3 iPhone 6 Front Panel Assembly Replacement: шаг 5, изображение 2 из 3 iPhone 6 Front Panel Assembly Replacement: шаг 5, изображение 3 из 3
    • Open the display to about a 90º angle, and lean it against something to keep it propped up while you're working on the phone.

    • In a pinch, an unopened canned beverage works well for this.

    • Add a rubber band to keep the display securely in place while you work. This prevents undue strain on the display cables.

  6. iPhone 6 Front Panel Assembly Replacement, Removing the battery connector bracket screws: шаг 6, изображение 1 из 1
    Инструмент, используемый на этом этапе:
    Magnetic Project Mat
    $19.95
    Купить
    • Remove the following Phillips screws from the battery connector bracket:

    • One 2.2 mm screw

    • One 3.2 mm screw

    • During your repair, keep track of each screw and make sure it goes back exactly where it came from to avoid damaging your phone.

  7. iPhone 6 Front Panel Assembly Replacement: шаг 7, изображение 1 из 1
    • Remove the metal battery connector bracket from the iPhone.

  8. iPhone 6 Front Panel Assembly Replacement, Disconnecting the battery connector: шаг 8, изображение 1 из 1
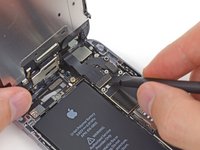
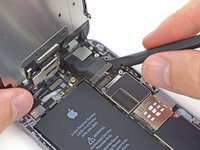
    • Use a plastic opening tool to gently pry the battery connector up from its socket on the logic board.

    • Take care to only pry up on the battery connector, and not the socket on the logic board. If you pry up on the logic board socket, you may break the connector entirely.

  9. iPhone 6 Front Panel Assembly Replacement, Removing the front panel assembly cable bracket screws: шаг 9, изображение 1 из 1
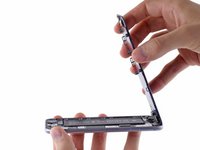
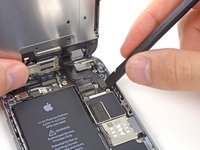
    • Remove the following five Phillips screws securing the front panel assembly cable bracket:

    • Three 1.2 mm screws

    • One 1.7 mm screw

    • One 3.1 mm screw

    • Incorrect placement of these screws during reassembly will cause permanent damage to your iPhone's logic board.

  10. iPhone 6 Front Panel Assembly Replacement: шаг 10, изображение 1 из 1
    • Remove the front panel assembly cable bracket from the logic board.

  11. iPhone 6 Front Panel Assembly Replacement: шаг 11, изображение 1 из 2 iPhone 6 Front Panel Assembly Replacement: шаг 11, изображение 2 из 2
    • In the next four steps, take care to pry up only on the cable connectors, and not on their sockets on the logic board.

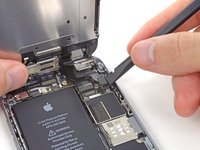
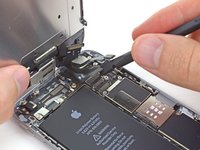
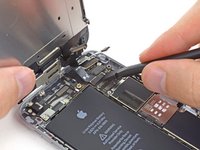
    • Use a spudger or a fingernail to disconnect the front-facing camera and sensor cable connector.

  12. iPhone 6 Front Panel Assembly Replacement: шаг 12, изображение 1 из 2 iPhone 6 Front Panel Assembly Replacement: шаг 12, изображение 2 из 2
    • Use a spudger or a fingernail to disconnect the home button cable connector.

  13. iPhone 6 Front Panel Assembly Replacement: шаг 13, изображение 1 из 2 iPhone 6 Front Panel Assembly Replacement: шаг 13, изображение 2 из 2
    • Make sure the battery is disconnected before you disconnect or reconnect the cable in this step.

    • Use a spudger or a fingernail to disconnect the display data cable connector.

    • When reassembling your phone, the display data cable may pop off its connector. This can result in white lines or a blank screen when powering your phone back on. If that happens, simply reconnect the cable and power cycle your phone. The best way to power cycle your phone is to disconnect and reconnect the battery connector.

  14. iPhone 6 Front Panel Assembly Replacement: шаг 14, изображение 1 из 2 iPhone 6 Front Panel Assembly Replacement: шаг 14, изображение 2 из 2
    • Use the flat end of a spudger to disconnect the digitizer cable connector.

    • When reconnecting the digitizer cable, do not press the center of the connector. Press one end of the connector, then press the opposite end. Pressing in the center of the connector can bend the component and cause digitizer damage.

  15. iPhone 6 Front Panel Assembly Replacement, Separating front panel assembly and rear case: шаг 15, изображение 1 из 1
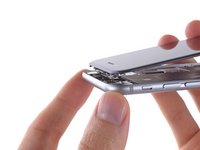
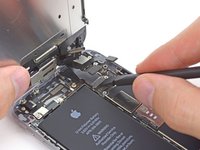
    • Remove the front panel assembly from the rear case.

Заключение

Compare your new replacement part to the original part—you may need to transfer remaining components or remove adhesive backings from the new part before installing.

To reassemble your device, follow the above steps in reverse order.

Take your e-waste to an R2 or e-Stewards certified recycler.

Repair didn’t go as planned? Try some basic troubleshooting, or search our Answers forum for help.

13 участников успешно повторили данное руководство.

3 Комментариев

Undo the last edit, I was not trying to modify this guide

rwmj5 - Ответить

how about replacing the battery ?

LON HOSKINS - Ответить

Hi. I messed up with the screws in the cover guard sheet for the display ribbon and my iPhone 6 plus isn't turning on. Does that mean the logic board is dead or the battery ? Should I throw the phone in the garbage can ?

nzf - Ответить

Добавить комментарий

Просмотр статистики:

За последние 24часов: 0

За последние 7 дней: 0

За последние 30 дней: 0

За всё время: 2,872