Перейти к основному содержанию
Присоединяйся к сообществу ремонтников - Создай аккаунт

iView-776TPCII Wi-Fi Antenna Replacement

Выберете то, что вам нужно

    1. iView-776TPCII Wi-Fi Antenna Replacement, Rear Panel: шаг 1, изображение 1 из 3 iView-776TPCII Wi-Fi Antenna Replacement, Rear Panel: шаг 1, изображение 2 из 3 iView-776TPCII Wi-Fi Antenna Replacement, Rear Panel: шаг 1, изображение 3 из 3
      • Before disassembling your device, make sure that the power is completely turned off.

      • Use the plastic opening tool to release the clips holding the rear panel of the device onto the front section.

      • The clips may take some pressure before releasing.

      • Continue around the entire device until all of the clips have been released.

      Спросите у FixBot

      Добавить комментарий

    2. iView-776TPCII Wi-Fi Antenna Replacement: шаг 2, изображение 1 из 2 iView-776TPCII Wi-Fi Antenna Replacement: шаг 2, изображение 2 из 2
      • Use a spudger to carefully free the speaker from it's housing on the back panel.

      • Place the spudger between the speaker and the rear panel. Use a prying motion to remove the component.

      • Be careful not to apply an over amount of force. If care is not taken, the speaker could break under the pressure.

      Спросите у FixBot

      Добавить комментарий

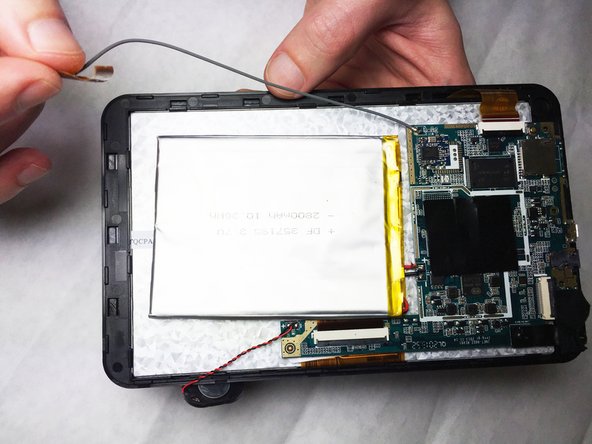
    1. iView-776TPCII Wi-Fi Antenna Replacement, Wi-Fi Antenna: шаг 3, изображение 1 из 2 iView-776TPCII Wi-Fi Antenna Replacement, Wi-Fi Antenna: шаг 3, изображение 2 из 2
      • Detach the end of the Wi-Fi antenna from the tape on the edge of the shell.

      Спросите у FixBot

      Добавить комментарий

    2. iView-776TPCII Wi-Fi Antenna Replacement: шаг 4, изображение 1 из 1
      Инструмент, используемый на этом этапе:
      Tweezers
      $4.99
      • Use the Portable Soldering Iron tool to heat the lead coming from the Wi-Fi antenna to the logic board, thereby breaking the connection.

      • For help on soldering, refer to the iFixit "How To Solder and Desolder Connections" technique guide as necessary.

      • Once heated, use tweezers to pull the wire free from its connection.

      Спросите у FixBot

      Добавить комментарий

Заключение

To reassemble your device, follow these instructions in reverse order.

Отменить: Я не выполнил это руководство.

Cory Gratzer

Участник с: 09/16/15

586 Репутация

Автор 5 руководств

Команда

IUPUI, Team 2-2, Baechle Fall 2015 Участник IUPUI, Team 2-2, Baechle Fall 2015

IUPUI-BAECHLE-F15S2G2

3 членов

Автор 12 руководств

0 Комментарии к руководству

Добавить комментарий

Статистика просмотров:

За последние 24 часов: 0

За последние 7 дней: 2

За последние 30 дней: 20

За всё время: 722