Введение
This repair guide was authored by the iFixit staff and hasn’t been endorsed by Google. Learn more about our repair guides here.
Use this guide to apply replacement adhesive to your Pixel 2 XL’s display.
Before you begin, you should already have removed the Pixel 2 XL’s display. Detailed instructions for removing the display can be found here.
Выберете то, что вам нужно
-
-
Remove any trace of the old adhesive from the Pixel's case.
-
If you're reinstalling your existing display, be sure to remove any remaining adhesive from the back of your display as well.
-
After removing all traces of glue and glass, clean the adhesion areas with high concentration isopropyl alcohol (at least 90%). This will ensure a better seal for the display.
 Спросите у FixBot
-
-
-
-
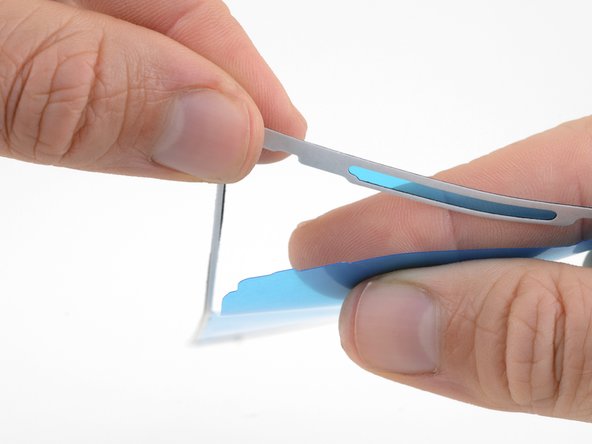
Carefully tear along the perforations to separate the outer portion of the adhesive backing from the adhesive strip.
-
Carefully tear along the inner perforations to separate the inner portion of the blue backing from the adhesive strip.
-
-
-
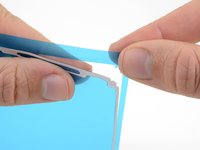
Peel away the white backing, exposing one side of the adhesive strip.
-
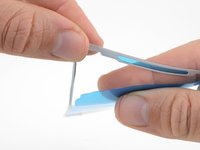
Carefully place the adhesive strip on the phone case, with the exposed side down, and the blue backing up.
-
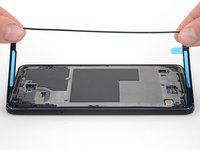
Line up the speaker holes in the adhesive strip over the speakers to correctly position the adhesive strip on the case.
-
With the adhesive lined up, use your finger or a spudger to press the adhesive strip down against the case.
-
-
-
When you are ready to seal the phone, carefully peel away the blue backing without peeling the adhesive off of the phone.
-
Return to your Pixel 2 XL's replacement guide to finish assembling your phone.
-


Repair didn’t go as planned? Check out our Answers community for troubleshooting help.
Отменить: Я не выполнил это руководство.
11 человек успешно провели ремонт по этому руководству.

5 Комментарии к руководству
Why is it necessary to replace the adhesive at all? Is this required to do to prevent the display from falling out?
Hi Troy,
That’s correct! If the old adhesive is old, dirty, or uneven, it may not hold onto the screen sufficiently.
I'd say in 2023 it is necessary. Even if you extra careful the adhesive is old and dirty and better to be replaced
Is there a liquid or gel adhesive I can lightly use in a pinch if the screen is intact, doesn’t need replacing, but is slightly lifting off from one of the corners? I’d like to save myself having to try to remove everything and reposition and re-seat a new adhesive entirely. Specifically I’m asking what’s most appropriate that wouldn’t make future screen repairs impossible.
This guide is outdated. The replacement adhesive has changed and did not include a clear backer, or an outer blue portion. Additionally, the inner perforations were not complete. Because of this, I had to install the adhesive to the screen, rather than the frame, then remove the white backer before final assembly. It was quite fiddly and frustrating, but I managed to get it all lined up and sealed well with no gaps.