Введение
Does your HP ProBook 440 g6's fans produce loud noises? Does your device overheat despite of cleaning it? In this guide, we'll walk you through the steps to replace your HP ProBook 440 g6 fan. The fan is a key part of a laptop as it provides active cooling to the reset of the device parts. This allows the parts to stay at a desired temperature so that they may each perform their function as intended.
Common Symptoms you may face due to a faulty fan include:
- Loud grinding fan noise
- Persistent overheating despite cleaning
- Repeated hard drive clicking with file error
- System suddenly freezes or shuts down
Here, we'll guide you step-by-step to ensure a safe and smooth replacement of your device's fan. Before we continue onto the replacement, make sure to put your device in Battery Safe mode, completely shut down your device, and unplug it from your charger.
Выберете то, что вам нужно
-
-
-
Using a Phillips #0 Screwdriver, remove the two 5 mm screws on the front-facing side of the lower case.
-
Using a Phillips #0 Screwdriver, remove the remaining five 5 mm Phillips screws securing the lower case.
 Спросите у FixBot
-
-
-
Starting under the display, carefully use a plastic prying tool (iFixit opening tool) to disengage the retaining clips.
-
Once a corner or edge starts to lift, slowly slide the tool along the edge to loosen more of the bottom panel.
-
Keep working around the edges until all the clips are loose.
-
-
-
Gently lift the rear of the cover to disengage it from the computer.
-
Carefully remove the bottom cover from the computer.
-
-
-
-
-
-
Using a Phillips #0 Screwdriver, remove the two 4mm Phillips screws that secure the battery to the computer.
-
-
-
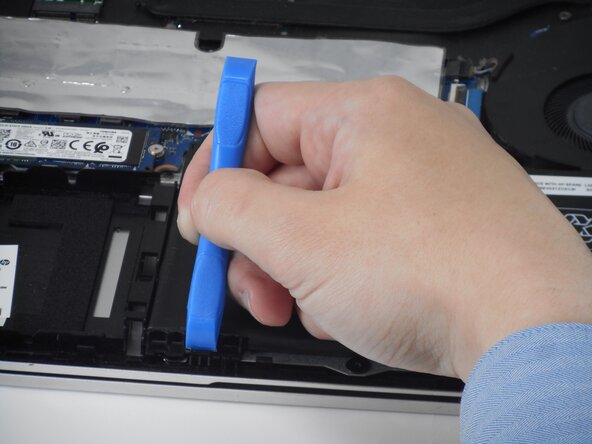
Use a tool to push the tab back on the bottom left of the battery.
-
-
-
Lift the top of the battery.
-
Lift the battery out of the computer.
-
-
-
-
-
Use a Phillips #0 screwdriver to remove the two 4 mm-long Phillips screws that secure the fan to the chassis.
-




To reassemble your device, follow the above steps in reverse order.
Take your e-waste to an R2 or e-Stewards certified recycler.
Repair didn’t go as planned? Try some basic troubleshooting or ask our Answers community for help.

Команда

University of Memphis, Team 1-4, Sneed Spring 2026 Участник University of Memphis, Team 1-4, Sneed Spring 2026
UM-SNEED-S26S1G4
3 членов
Автор 39 руководств
