Перейти к основному содержанию
Присоединяйся к сообществу ремонтников - Создай аккаунт

Logitech G Pro Wireless Mouse Side Button Switch Replacement

Выберете то, что вам нужно

    1. Logitech G Pro Wireless Mouse Side Button Switch Replacement, Side Button Switch: шаг 1, изображение 1 из 1
      • OPTIONAL BUT RECOMMENDED STEPS:

      • Find a stable desk or table to work on.

      • Create a clean work area on the surface.

      • Set up a mat on the work area.

      • Place the mouse on the work area.

      Спросите у FixBot

      Добавить комментарий

    2. Logitech G Pro Wireless Mouse Side Button Switch Replacement: шаг 2, изображение 1 из 1
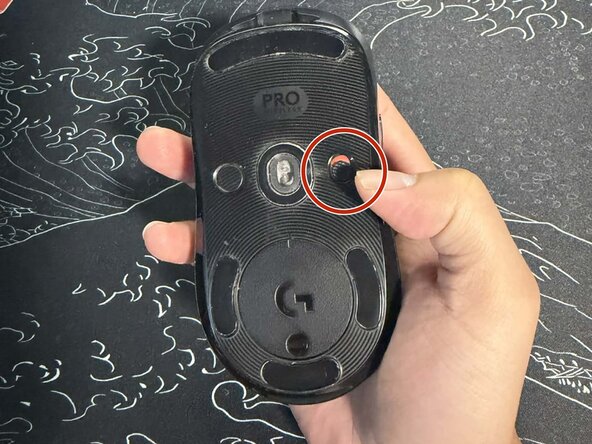
      • Flip the power switch to OFF.

      • The power switch is located on the bottom of the mouse.

      Спросите у FixBot

      Добавить комментарий

    3. Logitech G Pro Wireless Mouse Side Button Switch Replacement: шаг 3, изображение 1 из 2 Logitech G Pro Wireless Mouse Side Button Switch Replacement: шаг 3, изображение 2 из 2
      • Optional: Gently apply heat to the bottom of mouse using heat gun for easier removal of skates. If you intend to reuse the skates, take care not to strain, warp, or tear them.

      • Use a spudger to gently lift and remove the five skates.

      Спросите у FixBot

      Добавить комментарий

    4. Logitech G Pro Wireless Mouse Side Button Switch Replacement: шаг 4, изображение 1 из 3 Logitech G Pro Wireless Mouse Side Button Switch Replacement: шаг 4, изображение 2 из 3 Logitech G Pro Wireless Mouse Side Button Switch Replacement: шаг 4, изображение 3 из 3
      • Remove the seven 4.4 mm-long Phillips #00 screws on the bottom shell of the mouse.

      • The screws are located underneath the edge skates.

      • Place the screws into a container to avoid losing them. Organize the screws into separate containers based on the step they were removed on to avoid incorrect reassembly.

      Спросите у FixBot

      Добавить комментарий

    5. Logitech G Pro Wireless Mouse Side Button Switch Replacement: шаг 5, изображение 1 из 2 Logitech G Pro Wireless Mouse Side Button Switch Replacement: шаг 5, изображение 2 из 2
      • Separate the bottom shell of the mouse from the top shell.

      • Remove the single 3 mm-long Phillips #00 screw securing the battery bracket.

      • Pop the battery out gently with the spudger.

      • Be careful not to damage the battery as it can leak toxic chemicals, catch fire, or explode.

      Спросите у FixBot

      Добавить комментарий

    6. Logitech G Pro Wireless Mouse Side Button Switch Replacement: шаг 6, изображение 1 из 3 Logitech G Pro Wireless Mouse Side Button Switch Replacement: шаг 6, изображение 2 из 3 Logitech G Pro Wireless Mouse Side Button Switch Replacement: шаг 6, изображение 3 из 3
      • Use the tweezers to lift up the electrical ribbon locking tab.

      • Gently pull out the ribbon to separate the bottom shell and top shell of the mouse.

      • If the ribbon does not release, gently wiggle the ribbon while carefully pulling to remove. Do not forcefully pull the ribbon as it can get damaged.

      Спросите у FixBot

      Добавить комментарий

    7. Logitech G Pro Wireless Mouse Side Button Switch Replacement: шаг 7, изображение 1 из 1
      • Remove the four 3 mm-long Phillips #00 screws securing the left and right mouse buttons on the inside of the top shell.

      • Place the screws into a container to avoid losing them. Organize the screws into separate containers based on the step they were removed on to avoid incorrect reassembly.

      Спросите у FixBot

      Добавить комментарий

    8. Logitech G Pro Wireless Mouse Side Button Switch Replacement: шаг 8, изображение 1 из 3 Logitech G Pro Wireless Mouse Side Button Switch Replacement: шаг 8, изображение 2 из 3 Logitech G Pro Wireless Mouse Side Button Switch Replacement: шаг 8, изображение 3 из 3
      • Flip the top shell over.

      • Remove the right and left mouse buttons.

      Спросите у FixBot

      Добавить комментарий

    9. Logitech G Pro Wireless Mouse Side Button Switch Replacement: шаг 9, изображение 1 из 3 Logitech G Pro Wireless Mouse Side Button Switch Replacement: шаг 9, изображение 2 из 3 Logitech G Pro Wireless Mouse Side Button Switch Replacement: шаг 9, изображение 3 из 3
      • Using the screwdriver, remove the two 3 mm-long Phillips #00 screws securing the middle housing assembly inside the mouse. Set the screws aside in a safe place to avoid losing them.

      • Using the spudger, gently pry up the middle housing assembly from the edges. Carefully lift the middle section out of the mouse body.

      Спросите у FixBot

      Добавить комментарий

    10. Logitech G Pro Wireless Mouse Side Button Switch Replacement: шаг 10, изображение 1 из 3 Logitech G Pro Wireless Mouse Side Button Switch Replacement: шаг 10, изображение 2 из 3 Logitech G Pro Wireless Mouse Side Button Switch Replacement: шаг 10, изображение 3 из 3
      • Using the screwdriver, remove the four 3 mm-long Phillips #00 screws securing the scroll wheel assembly to the mouse.

      • Using the spudger, gently lift the small ribbon cable connector from the circuit board. Carefully disconnect the ribbon cable by pulling it straight out of the connector.

      • Do not pull on the ribbon cable itself. Always lift from the connector to avoid tearing the cable.

      • Once disconnected, lift and remove the scroll wheel assembly from the mouse.

      Спросите у FixBot

      Добавить комментарий

    11. Logitech G Pro Wireless Mouse Side Button Switch Replacement: шаг 11, изображение 1 из 3 Logitech G Pro Wireless Mouse Side Button Switch Replacement: шаг 11, изображение 2 из 3 Logitech G Pro Wireless Mouse Side Button Switch Replacement: шаг 11, изображение 3 из 3
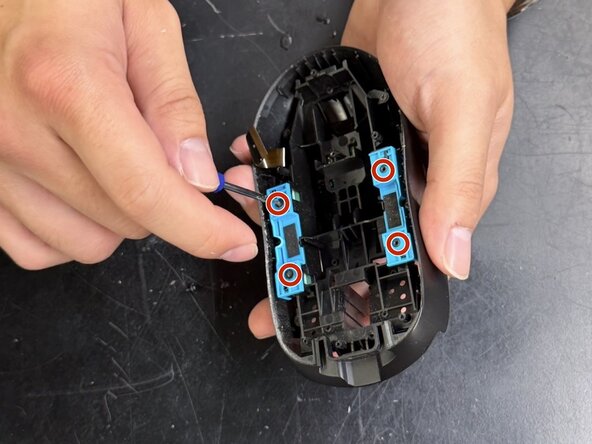
      • Using the screwdriver, remove the four 3mm Phillips #00 screws securing the blue side button brackets on both sides of the mouse.

      • Remove the nine 3 mm-long Phillips #00 screws securing the main internal frame (black plastic structure).

      • Remove the single 3mm Phillips #00 screw at the top of the mouse near the front end.

      • Set all screws aside in an organized manner to avoid mixing them up.

      Спросите у FixBot

      Добавить комментарий

    12. Logitech G Pro Wireless Mouse Side Button Switch Replacement: шаг 12, изображение 1 из 3 Logitech G Pro Wireless Mouse Side Button Switch Replacement: шаг 12, изображение 2 из 3 Logitech G Pro Wireless Mouse Side Button Switch Replacement: шаг 12, изображение 3 из 3
      • Carefully lift the internal assembly out of the outer mouse shell. Set the outer shell aside.

      • Remove the blue side button brackets from both sides of the internal frame.

      • Gently lift out the four side buttons from the frame.

      Спросите у FixBot

      Добавить комментарий

    13. Logitech G Pro Wireless Mouse Side Button Switch Replacement: шаг 13, изображение 1 из 3 Logitech G Pro Wireless Mouse Side Button Switch Replacement: шаг 13, изображение 2 из 3 Logitech G Pro Wireless Mouse Side Button Switch Replacement: шаг 13, изображение 3 из 3
      • Using the spudger, gently pry up the edge of the side circuit board from the plastic frame. Work your way along the edge, carefully releasing the clips holding the board in place.

      • Once loosened, lift the side circuit board away from the frame.

      Спросите у FixBot

      Добавить комментарий

    14. Logitech G Pro Wireless Mouse Side Button Switch Replacement: шаг 14, изображение 1 из 3 Logitech G Pro Wireless Mouse Side Button Switch Replacement: шаг 14, изображение 2 из 3 Logitech G Pro Wireless Mouse Side Button Switch Replacement: шаг 14, изображение 3 из 3
      • Using the spudger, gently insert the tip under the edge of the circuit board. Carefully pry upward to separate the board from the adhesive securing it to the frame.

      • Continue working along the edges until the adhesive is fully released. Once loosened, lift the circuit board assembly away from the frame.

      • If the adhesive is strong, apply slow, steady pressure instead of forcing it up quickly.

      Спросите у FixBot

      Добавить комментарий

    15. Logitech G Pro Wireless Mouse Side Button Switch Replacement: шаг 15, изображение 1 из 3 Logitech G Pro Wireless Mouse Side Button Switch Replacement: шаг 15, изображение 2 из 3 Logitech G Pro Wireless Mouse Side Button Switch Replacement: шаг 15, изображение 3 из 3
      • Desolder the switch pins on the underside of the PCB.

      • Using the spudger, gently insert the tip underneath the side switch component. Carefully lift the edge of the switch to begin separating it from the board.

      • Use a second tool (such as tweezers or a flathead tool) to assist in prying the switch upward. Continue applying gentle pressure until the side switch is fully detached from the board.

      • Avoid applying excessive force, as this may damage the circuit board or surrounding components.

      • This is the final disassembly step. Begin reassembly starting here after replacing the button switch.

      Спросите у FixBot

      Добавить комментарий

Заключение

To reassemble your device, follow the above steps in reverse order.
Take your e-waste to an R2 or e-Stewards certified recycler.
Repair didn’t go as planned? Try some basic troubleshooting or ask our Answers community for help.

Отменить: Я не выполнил это руководство.

Еще один человек закончил это руководство.

Shane Guzman

Участник с: 02/26/26

256 Репутация

1 руководство автора

Команда

CSU Los Angeles, Team 4-13, Harris Spring 2026 Участник CSU Los Angeles, Team 4-13, Harris Spring 2026

CSULA-HARRIS-S26S4G13

3 членов

Автор 11 руководств

0 Комментарии к руководству

Добавить комментарий

Статистика просмотров:

За последние 24 часов: 6

За последние 7 дней: 89

За последние 30 дней: 366

За всё время: 810