Перейти к основному содержанию
Присоединяйся к сообществу ремонтников - Создай аккаунт

Steam Controller (2nd Gen, 2026) Buttons Replacement

Выберете то, что вам нужно

  1. Steam Controller (2nd Gen, 2026) Buttons Replacement, Before you begin: шаг 1, изображение 1 из 3 Steam Controller (2nd Gen, 2026) Buttons Replacement, Before you begin: шаг 1, изображение 2 из 3 Steam Controller (2nd Gen, 2026) Buttons Replacement, Before you begin: шаг 1, изображение 3 из 3
    • Let your controller's battery drain below 25% before starting this repair.

    • Unplug all cables and accessories from the controller, including the Steam Controller Puck.

    • During your repair, it can be helpful to lay the Steam Controller on a clean, soft cloth for stabilization and to prevent scratches.

    Спросите у FixBot

    Добавить комментарий

  2. Steam Controller (2nd Gen, 2026) Buttons Replacement, Remove the back cover screws: шаг 2, изображение 1 из 2 Steam Controller (2nd Gen, 2026) Buttons Replacement, Remove the back cover screws: шаг 2, изображение 2 из 2
    Инструмент, используемый на этом этапе:
    TR6 Torx Security Screwdriver
    $5.99
    Спросите у FixBot

    Добавить комментарий

  3. Steam Controller (2nd Gen, 2026) Buttons Replacement, Remove the back cover: шаг 3, изображение 1 из 2 Steam Controller (2nd Gen, 2026) Buttons Replacement, Remove the back cover: шаг 3, изображение 2 из 2
    • Remove the back cover.

    Спросите у FixBot

    Добавить комментарий

  4. Steam Controller (2nd Gen, 2026) Buttons Replacement, Remove the battery: шаг 4, изображение 1 из 3 Steam Controller (2nd Gen, 2026) Buttons Replacement, Remove the battery: шаг 4, изображение 2 из 3 Steam Controller (2nd Gen, 2026) Buttons Replacement, Remove the battery: шаг 4, изображение 3 из 3
    • If your battery is swollen, take appropriate precautions. Never reinstall a swollen battery—replace it with a new one.

    • Lift the right edge of the battery to remove it.

    • During reassembly, first slide the left side of the battery into place so its connector is fully seated. Then, press the right side into place to secure it.

    Спросите у FixBot

    Добавить комментарий

  5. Steam Controller (2nd Gen, 2026) Buttons Replacement, Remove the mounting bracket screws: шаг 5, изображение 1 из 2 Steam Controller (2nd Gen, 2026) Buttons Replacement, Remove the mounting bracket screws: шаг 5, изображение 2 из 2
    • During the rest of your repair, don't forcefully push the controller down onto your work surface—you may damage the thumbsticks and trackpads.

    • Use a T6 Torx screwdriver to remove the four 7.4 mm‑long screws securing the battery mounting bracket.

    Спросите у FixBot

    Добавить комментарий

  6. Steam Controller (2nd Gen, 2026) Buttons Replacement, Remove the mounting bracket: шаг 6, изображение 1 из 2 Steam Controller (2nd Gen, 2026) Buttons Replacement, Remove the mounting bracket: шаг 6, изображение 2 из 2
    Спросите у FixBot

    Добавить комментарий

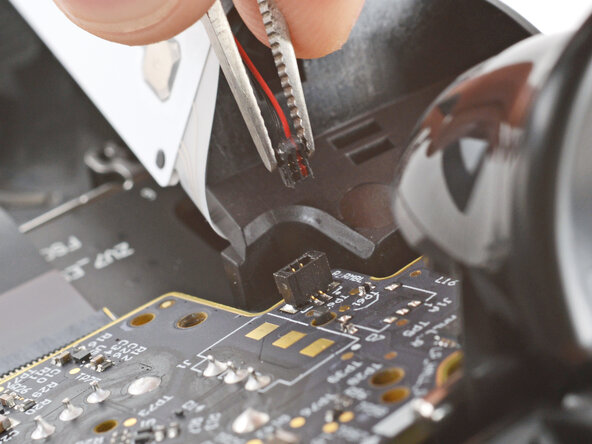
  7. Steam Controller (2nd Gen, 2026) Buttons Replacement, Disconnect the rumble motors: шаг 7, изображение 1 из 3 Steam Controller (2nd Gen, 2026) Buttons Replacement, Disconnect the rumble motors: шаг 7, изображение 2 из 3 Steam Controller (2nd Gen, 2026) Buttons Replacement, Disconnect the rumble motors: шаг 7, изображение 3 из 3
    • Don't pull on the rumble motor's delicate wires—they're easily damaged. Be careful not to pinch the wires with your tweezers, and only pull on the connector itself.

    • Firmly grip the short edges of one rumble motor connector with a pair of tweezers and pull straight up to disconnect it

    • Grip the tweezers as close to the tip as possible to get a better hold on the connector.

    Спросите у FixBot

    Добавить комментарий

  8. Steam Controller (2nd Gen, 2026) Buttons Replacement: шаг 8, изображение 1 из 3 Steam Controller (2nd Gen, 2026) Buttons Replacement: шаг 8, изображение 2 из 3 Steam Controller (2nd Gen, 2026) Buttons Replacement: шаг 8, изображение 3 из 3
    • Repeat to disconnect the other rumble motor.

    Спросите у FixBot

    Добавить комментарий

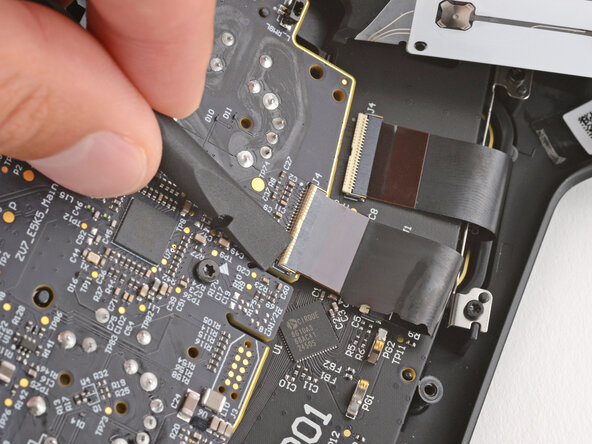
  9. Steam Controller (2nd Gen, 2026) Buttons Replacement, Disconnect the interconnect cable: шаг 9, изображение 1 из 3 Steam Controller (2nd Gen, 2026) Buttons Replacement, Disconnect the interconnect cable: шаг 9, изображение 2 из 3 Steam Controller (2nd Gen, 2026) Buttons Replacement, Disconnect the interconnect cable: шаг 9, изображение 3 из 3
    • Be careful not to damage any of the small, surface-mounted components on the main board.

    • Use a spudger to lift the hinged locking flap on the interconnect cable ZIF connector, located on the bottom edge of the main board.

    Спросите у FixBot

    Добавить комментарий

  10. Steam Controller (2nd Gen, 2026) Buttons Replacement: шаг 10, изображение 1 из 2 Steam Controller (2nd Gen, 2026) Buttons Replacement: шаг 10, изображение 2 из 2
    • Use tweezers to grip the cable by its plastic pull tab and slide it out of the socket.

    Спросите у FixBot

    Добавить комментарий

  11. Steam Controller (2nd Gen, 2026) Buttons Replacement, Remove the main board screws: шаг 11, изображение 1 из 3 Steam Controller (2nd Gen, 2026) Buttons Replacement, Remove the main board screws: шаг 11, изображение 2 из 3 Steam Controller (2nd Gen, 2026) Buttons Replacement, Remove the main board screws: шаг 11, изображение 3 из 3
    • Use a T6 Torx screwdriver to remove the three 7.4 mm‑long screws securing the main board.

    • When reinstalling the screws, raise the controller so the thumbsticks aren't pressed against your work surface—pressure on the thumbsticks can cause improper alignment and seating.

    Спросите у FixBot

    Добавить комментарий

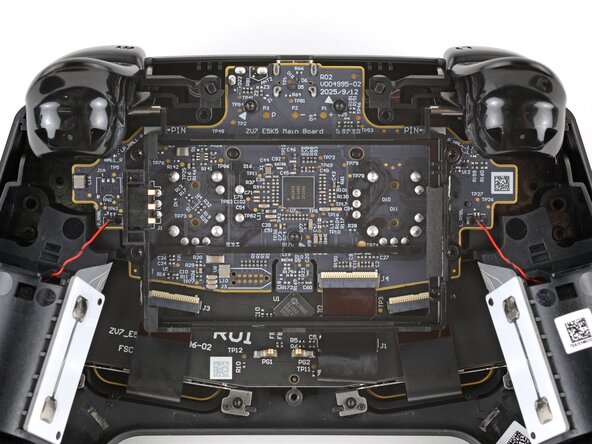
  12. Steam Controller (2nd Gen, 2026) Buttons Replacement, Remove the main board: шаг 12, изображение 1 из 3 Steam Controller (2nd Gen, 2026) Buttons Replacement, Remove the main board: шаг 12, изображение 2 из 3 Steam Controller (2nd Gen, 2026) Buttons Replacement, Remove the main board: шаг 12, изображение 3 из 3
    • Pull the main board down so the top corners clear the triggers.

    • You should be able to remove the board without removing the triggers. If you're having trouble, check out this guide to remove them.

    • Remove the main board, guiding the thumbsticks through their cutouts.

    • During reassembly, make sure the two rumble motor wires don't get trapped underneath the board. Use the four alignment posts to ensure the board is properly positioned.

    Спросите у FixBot

    Добавить комментарий

  13. Steam Controller (2nd Gen, 2026) Buttons Replacement, Rubber piece information: шаг 13, изображение 1 из 3 Steam Controller (2nd Gen, 2026) Buttons Replacement, Rubber piece information: шаг 13, изображение 2 из 3 Steam Controller (2nd Gen, 2026) Buttons Replacement, Rubber piece information: шаг 13, изображение 3 из 3
    • The rubber piece above the status LED may have been dislodged when removing the main board.

    • If the rubber piece is out of place, remove it and set it aside.

    • During reassembly, place the rubber piece so the two tabs are on the bottom and towards the back.

    Спросите у FixBot

    Добавить комментарий

  14. Steam Controller (2nd Gen, 2026) Buttons Replacement, Remove the hinge pin: шаг 14, изображение 1 из 3 Steam Controller (2nd Gen, 2026) Buttons Replacement, Remove the hinge pin: шаг 14, изображение 2 из 3 Steam Controller (2nd Gen, 2026) Buttons Replacement, Remove the hinge pin: шаг 14, изображение 3 из 3
    • With one hand, hold one of the triggers down in the fully actuated position.

    • Don't let go of the trigger, or it will eject and you may lose its spring.

    • With your free hand, use tweezers to pull the hinge pin straight out and remove it.

    • During reassembly, hold the trigger down and slide the pin through both hinge holes—the pin will stop sliding once it's fully inserted. Test the trigger to ensure the pin was properly installed.

    • When correctly inserted, the pin's end will be aligned with the white rectangle on the board (labelled PIN)—the should be no wobble.

    Спросите у FixBot

    Добавить комментарий

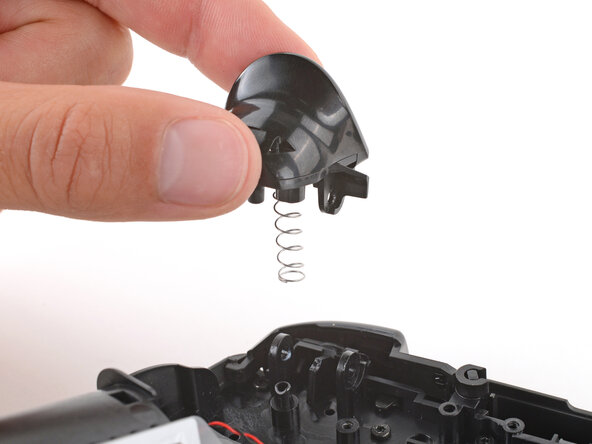
  15. Steam Controller (2nd Gen, 2026) Buttons Replacement, Remove the trigger: шаг 15, изображение 1 из 3 Steam Controller (2nd Gen, 2026) Buttons Replacement, Remove the trigger: шаг 15, изображение 2 из 3 Steam Controller (2nd Gen, 2026) Buttons Replacement, Remove the trigger: шаг 15, изображение 3 из 3
    • Lift the trigger straight up and remove it.

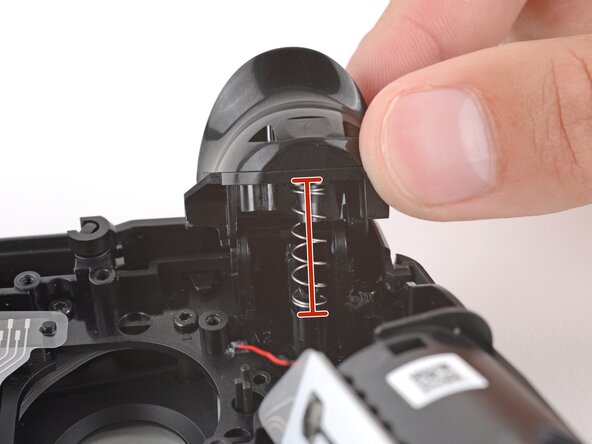
    • Remove the spring and store it in a safe place for reassembly.

    • The spring will either stick to the trigger's magnet or stay on its post.

    Спросите у FixBot

    Добавить комментарий

  16. Steam Controller (2nd Gen, 2026) Buttons Replacement, Remove the other trigger: шаг 16, изображение 1 из 3 Steam Controller (2nd Gen, 2026) Buttons Replacement, Remove the other trigger: шаг 16, изображение 2 из 3 Steam Controller (2nd Gen, 2026) Buttons Replacement, Remove the other trigger: шаг 16, изображение 3 из 3
    • Repeat to remove the other trigger.

    Спросите у FixBot

    Добавить комментарий

  17. Steam Controller (2nd Gen, 2026) Buttons Replacement, Reassembly information: шаг 17, изображение 1 из 3 Steam Controller (2nd Gen, 2026) Buttons Replacement, Reassembly information: шаг 17, изображение 2 из 3 Steam Controller (2nd Gen, 2026) Buttons Replacement, Reassembly information: шаг 17, изображение 3 из 3
    • During reassembly, follow this step to install the triggers.

    • Place one of the trigger springs over its post on the controller.

    • Put the trigger in place, making sure the spring goes over both of its posts (one on the controller and one on the trigger) and that the hinge holes are all aligned.

    • Hold the trigger down and slide the pin through both hinge holes—the pin will stop sliding once it's fully inserted.

    • If you're having trouble, make sure you're installing the trigger on the correct side.

    • Test the trigger to ensure the pin was properly installed.

    • Repeat to install the other trigger.

    Спросите у FixBot

    Добавить комментарий

  18. Steam Controller (2nd Gen, 2026) Buttons Replacement, Remove the midframe screws: шаг 18, изображение 1 из 2 Steam Controller (2nd Gen, 2026) Buttons Replacement, Remove the midframe screws: шаг 18, изображение 2 из 2
    • Use a T6 Torx screwdriver to remove the eleven 7.4 mm‑long screws securing the midframe.

    • When removing the screw in the center of the controller, be careful not to damage the plastic button membrane.

    Спросите у FixBot

    Добавить комментарий

  19. Steam Controller (2nd Gen, 2026) Buttons Replacement, Remove the midframe: шаг 19, изображение 1 из 3 Steam Controller (2nd Gen, 2026) Buttons Replacement, Remove the midframe: шаг 19, изображение 2 из 3 Steam Controller (2nd Gen, 2026) Buttons Replacement, Remove the midframe: шаг 19, изображение 3 из 3
    • Lift the midframe straight up and remove it.

    • The buttons and their silicone pads are now sitting loose in their recesses. Be very careful not to flip the front shell, or the buttons will fall out.

    • During reassembly:

    • Check the two large silicone button pads to make sure they're aligned properly and fully seated—if they aren't, button presses may feel off or not register.

    • Use the alignment posts to ensure the midframe is in the right position.

    Спросите у FixBot

    Добавить комментарий

  20. Steam Controller (2nd Gen, 2026) Buttons Replacement, Remove the button membranes: шаг 20, изображение 1 из 3 Steam Controller (2nd Gen, 2026) Buttons Replacement, Remove the button membranes: шаг 20, изображение 2 из 3 Steam Controller (2nd Gen, 2026) Buttons Replacement, Remove the button membranes: шаг 20, изображение 3 из 3
    • Remove the three silicone button membranes.

    Спросите у FixBot

    Добавить комментарий

  21. Steam Controller (2nd Gen, 2026) Buttons Replacement, Remove the buttons: шаг 21, изображение 1 из 3 Steam Controller (2nd Gen, 2026) Buttons Replacement, Remove the buttons: шаг 21, изображение 2 из 3 Steam Controller (2nd Gen, 2026) Buttons Replacement, Remove the buttons: шаг 21, изображение 3 из 3
    • Use tweezers to remove the D‑Pad, View, Steam, Menu, and ABXY buttons.

    • Alternatively, you can flip the front case over and let the buttons fall out.

    • To replace the Quick Access Menu button, you'll need to remove the remaining board attached to the front shell. Check out this guide to do so.

    • During reassembly, use the alignment tabs to orient each button in its recess. Each one is keyed specifically for its recess and proper orientation.

    Спросите у FixBot

    Добавить комментарий

  22. Steam Controller (2nd Gen, 2026) Buttons Replacement, Seat the button dampeners: шаг 22, изображение 1 из 3 Steam Controller (2nd Gen, 2026) Buttons Replacement, Seat the button dampeners: шаг 22, изображение 2 из 3 Steam Controller (2nd Gen, 2026) Buttons Replacement, Seat the button dampeners: шаг 22, изображение 3 из 3
    • During reassembly:

    • Make sure the button dampeners (that surround the button recesses) are pushed down and fully seated against the shell. Otherwise, button presses may feel off or not register.

    Спросите у FixBot

    Добавить комментарий

  23. Steam Controller (2nd Gen, 2026) Buttons Replacement, Disconnect the touchpad cables: шаг 23, изображение 1 из 3 Steam Controller (2nd Gen, 2026) Buttons Replacement, Disconnect the touchpad cables: шаг 23, изображение 2 из 3 Steam Controller (2nd Gen, 2026) Buttons Replacement, Disconnect the touchpad cables: шаг 23, изображение 3 из 3
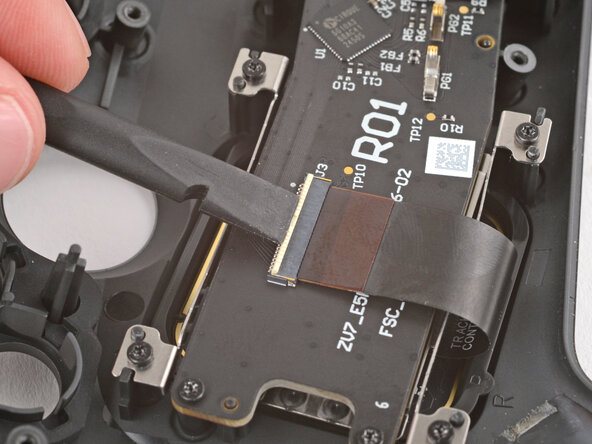
    • Use the flat end of a spudger to lift the hinged, locking flap on one of the touchpad ZIF connectors.

    Спросите у FixBot

    Добавить комментарий

  24. Steam Controller (2nd Gen, 2026) Buttons Replacement: шаг 24, изображение 1 из 2 Steam Controller (2nd Gen, 2026) Buttons Replacement: шаг 24, изображение 2 из 2
    • Use tweezers to grip the cable by its plastic pull tab and slide it out of the socket.

    Спросите у FixBot

    Добавить комментарий

  25. Steam Controller (2nd Gen, 2026) Buttons Replacement: шаг 25, изображение 1 из 3 Steam Controller (2nd Gen, 2026) Buttons Replacement: шаг 25, изображение 2 из 3 Steam Controller (2nd Gen, 2026) Buttons Replacement: шаг 25, изображение 3 из 3
    • Repeat to disconnect the other touchpad cable.

    Спросите у FixBot

    Добавить комментарий

  26. Steam Controller (2nd Gen, 2026) Buttons Replacement, Remove the FSC board screws: шаг 26, изображение 1 из 2 Steam Controller (2nd Gen, 2026) Buttons Replacement, Remove the FSC board screws: шаг 26, изображение 2 из 2
    • Use a T5 Torx screwdriver to remove the four 6.0 mm‑long screws securing the FSC board.

    Спросите у FixBot

    Добавить комментарий

  27. Steam Controller (2nd Gen, 2026) Buttons Replacement, Remove the FSC board: шаг 27, изображение 1 из 3 Steam Controller (2nd Gen, 2026) Buttons Replacement, Remove the FSC board: шаг 27, изображение 2 из 3 Steam Controller (2nd Gen, 2026) Buttons Replacement, Remove the FSC board: шаг 27, изображение 3 из 3
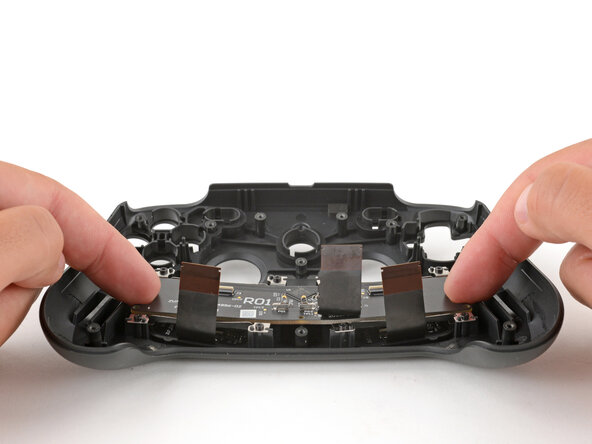
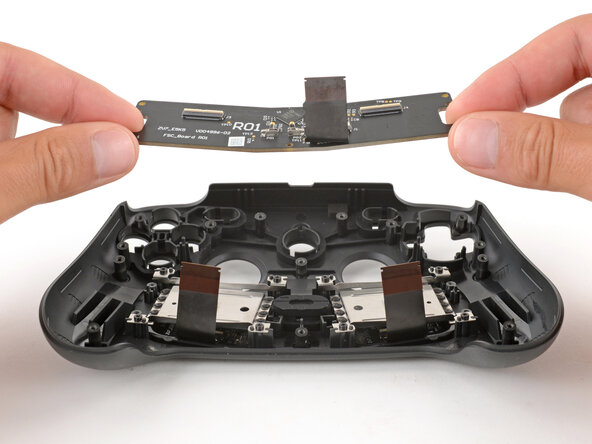
    • Remove the FSC board.

    • During reassembly:

    • Use the alignment pegs to ensure the board is correctly positioned.

    Спросите у FixBot

    Добавить комментарий

  28. Steam Controller (2nd Gen, 2026) Buttons Replacement, Remove the Quick Access Menu button: шаг 28, изображение 1 из 3 Steam Controller (2nd Gen, 2026) Buttons Replacement, Remove the Quick Access Menu button: шаг 28, изображение 2 из 3 Steam Controller (2nd Gen, 2026) Buttons Replacement, Remove the Quick Access Menu button: шаг 28, изображение 3 из 3
    • Remove the Quick Access Menu membrane and button.

    • During reassembly, make sure the silicone button dampener (it surrounds the button recess) is fully pushed down and seated against the shell.

    Спросите у FixBot

    Добавить комментарий

Заключение

To reassemble your device, follow these instructions in reverse order.

Repair didn’t go as planned? Try some basic troubleshooting, or ask our Answers community for help.

Отменить: Я не выполнил это руководство.

Spencer Day

Участник с: 09/14/22

195 666 Репутация

Автор 1 243 руководств

0 Комментарии к руководству

Добавить комментарий

Статистика просмотров:

За последние 24 часов: 10

За последние 7 дней: 120

За последние 30 дней: 623

За всё время: 2,012