Перейти к основному содержанию
Присоединяйся к сообществу ремонтников - Создай аккаунт

Texas Instruments TI-30 XS Multiview Solar Panel Replacement

Выберете то, что вам нужно

  1. Texas Instruments TI-30 XS Multiview Solar Panel Replacement, Open the device: шаг 1, изображение 1 из 2 Texas Instruments TI-30 XS Multiview Solar Panel Replacement, Open the device: шаг 1, изображение 2 из 2
    • If the screw is not turning, do not force it. This can strip the screw. See the How to Remove a Stripped Screw guide if the screw is already stripped.

    • Using the #00 screwdriver, unscrew the six, 6mm Phillips screws.

    • Use the spudger (or fingernail) to pry into the space between the blue back cover and the white body to take off the back cover.

    Спросите у FixBot

    Добавить комментарий

  2. Texas Instruments TI-30 XS Multiview Solar Panel Replacement, Open the battery compartiment: шаг 2, изображение 1 из 1
    • Using the #00 Phillips screwdriver unscrew the two, 3mm Phillips screws located near the top of the calculator.

    • Lift the metal plate from the battery and set it to the side.

    Спросите у FixBot

    Добавить комментарий

  3. Texas Instruments TI-30 XS Multiview Solar Panel Replacement, Eject the battery: шаг 3, изображение 1 из 1
    • Use the spudger (or fingernail) to lift the battery from the black holder.

    Спросите у FixBot

    Добавить комментарий

    • Put the new CR2032 battery in. Never insert a different type of battery!

    • Make sure the positive side of your CR2032 is facing up.

    • Reverse the steps 2 and 1.

    Спросите у FixBot

    Добавить комментарий

  4. Texas Instruments TI-30 XS Multiview Solar Panel Replacement, Free the solar panel: шаг 5, изображение 1 из 1
    • Use the #00 Phillips screwdriver to remove the one 3mm Phillips screw holding the solar panel in place.

    Спросите у FixBot

    Добавить комментарий

  5. Texas Instruments TI-30 XS Multiview Solar Panel Replacement, Carefully pull the panel out: шаг 6, изображение 1 из 1
    • Be careful not to pull the solar panel too far out, as the wires connecting it to the calculator are fragile and could be ripped off.

    • Carefully pull the solar panel away from the calculator, as shown to the left.

    Спросите у FixBot

    Добавить комментарий

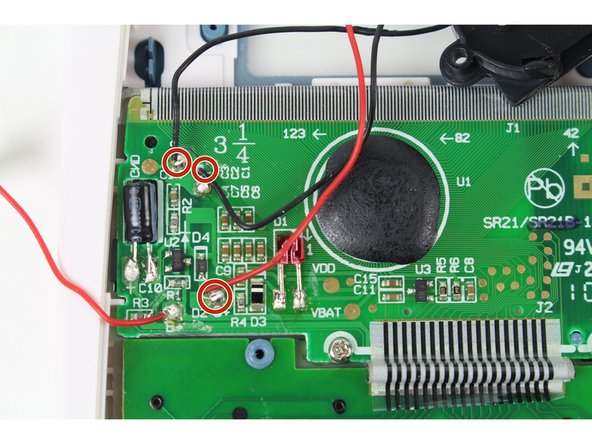
  6. Texas Instruments TI-30 XS Multiview Solar Panel Replacement, Unsolder the wires: шаг 7, изображение 1 из 1
    • The capacitor might not be discharged. Proceed with caution.

    • Unsolder the three wires from the motherboard.

    • Unsoldering help can be found here.

    • To re-solder the wires from the new solar panel to the calculator motherboard take notice of the color and placement of the wires.

    Спросите у FixBot

    Добавить комментарий

Заключение

To reassemble your device, follow these instructions in reverse order.

Отменить: Я не выполнил это руководство.

Aaron Feinstein

Участник с: 10/01/15

401 Репутация

1 руководство автора

Команда

Cal Poly, Team 11-2, Forte Fall 2015 Участник Cal Poly, Team 11-2, Forte Fall 2015

CPSU-FORTE-F15S11G2

4 членов

Автор 9 руководств

1 Комментарий к руководству

Do you know where I could get a replacement solar panel for the calculator?

Josh - Ответить Поделиться

Добавить комментарий

Статистика просмотров:

За последние 24 часов: 1

За последние 7 дней: 7

За последние 30 дней: 32

За всё время: 3,018