Введение
The iPhone 11’s SIM card reader is modular and can be replaced separately from the logic board. If you’re having issues with your SIM card or cellular network connection, replacing the SIM reader may resolve the problem.
Выберете то, что вам нужно
-
-
Power off your iPhone before beginning disassembly.
-
Remove the two 6.7 mm-long pentalobe P2 screws at the bottom edge of the iPhone.
-
-
-
Measure 3 mm from the tip and mark the opening pick with a permanent marker.
-
-
-
Lay overlapping strips of clear packing tape over the iPhone's screen until the whole face is covered.
-
If you can't get the suction cup to stick in the next few steps, fold a strong piece of tape (such as duct tape) into a handle and lift the screen with that instead.
-
-
Инструмент, используемый на этом этапе:Clampy - Anti-Clamp$24.95
-
Pull the blue handle backwards to unlock the Anti-Clamp's arms.
-
Slide the arms over either the left or right edge of your iPhone.
-
Position the suction cups near the bottom edge of the iPhone—one on the top, and one on the bottom.
-
Squeeze the cups together to apply suction to the desired area.
-
-
-
Pull the blue handle forward to lock the arms.
-
Turn the handle clockwise 360 degrees or until the cups start to stretch.
-
Make sure the suction cups remain aligned with each other. If they begin to slip out of alignment, loosen the suction cups slightly and realign the arms.
-
-
-
Heat an iOpener and thread it through the arms of the Anti-Clamp.
-
Fold the iOpener so it lays on the bottom edge of the iPhone.
-
Wait one minute to give the adhesive a chance to release and present an opening gap.
-
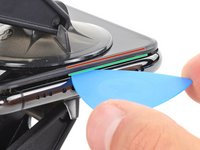
Insert an opening pick into the gap under the screen and the plastic bezel, not the screen itself.
-
Skip the next three steps.
-
-
-
Use a hairdryer or heat gun or prepare an iOpener and apply it to the lower edge of the iPhone for about a minute.
-
-
-
If you're using a single suction handle, apply it to the bottom edge of the phone, while avoiding the curved portion of the glass.
-
-
-
Pull up on the suction cup with firm, constant pressure to create a slight gap between the front panel and rear case.
-
Insert an opening pick into the gap under the screen and the plastic bezel, not the screen itself.
-
-
-
Slide the opening pick around the lower left corner and up the left edge of the iPhone, slicing through the adhesive holding the display in place.
-
-
-
-
Re-insert your pick at the bottom edge of the iPhone, and slide it up the right side to continue separating the adhesive.
-
-
-
Gently pull the right edge of the display down slightly (in the direction of the Lightning port).
-
Insert your pick into the top-right corner of the phone.
-
-
-
Continue pulling the display down (toward the Lightning port) as needed in order to make a gap large enough for the pick.
-
Slide the pick to the top left corner and cut any remaining adhesive securing the display.
-
-
-
Pull the small nub on the suction cup to detach it from the front panel.
-
-
-
Open the iPhone by swinging the display up from the left side, like the back cover of a book.
-
Prop the display up against something sturdy.
-
-
-
To access the screws in the following step, tilt the display by slightly lifting its lower edge.
-
-
Инструмент, используемый на этом этапе:Magnetic Project Mat$19.95
-
Use a Y000 driver to remove the three 1.1 mm-long screws securing the battery connector bracket.
-
-
-
Use a spudger or a clean fingernail to pry the battery connector up from its socket on the logic board.
-
Bend the connector slightly away from the logic board to prevent it from accidentally contacting the socket.
-
-
-
Use a Y000 driver to remove the five 1.1 mm screws securing the logic board cover bracket.
-
-
-
Use a spudger or a fingernail to disconnect the LCD panel cable connector.
-
Disconnect the digitizer connector next to it.
-
-
-
Use the point of a spudger or a fingernail to disconnect the front panel sensor assembly connector.
-
-
-
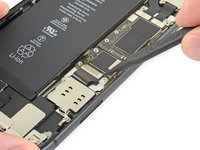
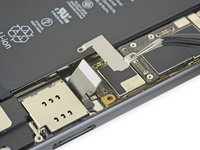
Use a spudger or a fingernail to pry up and disconnect the flex cable for the Lightning connector assembly.
-
-
-
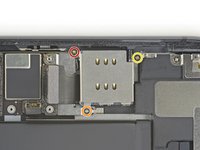
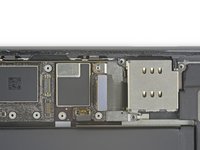
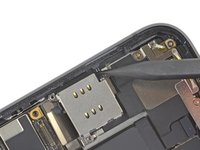
Remove the three Phillips screws surrounding the SIM card reader:
-
One 1.5 mm screw
-
One 1.9 mm screw
-
One 1.6 mm screw securing a grounding bracket
-
Removing the grounding bracket secured by the final screw.
-
-
-
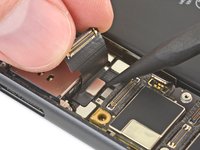
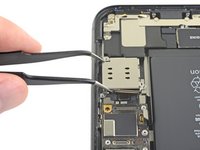
Use a standoff driver to remove the 3.1 mm screw securing the SIM card reader connector bracket.
-
-
-
Remove the SIM reader's connector bracket.
-
-
-
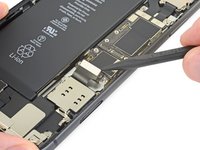
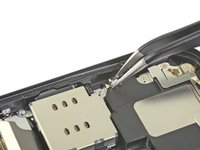
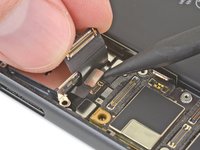
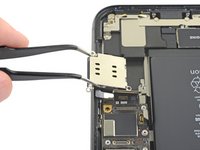
While gently lifting the Lightning connector flex cable out of the way, use the point of a spudger to pry up and disconnect the SIM card reader flex cable.
-
-
-
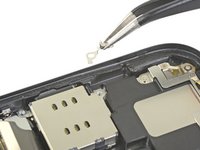
Use the point of a spudger to push the SIM eject plunger out towards the edge of the phone.
-
-
-
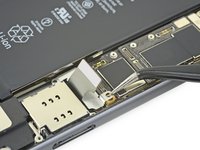
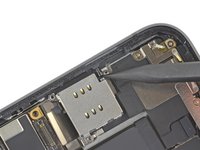
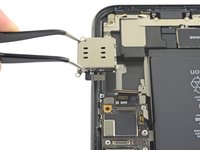
Lift the SIM card reader and slide it toward the outside edge of the iPhone.
-
Remove the SIM card reader.
-


To reassemble your device, follow the above steps in reverse order.
Take your e-waste to an R2 or e-Stewards certified recycler.
Repair didn’t go as planned? Try some basic troubleshooting, or ask our iPhone 11 Answers community for help.
Отменить: Я не выполнил это руководство.
20 человек успешно провели ремонт по этому руководству.


10 Комментарии к руководству
Puedo cambiar una single SIM tray por una dual SIM tray?
Gracias
Helpful guide as always! I will note, I get a “SIM Failure” message after completing this repair.. It works properly but the message pops up (multiple times) on a reboot. Potentially a low quality part? I’ve only done this once so I can’t say if this is a common issue.
cheers!
Hello,
It could be a low quality part, if you can found, try with a genuine parts, maybe removed from a broken iPhone.
Cheers :)
jacopo -
can I change a single SIM card reader for a dual SIM card reader on my iPhone 11?
We haven’t tested this yet (we will!) but internet sources seem to point towards yes!