Введение
Use this guide to replace a broken rear glass on your iPhone 14. The rear glass includes the charging coil and rear-facing microphone mounted on it.
This guide was created using the A2882 (international) model. If you're fixing a different iPhone 14 model, there may be some visual discrepancies, but the procedure should be the same.
For your safety, discharge the battery below 25% before disassembling your device. This reduces the risk of fire if the battery is accidentally damaged during the repair. If your battery is swollen, take appropriate precautions.
Note: On iOS 18 and newer, you can pair new, genuine rear glass parts using Apple's Repair Assistant.
You’ll need replacement adhesive to reattach the screen when reassembling the device. Your device will function normally, but will most likely lose its IP (Ingress Protection) rating.
Выберете то, что вам нужно
-
-
Power off your iPhone before beginning disassembly.
-
Remove the two 6.8 mm-long pentalobe P2 screws at the bottom edge of the iPhone.
-
-
-
Measure 3 mm from the tip and mark the opening pick with a permanent marker.
Got to step 2 and realized the fix kit doesn't include an opening pick! Looks like a guitar pick, and I have those lying around. Is that expected? Looks like the pick is used in many steps below. There's a little blue crowbar that isn't mentioned in the instructions. Perhaps that replaces the opening pick?
Hi! I can't see which guide you were using when writing this comment. Can you reply here with which guide and fix kit you used?
I see you posted this in Meta. I hope it's resolved soon! In the meantime, a guitar pick may work well enough for your repair.
what fix kit?
My fix kit didn't include an opening pick either
My AliExpress refurbished screen came with a pick that has a coin-like circle that pops out, so no modification was necessary
It's not an Ifixit KIT if it doesn't include everything. You'll need to order the opening pic separately. Or head to Walmart like myself and look for guitar pics. Hopefully, this will work just as well.
No pick in mine as well. It’s really not clear that you have to order this separately when ordering an IPhone SE 202/2022 screen repair kit. Is this the case?
Frustrated, I ordered a compact package where everything was encapsulated. Useless suction tools could not separate the screen. If it is unable to decouple the screen, then why sucking suction tools you have provided.
For my kit the triangle pick was stuck inside the box with the screen not with the other tools maybe it's also there for you
Y’all are getting far, FAR too detailed with some of this stuff…. Measuring and marking the pick that you won’t actually use to open the device?!? lol that’s kinda funny. Just heat it up, grab a spudger, and the back just pops right off! The iFixit tech need to stick to the KISS method more often, you know KEEP IT SIMPLE STUPID!!! Like l, for reals, I’ve been doing this stuff for YEARS and using iFixit guides regularly and this is just ridiculous at this point!
Will the phone still work if the sensor assembly on the back of the screen is damaged?
-
-
-
Lay overlapping strips of clear packing tape over the iPhone's rear glass until the whole face is covered.
-
If you can't get the suction cup to stick in the next few steps, fold a strong piece of tape (such as duct tape) into a handle and lift the rear glass with that instead.
-
-
Инструмент, используемый на этом этапе:Clampy - Anti-Clamp$24.95
-
Follow this guide to secure your screen with the included tape.
-
Pull the blue handle backwards to unlock the Anti-Clamp's arms.
-
Slide the arms over either the left or right edge of your iPhone.
-
Position the suction cups near the bottom edge of the iPhone—one on the front, and one on the back.
-
Squeeze the cups together to apply suction to the desired area.
-
-
-
Pull the blue handle forwards to lock the arms.
-
Turn the handle clockwise 360 degrees or until the cups start to stretch.
-
Make sure the suction cups remain aligned with each other. If they begin to slip out of alignment, loosen the suction cups slightly and realign the arms.
-
-
-
Support your iPhone on something sturdy such as a hardcover book so it rests hands-free and parallel to the ground; this makes it easier to work with in the following steps.
-
Use a hair dryer to heat along the bottom edge of the iPhone. The glass should feel slightly too hot to touch.
-
Wait one minute to give the adhesive a chance to release and present an opening gap.
-
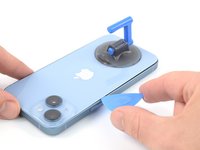
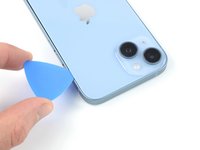
Insert an opening pick under the rear glass when the Anti-Clamp creates a large enough gap.
-
Skip the next two steps.
-
-
-
Use a hair dryer or a heat gun to heat the bottom edge of the iPhone for 90 seconds or until the rear glass is slightly too hot to touch.
-
-
-
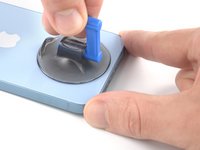
Apply a suction handle to the bottom edge of the rear glass, while avoiding the very edge of the glass.
-
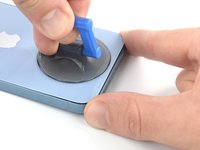
Pull up on the suction cup with firm, constant pressure to create a slight gap between the rear glass and the case.
-
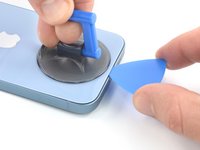
Insert an opening pick into the gap.
-
-
-
-
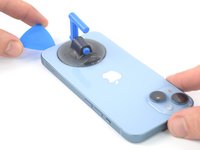
Use a hair dryer to heat the left edge of the iPhone for 90 seconds or until the rear glass is slightly too hot to touch.
-
-
-
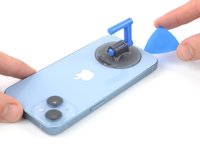
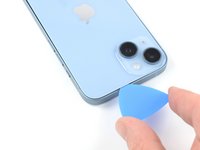
Slide the opening pick around the lower left corner and up the left edge of the iPhone, slicing through the adhesive holding the rear glass in place.
-
-
-
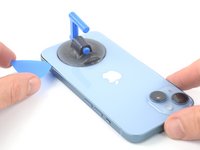
Use a hair dryer to heat the right edge of the iPhone (the edge with the power button) for 90 seconds or until the rear glass is slightly too hot to touch.
-
-
-
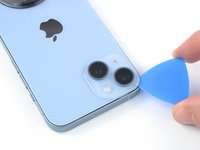
Re-insert your pick at the bottom edge of the iPhone, and slide it up the right side to continue separating the adhesive.
-
-
-
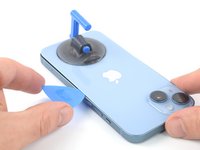
Use a hair dryer to heat the top edge of the iPhone for 90 seconds or until the rear glass is slightly too hot to touch.
-
-
-
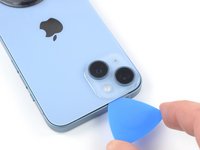
Insert your pick underneath the top right edge of the phone. Slide it around the top-right corner and halfway across the top edge.
-
-
-
Insert your pick underneath the top-left edge of the phone. Slide it around the top-left corner and halfway across the top edge.
-
-
-
Remove your suction handle from the rear glass.
-
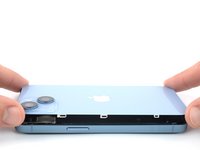
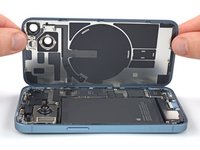
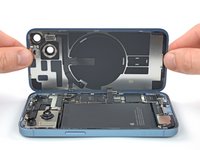
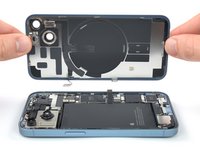
Slowly open your iPhone by swinging the rear glass up from the left side, like the back cover of a book.
-
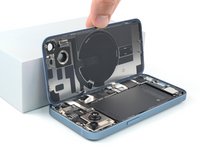
Lean the rear glass against something to keep it propped up while you're working on the phone.
-
If you don't have anything at hand to lean the rear glass against, your suction handle can do the trick.
-
-
Инструмент, используемый на этом этапе:Magnetic Project Mat$19.95
-
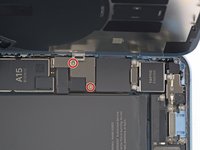
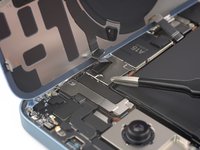
Use a Y000 screwdriver to remove the two 1.3 mm-long screws securing the battery connector cover.
-
-
Инструмент, используемый на этом этапе:Tweezers$4.99
-
-
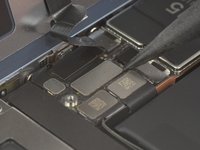
Use the pointed end of a spudger to disconnect the battery cable by prying the connector straight up from its socket.
-
Bend the connector slightly away from the logic board to prevent it from accidentally making contact with the socket and providing power to the phone during your repair.
-
-
-
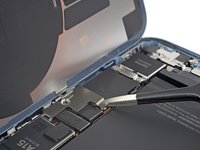
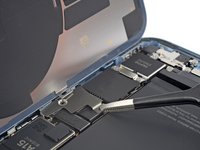
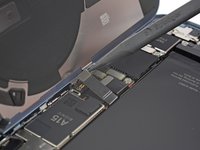
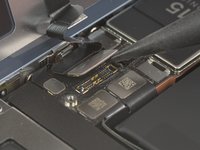
Use a Y000 screwdriver to remove the single 1.0 mm-long screw securing the charging coil connector cover.
-
-
-
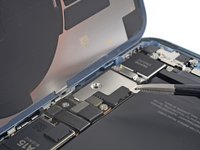
Use a pair of tweezers to remove the charging coil connector cover.
-
-
-
Use the pointed end of a spudger to disconnect the charging coil cable by prying the connector straight up from its socket.
-


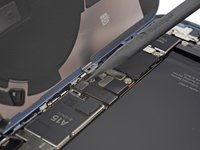


Compare your new replacement part to the original part—you may need to transfer remaining components or remove adhesive backings from the new part before installing.
To reassemble your device, follow the above steps in reverse order.
After your repair, depending on the replacement part, you may be able to calibrate it using Apple's Repair Assistant, available as of iOS 18. Update your device, navigate to Settings → General →About → Parts & Service History, tap Restart & Finish Repair, and follow the onscreen prompts.
Take your e-waste to an R2 or e-Stewards certified recycler.
Repair didn’t go as planned? Try some basic troubleshooting, or ask our Answers community for troubleshooting help.
Отменить: Я не выполнил это руководство.
22 человек успешно провели ремонт по этому руководству.

Команду

Tobias Isakeit - Repairability Engineer Участник Tobias Isakeit - Repairability Engineer
Business
1 член
Автор 1 131 руководств
16 Комментариев
Does Ifixit currently offer this part?
Dear Mark Schulze, unfortunately not.
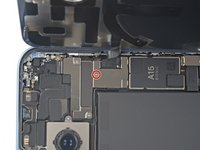
After completing this repair, my camera doesn't save flash photos anymore, even though the flash fires and it saves normal photos. Flash photos still save with the original back glass. Anyone else run into this issue?
Hi Rich, the issue could be caused by a damaged IC (see marked in this image)
You need to transfer the charging coil and any parts adhered to the back glass as they are paired.
What about transferring the hardware from the old glass to the new one!?!?
FYI everyone:
On the 14 models the back glass assembly has the charging coil and other parts paired, you must transfer these or else photos with flash on wont save!
I have heard that the flash and microphone attached to the back glass is serialized and you need the original one to replace the back glass or else it won't save photos with the flash turned on. is this still true? and if so, how do you remove the microphone attached to the back glass??? i have been going at it for days with isopropyl, heat, and various prying tools and it will not budge. is it welded or something? because at this point i have tried everything and am just about ready to give up and deal with getting chewed out by my client because it won't save photos with the flash turned on and all i can say to him is sorry.
You should only need to transfer the wireless charging assembly including the flash. Not sure if the microphone is attached to that as I hadn't seen it often.
However if it is connected to the wireless charging assembly and flash let me know.
You may click the button to view the unverified version of this guide as I have added a couple notes about this, but they haven't been verified by an admin yet.
I've been having the same issue with the microphone braket. It won't budge. I've weighted it down and put some T700 glue around it to hold it in place. Hopefully that will work. It is truly an act of bastardry for Apple to employ such tactics to prevent proper repair.
Jack -
Apple do supply the rear backs
this isnt the process of changing over the magsafe and the flash/microphone this is only to take it off
Does this also apply to the 14 Pro?
Post addition was never accepted:
Be aware that you must transfer the wireless charging coil flex and any other accompanying flexes to your new back glass. If this is not done your device will not save photos taken with flash.
This guide fails to mention you need to transfer the Wireless Charger/Flashlight assembly or you'll run into a few software "glitches" that Apple programmed in to discourage repair. If you damage the coil you need to Solder an IC to a new one.
PLEASE remove back first and disconnect battery before taking cables off!! as per Apple instructions
PC Technology Group - Ответить