Введение
If your iPhone 14 screen is cracked, not responding to touch, or not showing a picture when your phone is powered on, use this guide to restore your iPhone to working order with a new screen, a.k.a. display assembly.
This guide was created using the A2882 (international) model. If you're fixing a different iPhone 14 model, there may be some visual discrepancies, but the procedure should be the same.
Note: On iOS 17.6 and earlier, True Tone and auto brightness functionality is disabled after a screen replacement, even when using an original Apple screen. Face ID is also disabled, unless the iPhone is running iOS 15.2 or newer. On iOS 18 and newer, you can calibrate your new screen using Apple's Repair Assistant to restore True Tone functionality on genuine screens purchased from Apple.
You’ll need replacement adhesive to reattach the screen when reassembling the device. Your device will function normally, but will most likely lose its IP (Ingress Protection) rating.
Выберете то, что вам нужно
-
-
Power off your iPhone before beginning disassembly.
-
Remove the two 6.8 mm-long pentalobe P2 screws at the bottom edge of the iPhone.
-
-
-
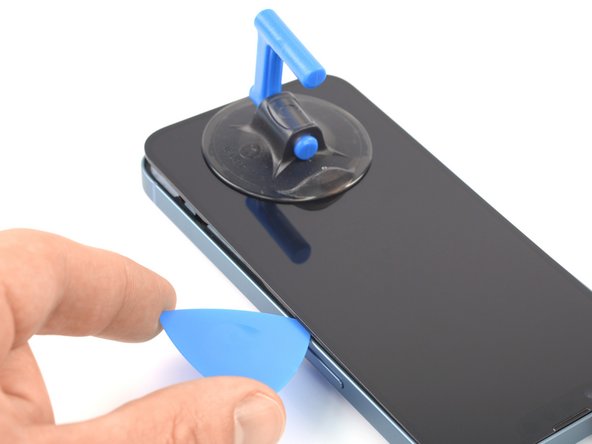
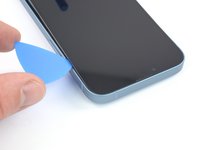
Measure 3 mm from the tip and mark the opening pick with a permanent marker.
Got to step 2 and realized the fix kit doesn't include an opening pick! Looks like a guitar pick, and I have those lying around. Is that expected? Looks like the pick is used in many steps below. There's a little blue crowbar that isn't mentioned in the instructions. Perhaps that replaces the opening pick?
Hi! I can't see which guide you were using when writing this comment. Can you reply here with which guide and fix kit you used?
I see you posted this in Meta. I hope it's resolved soon! In the meantime, a guitar pick may work well enough for your repair.
what fix kit?
My fix kit didn't include an opening pick either
My AliExpress refurbished screen came with a pick that has a coin-like circle that pops out, so no modification was necessary
It's not an Ifixit KIT if it doesn't include everything. You'll need to order the opening pic separately. Or head to Walmart like myself and look for guitar pics. Hopefully, this will work just as well.
No pick in mine as well. It’s really not clear that you have to order this separately when ordering an IPhone SE 202/2022 screen repair kit. Is this the case?
Frustrated, I ordered a compact package where everything was encapsulated. Useless suction tools could not separate the screen. If it is unable to decouple the screen, then why sucking suction tools you have provided.
For my kit the triangle pick was stuck inside the box with the screen not with the other tools maybe it's also there for you
Y’all are getting far, FAR too detailed with some of this stuff…. Measuring and marking the pick that you won’t actually use to open the device?!? lol that’s kinda funny. Just heat it up, grab a spudger, and the back just pops right off! The iFixit tech need to stick to the KISS method more often, you know KEEP IT SIMPLE STUPID!!! Like l, for reals, I’ve been doing this stuff for YEARS and using iFixit guides regularly and this is just ridiculous at this point!
Will the phone still work if the sensor assembly on the back of the screen is damaged?
-
-
-
Lay overlapping strips of clear packing tape over the iPhone's screen until the whole face is covered.
-
If you can't get the suction cup to stick in the next few steps, fold a strong piece of tape (such as duct tape) into a handle and lift the screen with that instead.
Had to do the superglue. Also that glass was so shattered that it came off in pieces, took my almost an hour to get the whole screen of. Tape didn't really help there, it would just pull the tape off instead of the screen. Do note that the whole screen assembly is quite thick, I think I initially put my pick in a layer inbetween.
1st step you have forgotten remove the back to disconnect battery golden rule battery first
-
-
Инструмент, используемый на этом этапе:Clampy - Anti-Clamp$24.95
-
Follow this guide to secure your rear glass with the included tape.
-
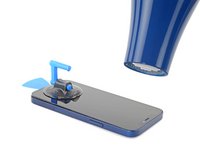
Pull the blue handle backwards to unlock the Anti-Clamp's arms.
-
Slide the arms over either the left or right edge of your iPhone.
-
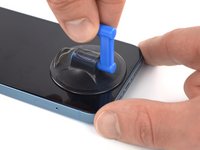
Position the suction cups near the bottom edge of the iPhone—one on the front, and one on the back.
-
Squeeze the cups together to apply suction to the desired area.
-
-
-
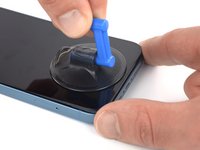
Pull the blue handle forward to lock the arms.
-
Turn the handle clockwise 360 degrees or until the cups start to stretch.
-
Make sure the suction cups remain aligned with each other. If they begin to slip out of alignment, loosen the suction cups slightly and realign the arms.
-
-
-
Support your iPhone on something sturdy such as a hardcover book so it rests hands-free and parallel to the ground; this makes it easier to work with in the following steps.
-
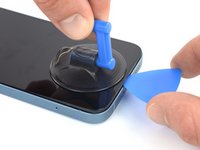
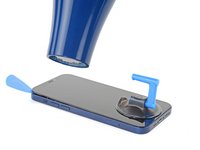
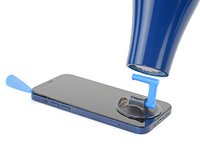
Use a hair dryer to heat along the bottom edge of the iPhone. The screen should feel slightly too hot to touch.
-
Wait one minute to give the adhesive a chance to release and present an opening gap.
-
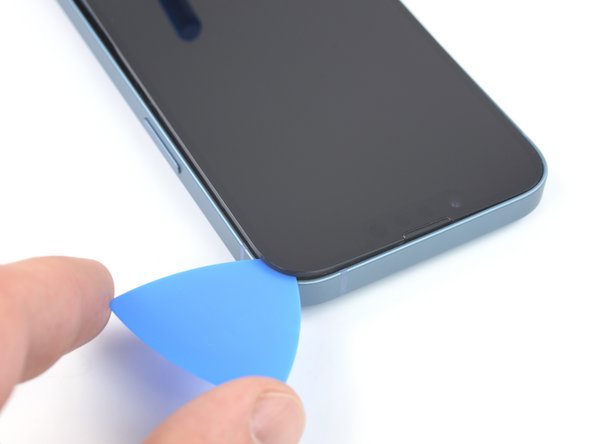
Insert an opening pick under the screen's plastic bezel when the Anti-Clamp creates a large enough gap.
-
Skip the next two steps.
-
-
-
Use a hair dryer or a heat gun to heat the bottom edge of the iPhone for 90 seconds or until the screen is slightly too hot to touch.
-
-
-
Apply a suction handle to the bottom edge of the phone, while avoiding the very edge of the glass.
-
Pull up on the suction cup with firm, constant pressure to create a slight gap between the screen and the frame.
-
Insert an opening pick into the gap under the screen's plastic bezel.
-
-
-
Use a hair dryer to heat the right edge of the iPhone (the edge with the power button) for 90 seconds or until the screen is slightly too hot to touch.
-
-
-
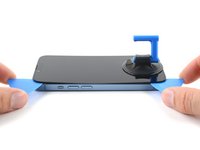
Slide the opening pick around the bottom right corner of the iPhone to separate its adhesive.
-
Continue sliding up the right edge of the iPhone until you reach the top right corner.
-
Leave the pick in the top right corner before continuing.
-
-
-
Use a hair dryer to heat the top edge of the iPhone for 90 seconds or until the screen is slightly too hot to touch.
-
-
-
-
Slide the opening pick around the top right corner of the iPhone to separate the top adhesive.
-
Leave the pick in the top left corner before continuing.
-
-
-
Use a hair dryer to heat the left edge of the iPhone for 90 seconds or until the screen is slightly too hot to touch.
-
-
-
Insert a second opening pick in the bottom left corner of the iPhone.
-
Twist both picks simultaneously until the left edge clips release.
My glass was so shattered that twisting picks never was going to create enough force for the centre to come loose. I just pulled up the corners with my hands.
-
-
-
Remove your suction handle from the screen.
-
Rotate your iPhone so the right edge faces you.
-
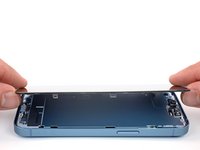
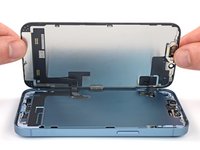
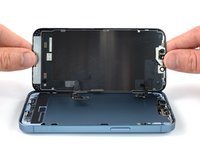
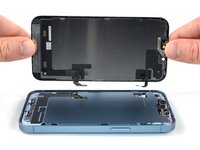
Open your iPhone by swinging the screen up from the right side, like the front cover of a book.
-
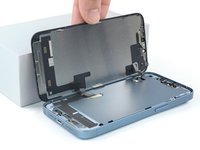
Lean the screen against something to keep it propped up while you're working on the phone.
-
-
Инструмент, используемый на этом этапе:Magnetic Project Mat$19.95
-
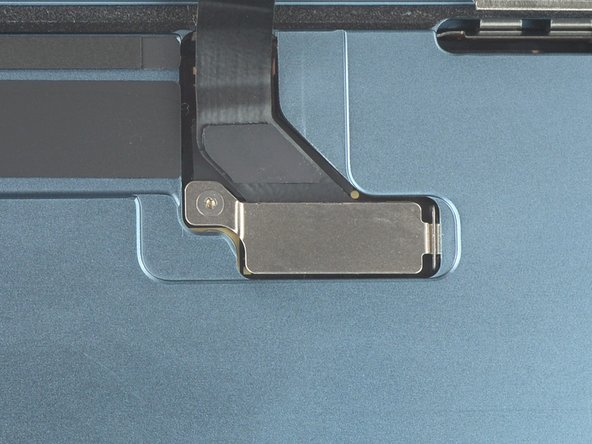
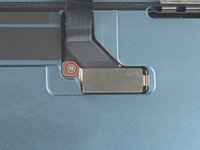
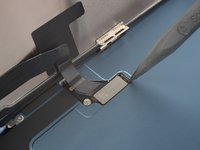
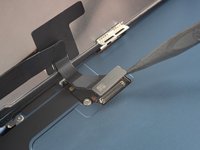
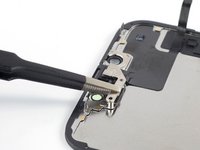
Use a Y000 screwdriver to remove the 0.9 mm-long screw securing the display connector bracket.
-
-
Инструмент, используемый на этом этапе:Tweezers$4.99
-
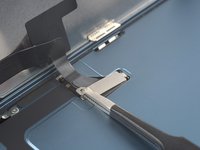
Grasp the screw hole end of the connector bracket with a pair of tweezers.
-
Lift the bracket slightly to loosen the latch on the other edge.
-
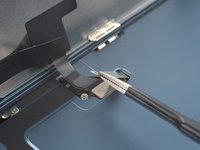
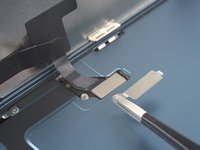
Remove the display connector bracket.
-
-
-
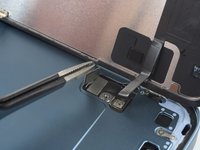
Use the pointed end of a spudger to disconnect the display cable by prying the connector straight up from its socket.
@robialecm It's not necessary, although it is a bit risky to do it without disconnecting the battery by just turning it off. Anyway, I wanted to check if the new screen was working before fully reassembling, otherwise the warranty on my replacement screen would be void. I have to admit I accidentally turned on the phone a few times, it's hard to not press the power button every once in a while. I managed to turn off the phone more or less by pressing volume up then volume down then hold power button then wait until reboot, keep holding power button until screen goes dark, then quickly release. But I was lucky that the new screen didn't sustain any damage because I'm pretty sure the phone was on while I was messing with the display connector.
I was very careful reconnecting the cables, and therefore it took my a very long time. Every time I pushed one side, the other side would come out. In the end the trick was to keep one side pressed down while gently - not too gently - pressing the other side.
-
-
-
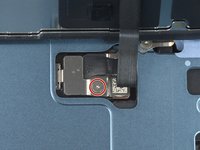
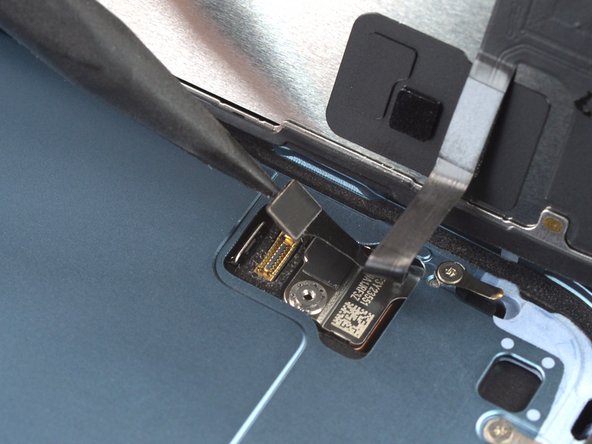
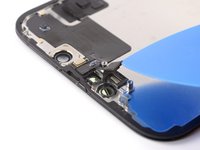
Use a Y000 screwdriver to remove the 0.9 mm-long screw securing the front sensor connector bracket.
-
-
-
Grasp the screw hole end of the connector bracket with a pair of tweezers.
-
Lift the bracket slightly to loosen the latch on the other edge.
-
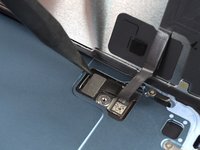
Remove the front sensor connector bracket.
-
-
-
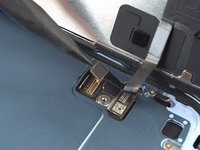
Use the pointed end of a spudger to disconnect the front sensor cable by prying the connector straight up from its socket.
-
-
-
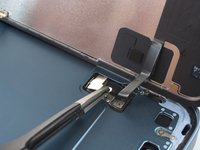
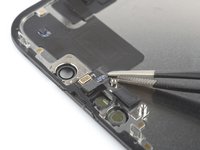
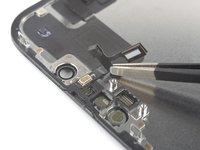
Use a Y000 screwdriver to remove the two 1.4 mm-long screws securing the sensor assembly bracket.
-
-
Инструмент, используемый на этом этапе:Tweezers$4.99
-
Use tweezers, or your fingers, to remove the front sensor assembly bracket.
-
-
-
Heat an iOpener and apply it to the top edge of the screen for two minutes.
-
-
-
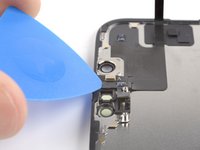
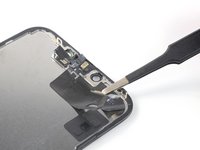
Insert an opening pick between the ambient light sensor and its recess in the screen.
-
Pry up with the pick to separate the ambient light sensor from the screen.
-
-
-
Insert an opening pick between the proximity sensor and its recess on the screen.
-
Pry up with the pick to separate the proximity sensor from the screen.
-
-
-
Use tweezers, or your fingers, to move the proximity sensor cable away from the screen.
-
-
-
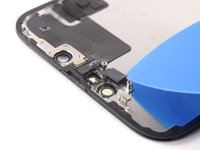
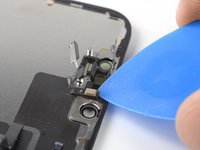
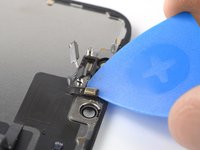
Insert an opening pick under the microphone cable, close to the microphone (the metal rectangle).
-
Slide the opening pick around the perimeter of the microphone to separate its adhesive.
-
-
-
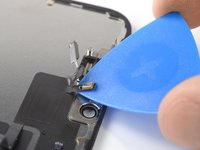
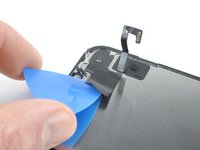
Insert an opening pick under the left side of the front sensor assembly.
-
Slide the pick under the assembly to separate it from the frame.
-
-
Инструмент, используемый на этом этапе:Tesa 61395 Tape$5.99
-
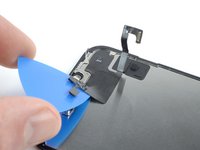
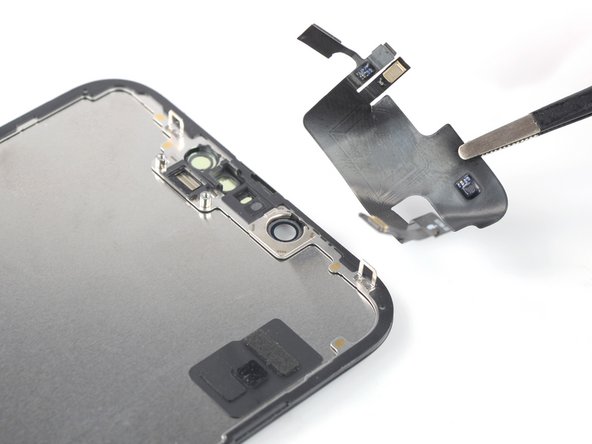
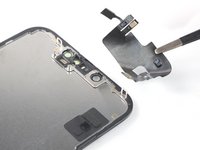
Remove the front sensor assembly.
-
Connect the sensors to their slots in the frame to help align the main section of the assembly.
-
Use Tesa tape to re-adhere any sections of the assembly that are no longer sticky.
-


If possible, turn on your device and test your repair before installing new adhesive and resealing.
To reassemble your device, follow these instructions in reverse order.
After your repair, depending on the replacement part, you may be able to calibrate it using Apple's Repair Assistant, available as of iOS 18. Update your device, navigate to Settings → General →About → Parts & Service History, tap Restart & Finish Repair, and follow the onscreen prompts.
The best way to secure the new screen is to apply a sheet of custom-cut double-sided tape to the frame and place the screen back in its original position.
Take your e-waste to an R2 or e-Stewards certified recycler.
Repair didn’t go as planned? Try some basic troubleshooting, or ask our Answers community for help.
Отменить: Я не выполнил это руководство.
25 человек успешно провели ремонт по этому руководству.

Команду

Tobias Isakeit - Repairability Engineer Участник Tobias Isakeit - Repairability Engineer
Business
1 член
Автор 1 131 руководств
8 Комментариев
great and good job
What about the battery isnt it a risk to connect it like this. Feels like half of the repair job,
Hi atlas Tanko, you're right, normally we recommend disconnecting the battery before replacing the screen. Due to the design of the iPhone 14 and 14 Plus (separate entry methods for screen and battery replacements), we consider it safe in this case. For the iPhone 14 Pro and Pro Max, we still include steps for disconnecting the battery during screen replacements.
Hi
iPhone 14 not showing display after replacement.
Connected old one, still no display.
I have previously discharged battery down, managed to access torch and also let screen on up to 10m at time - even though screen was quite damaged.
I am a 'careful repairer', but of course one can easily short pins of screen connector while trying to fit it, even though I use magnified glasses to see I do it as best as possible.
Any idea, do not know the 14 at all.
Thanks
Hi JoeBlog,
Sorry to hear that you're facing some issues with your repair. How long did you let your phone charge after the repair? Did the device show signs of turning on, like vibration while booting / doing a hard reboot? Does it get recognized when being plugged into a computer? Please also check our troubleshooting resources for the iPhone 14.
you don't disconnect the battery ?
Always disconnect the Battery!
Oliver -
PLEASE remove back first and disconnect battery before taking cables off!! as per Apple instructions
PC Technology Group - Ответить