Введение
Use this guide to replace a faulty logic board in your iPhone 5c.
Выберете то, что вам нужно
Видеообзор
-
-
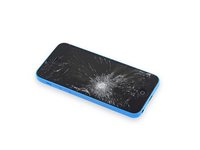
If your display glass is cracked, keep further breakage contained and prevent bodily harm during your repair by taping the glass.
-
Lay overlapping strips of clear packing tape over the iPhone's display until the whole face is covered.
 Спросите у FixBot
-
-
-
Power off your iPhone before beginning disassembly.
-
Remove the two 3.8 mm P2 Pentalobe screws on either side of the Lightning connector.
-
-
-
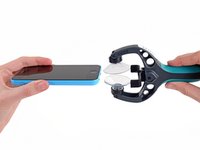
Close the handle on the iSclack, opening the suction-cup jaws.
-
Place the bottom of your iPhone in between the suction cups, against the plastic depth gauge.
-
The top suction cup should rest just above the home button.
-
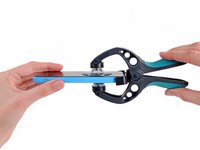
Open the handles to close the jaws of the iSclack. Center the suction cups and press them firmly onto the top and bottom of the iPhone.
-
-
-
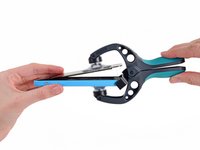
Hold onto your iPhone securely and close the handle of the iSclack to separate the suction cups, pulling the front panel up from the rear case.
-
The iSclack is designed to safely open your iPhone just enough to separate the pieces, but not enough to damage any cables.
-
Skip the next three steps and continue on to Step 8.
-
-
-
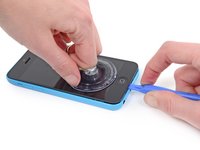
Press a suction cup onto the screen, just above the home button.
-
-
-
While holding the iPhone down with one hand, pull up on the suction cup to slightly separate the front panel assembly from the rear case.
-
With a plastic opening tool, begin to gently pry the rear case down, away from the display assembly, while you pull up with the suction cup.
-
-
-
Pull the plastic nub to release the vacuum seal on the suction cup.
-
Remove the suction cup from the display assembly.
-
-
-
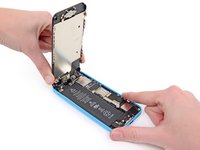
Lift the home button end of the front panel up to gain access to the connectors near the top of the phone.
-
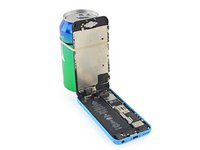
Open the display to about a 90º angle, and lean it against something to keep it propped up while you're working on the phone.
-
In a pinch, you can use an unopened canned beverage to hold the display.
-
Add a rubber band to keep the display securely in place while you work. This prevents undue strain on the display cables.
-
-
-
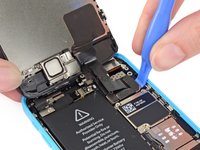
Remove the two 1.6 mm Phillips #000 screws securing the metal battery connector bracket to the logic board.
-
-
-
Use a spudger or a clean fingernail to gently pry the battery connector up from its socket on the logic board.
-
-
-
-
Remove the following Phillips #000 screws securing the front panel assembly cable bracket to the logic board:
-
Two 1.3 mm screws
-
One 1.7 mm screw
-
One 3.25 mm screw
-
-
-
Remove the front panel assembly cable bracket from the logic board.
-
-
-
Use a plastic opening tool or a fingernail to disconnect the front-facing camera and sensor cable connector.
-
-
-
Use a plastic opening tool or a fingernail to disconnect the LCD cable connector.
-
-
-
Remove the front panel assembly from the rear case.
-
-
-
Insert a SIM card eject tool or a paperclip into the small hole in the SIM card tray.
-
Press the SIM card eject tool inwards to eject the tray.
-
This may require a significant amount of force.
-
-
-
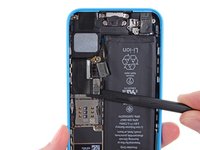
Disconnect the Lightning connector ribbon cable from its socket on the logic board.
-
-
-
The Lightning connector cable is lightly adhered to a shield on the logic board. Use the flat end of a spudger to gently peel the cable up.
-
-
-
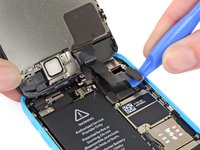
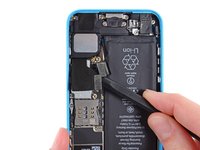
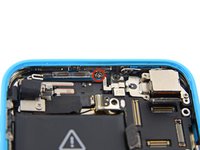
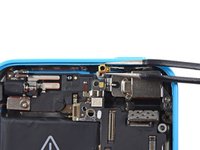
Disconnect the antenna connector from the base of the logic board.
-
-
-
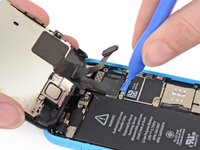
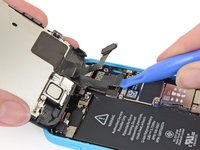
Use the flat end of a spudger to disconnect the audio control cable connector from its socket on the logic board.
-
-
-
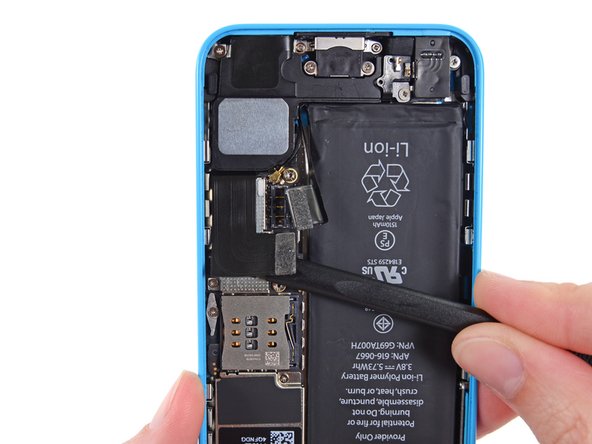
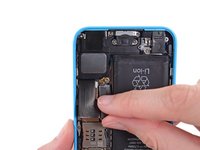
Disconnect the rear facing camera cable connector from its socket on the logic board.
-
-
Инструмент, используемый на этом этапе:Tweezers$4.99
-
A small piece of tape may obscure the logic board grounding clip. If so, use a pair of tweezers to remove the tape.
-
-
Инструмент, используемый на этом этапе:Standoff Screwdriver for iPhones$5.49
-
Remove the following screws securing the logic board to the rear case:
-
Two 2.3 mm Phillips screws
-
Three 2.7 mm standoff screws
-
One 2.5 mm Phillips #000 screw
-
-
-
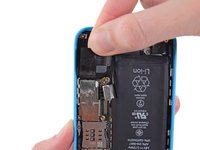
Remove the 1.2 mm Phillips #000 screw securing the grounding clip to the top side-wall.
-
Use tweezers to remove the logic board grounding clip.
-
-
-
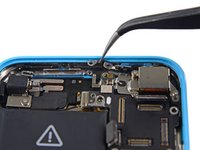
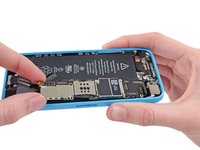
Use a plastic opening tool to gently lift the lower end of the logic board up from the rear case enough for you to grab it with your fingers.
-
-
-
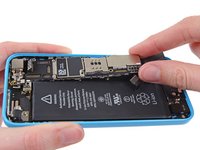
Pull the logic board away from the rear-facing camera just enough to expose the gold contact cap under the top end of the board.
-
-
-
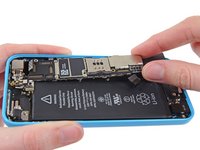
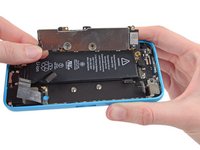
Flip the logic board up toward the volume control buttons to expose the antenna connector.
-
-
-
Disconnect the antenna connector from the back of the logic board.
-


To reassemble your device, follow these instructions in reverse order.
Отменить: Я не выполнил это руководство.
146 человек успешно провели ремонт по этому руководству.


14 Комментарии к руководству
Would a logic board swap be easier than a battery swap between 2 iPhone 5C's? ?
A battery swap would be significantly easier! Here's the battery replacement guide. =)
While I was repairing my phone, I guess the part where I didn't go around was taking out the battery because it felt like it was the more fragile part. This was because I did not have the proper equipment to take it away. This guide was pretty helpful for me in reconnecting cables.
Anyway, I am bothered that as I took out the logic board, there was this golden thing that just slid out of place. It slid from the top portion of the phone, but I do not know where it was originally and I do not know how it was supposed to be placed. It looked like an open box of sorts (but only had 3 sides bent up) and had a hole in the middle. It would be great if anyone would know where it could be placed so I could put back my phone.
Look at step 29 :)
Where i can buy this board for iphone5c