
Alienware 15 R3 Hard Drive Replacement
Введение
Перейти к шагу 1Use this guide to solve the Blue Screen of Death of Alienware 15 R3 which usually occurs when booting.
Alienware 15 R3 failed to properly read the SSD containing system files when booting resulting the Blue Screen of Death. Changing the booting option in BIOS will not help to solve the problem. Therefore, replacing the hard drive from Alienware 15 R3 is the most effective solution.
I recommend backup important files in your hard drive before repairing.
Выберете то, что вам нужно
Наборы для ремонта
Эти комплекты содержат все детали и инструменты, используемые в руководстве.


Запчасти


Инструменты


Показать больше…
-
-
Find Power in start menu and click Shut Down to turn off your Alienware 15 R3.
-
Wait a few seconds until all the lights around are off.
-
Unplug the power supply.
-
-
-
Remove the seven M2.5x13 screws from the base cover.
-
Remove the base cover carefully.
-
-
-
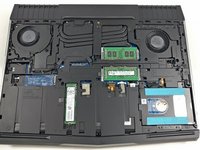
Remove the two M3x3 screws that are holding the bracket and one M2.5x8 screw holding the hard drive assembly .
-
Remove the hard drive from the laptop.
-
-
-
Put bottom plate back on your laptop and secure the bottom plate with the screws removed previously.
-


By removing the HDD from the laptop, BSOD will never happen again when you boot the laptop. Please note that, the storage space than it was in the past.
By removing the HDD from the laptop, BSOD will never happen again when you boot the laptop. Please note that, the storage space than it was in the past.
Отменить: Я не выполнил это руководство.
Еще один человек закончил это руководство.
Команду

York University, Team S1-G1, O'Regan Fall 2021 Участник York University, Team S1-G1, O'Regan Fall 2021
YORK-O'REGAN-F21S1G1
1 член
Автор 1 руководств