
Asus Chromebook C523N Battery Replacement
Введение
Перейти к шагу 1If the Asus Chromebook C523N battery life is extremely short, the unit will not charge, or turn on use this guide to replace the battery.
Before using this guide, check to make sure that the laptop will not charge and that the charger is working.
To begin replacing the battery, make sure that the laptop is powered off and disconnected from any power source.
Выберете то, что вам нужно


-
-
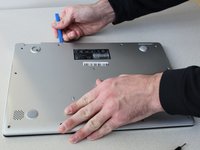
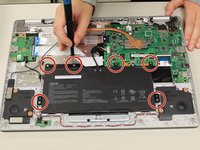
Remove the four 0.5mm JIS #00 screws from the bottom edge of the Chromebook and one in the center.
-
Remove the six 1.7mm JIS #00 screws from the sides and top edge of the Chromebook.
-
-
-
Using a spudger, lift the top left base pad and remove it to reveal a final screw underneath.
-
Remove the one 0.5mm JIS #00 screw underneath the base pad.
-
-
-
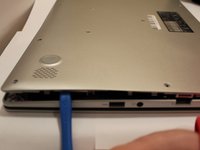
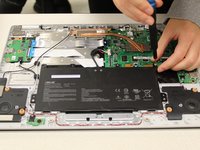
Use an opening tool to gently pry the base enclosure up and remove from the laptop.
-
-
-
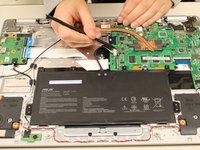
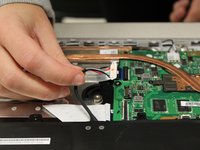
To disconnect the cable, use the tip of a spudger or your fingernail to flip up the small locking flap.
-
Gently disconnect the battery cable from the motherboard.
-


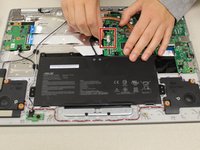


To reassemble your device, follow these instructions in reverse order.
To reassemble your device, follow these instructions in reverse order.
Отменить: Я не выполнил это руководство.
9 человек успешно провели ремонт по этому руководству.
Команду

Grand Valley State University, Team S4-G2, DeVasto Fall 2019 Участник Grand Valley State University, Team S4-G2, DeVasto Fall 2019
GVSU-DEVASTO-F19S4G2
4 членов
Автор 6 руководств
3 Комментариев
Hi, thank you for this tutorial.
I’ve tried to remove the battery myself but I’ve made a mistake on step 4 while trying to disconnect the cord from the motherboard. By pushing too hard, i’ve unsoldered from the motherboard the black item the cord plugs into. Do you think it can be soldered back by a professional ? If not, can it be replaced ? Thanks in advance,
Hi, the %#*@ same thing happened to me too. Could u solve it with a professional?
Regards
Hey, I replaced the battery is a new one, but when I plug it in the orange light starts flashing but the laptop does start and when I plug in the charger it keeps flashing. Don't know what the problem is. It did work without a battery for a while because I had to order it, can someone help?