Перейти к основному содержанию
/
Мой рабочий стол для верстки руководств

Получите быстрый доступ к руководствам, запчастям и ответам касательно ваших устройств

Asus MeMO Pad 8 ME181C Battery Replacement

Asus MeMO Pad 8 ME181C Battery Replacement

Amy Clarke

Amy Clarke и 5 другие участники

Последнее обновление September 2, 2018

2 - 3 минут
Средне
Руководство, предоставленное сообществом

Use this guide to replace a faulty battery in you ASUS MeMO Pad 8.

Выберете то, что вам нужно

Инструменты

  • iFixit Opening Tool
    iFixit Opening Tool
  • Spudger
    Spudger
  1. Asus MeMO Pad 8 ME181C Battery Replacement, Rear Case: шаг 1, изображение 1 из 2 Asus MeMO Pad 8 ME181C Battery Replacement, Rear Case: шаг 1, изображение 2 из 2
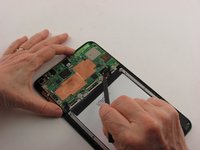
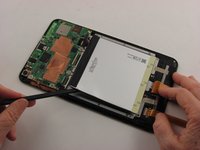
    • Insert a plastic opening tool into the seam between the rear case and the screen.

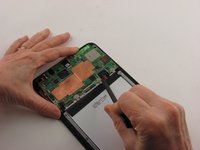
    • Work the plastic opening tool around the perimeter of the device to completely remove the rear case.

  2. Asus MeMO Pad 8 ME181C Battery Replacement, Battery: шаг 2, изображение 1 из 3 Asus MeMO Pad 8 ME181C Battery Replacement, Battery: шаг 2, изображение 2 из 3 Asus MeMO Pad 8 ME181C Battery Replacement, Battery: шаг 2, изображение 3 из 3
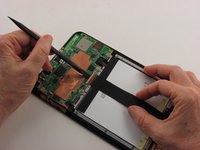
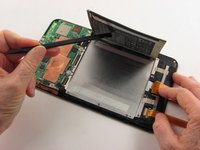
    • Use the flat end of the nylon spudger to flip up the retaining flap of the Zero Insertion Force (ZIF) connector holding the orange motherboard ribbon cable in place.

  3. Asus MeMO Pad 8 ME181C Battery Replacement: шаг 3, изображение 1 из 2 Asus MeMO Pad 8 ME181C Battery Replacement: шаг 3, изображение 2 из 2
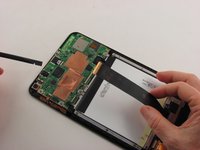
    • Use the flat end of the nylon spudger to flip up the retaining flap of the ZIF connector holding the black motherboard ribbon cable in place.

  4. Asus MeMO Pad 8 ME181C Battery Replacement: шаг 4, изображение 1 из 2 Asus MeMO Pad 8 ME181C Battery Replacement: шаг 4, изображение 2 из 2
    • Use the pointed end of the nylon spudger to pop up the battery connector.

    • When reconnecting the battery cable after replacing the battery, press the battery connector with your finger until it clicks into place.

  5. Asus MeMO Pad 8 ME181C Battery Replacement: шаг 5, изображение 1 из 2 Asus MeMO Pad 8 ME181C Battery Replacement: шаг 5, изображение 2 из 2
    • Use the flat end of the nylon spudger to pry up the battery.

    • The battery is secured with adhesive. Some force is required to detach battery from the device.

    • If removing motherboard is necessary, it may be easier complete this step with the motherboard simultaneously later.

Заключение

To reassemble your device, follow these instructions in reverse order.

7 человек успешно провели ремонт по этому руководству.

Amy Clarke

Участник с: 05/05/16

223 Репутация

Автор 2 руководств

Команду

iFixit, Team 1-1, Wacker Spring 2016 Участник iFixit, Team 1-1, Wacker Spring 2016

FIX-WACKER-S16S1G1

3 членов

Автор 4 руководств

2 Комментариев

Great instructions and easy disassembly/reassembly. Photos really helped!

Joe Martin - Ответить

The time and difficulty for doing this and the me176cx should be the same.

P Schmied - Ответить

Добавить комментарий

Статистика просмотров:

За последние 24 час(ов): 0

За последние 7 дней: 3

За последние 30 дней: 8

За всё время: 5,279