
Asus MeMO Pad 8 ME181C Rear Facing Camera Replacement
Введение
Перейти к шагу 1Due to the nature of the component being replaced be sure to wear appropriate gloves to avoid getting any skin based oils or residues onto the camera lens as these will inhibit the lens from functioning properly. As well be careful removing and connecting the ribbon wires as they are very fragile and internal breakages of the wire can lead to the camera being broken as well as other components being damaged.
Выберете то, что вам нужно
Инструменты


Показать больше…
-
-
Insert a plastic opening tool into the seam between the rear case and the screen.
-
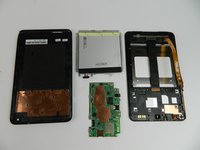
Work the plastic opening tool around the perimeter of the device to completely remove the rear case.
-
-
-
Working from top to bottom, you will remove all screws with a #000 Phillips head driver, (20) total.
-
(2) screws located in the top corners. NOTE: These screws will be in the speakers.
-
(4) screws located along the top of the battery, (3) along each side of the battery, and (3) along the bottom of the battery.
-
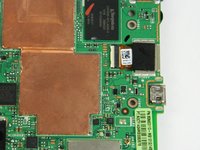
(1) screw in the middle of the motherboard on the side with the orange ribbon cable, (4) screws in the bottom of the motherboard .
-
-
-
Make sure that the battery is disconnected from the motherboard by unplugging the ribbon cables.
-
-
Инструмент, используемый на этом этапе:Tweezers$4.99
-
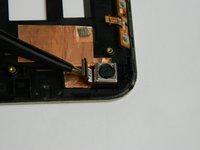
Before you remove the entire assembly, first unplug side buttons and cameras from the motherboard using tweezers.
-
-
-
While the device is open, this is your opportunity to check and see if there is any other damage to the motherboard or other associated parts.
-


To reassemble your device, follow these instructions in reverse order.
To reassemble your device, follow these instructions in reverse order.
Команду

USF Tampa, Team 5-6, Lacy Fall 2016 Участник USF Tampa, Team 5-6, Lacy Fall 2016
USFT-LACY-F16S5G6
3 членов
Автор 6 руководств