Перейти к основному содержанию
/
Мой рабочий стол для верстки руководств

Получите быстрый доступ к руководствам, запчастям и ответам касательно ваших устройств

Battery Disconnect

Battery Disconnect

Thomas Boland

Thomas Boland и еще один участник

Последнее обновление December 29, 2020

15 - 30 минут
Средне
Руководство, предоставленное сообществом

Prereq for disconnecting the battery of your Samsung Galaxy A10e.

Выберете то, что вам нужно

Запчасти

Инструменты

Показать больше…

  1. Battery Disconnect, SIM Card: шаг 1, изображение 1 из 2 Battery Disconnect, SIM Card: шаг 1, изображение 2 из 2
    • Insert a SIM card eject tool, bit, or a straightened paperclip into the small hole in the SIM card tray.

    • Press to eject the tray.

  2. Battery Disconnect: шаг 2, изображение 1 из 2 Battery Disconnect: шаг 2, изображение 2 из 2
    • Remove the SIM card tray from the phone.

    • The SIM card(s) and SD card will fall out of the tray easily.

    • When reinserting the tray, ensure the SIM card and SD card are in the correct slots and oriented correctly.

    • For dual-SIM versions of this phone, there may be two SIM cards. Ensure the SIM cards are placed in the slots corresponding to the correct phone lines.

  3. Battery Disconnect, Back Cover: шаг 3, изображение 1 из 1
    • The back cover is held in place by plastic clips.

    • Insert an opening pick between the screen and the back cover on the bottom of the phone where the charging port is located.

  4. Battery Disconnect: шаг 4, изображение 1 из 1
    • Slide the opening pick to the bottom left corner to release the clips.

  5. Battery Disconnect: шаг 5, изображение 1 из 1
    • Slide the opening pick along the left edge to the top left corner of the phone, to release the clips.

  6. Battery Disconnect: шаг 6, изображение 1 из 1
    • Slide the opening pick from the top left corner to the top right corner to release the plastic clips.

  7. Battery Disconnect: шаг 7, изображение 1 из 1
    • Slide the opening pick from the top right corner to the bottom right corner to release the remaining clips.

  8. Battery Disconnect: шаг 8, изображение 1 из 1
    • Remove the back cover.

  9. Battery Disconnect, Motherboard Cover: шаг 9, изображение 1 из 1
    • Remove screws from the motherboard antenna cover.

    • 3 Phillips #00, 3mm length.

  10. Battery Disconnect: шаг 10, изображение 1 из 1
    Инструмент, используемый на этом этапе:
    Tweezers
    $4.99
    • Use the tip of a spudger or tweezers to remove the antenna cover.

  11. Battery Disconnect: шаг 11, изображение 1 из 1
    • Remove screws from the motherboard cover.

    • 3 Phillips #00, 3mm length

  12. Battery Disconnect: шаг 12, изображение 1 из 1
    • Use the tip of a spudger or tweezers to remove the motherboard cover.

  13. Battery Disconnect, Battery Disconnect: шаг 13, изображение 1 из 2 Battery Disconnect, Battery Disconnect: шаг 13, изображение 2 из 2
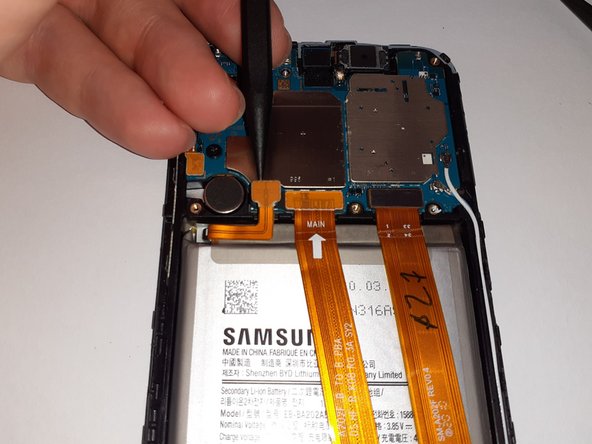
    • Use a spudger to disconnect the battery by prying the connector straight up from its socket.

  14. Battery Disconnect: шаг 14, изображение 1 из 1
    • Gently flex the battery connector away from its socket.

Заключение

To reassemble your device, follow these instructions in reverse order.

6 человек успешно провели ремонт по этому руководству.

Thomas Boland

Участник с: 09/29/20

1 818 Репутация

Автор 5 руководств

2 Комментариев

Do I need to heat up the screen of my phone to make it easier for me to get the back cover off of my phone?

Pifase - Ответить

no, it just clips on, there's no adhesive

Ely Wickander -

Добавить комментарий

Статистика просмотров:

За последние 24 час(ов): 0

За последние 7 дней: 3

За последние 30 дней: 26

За всё время: 2,410