Перейти к основному содержанию
/
Мой рабочий стол для верстки руководств

Получите быстрый доступ к руководствам, запчастям и ответам касательно ваших устройств

Black and Decker Dustbuster HNVC115J22 Motor Replacement

Black and Decker Dustbuster HNVC115J22 Motor Replacement

Ethan Hemstreet

Ethan Hemstreet и 2 другие участники

Последнее обновление December 20, 2021

10 - 15 минут
Легко

This guide shows users how to replace the motor in the Black and Decker Dustbuster Handheld Vacuum (Model No. HNVC115J22 ). If your vacuum doesn’t run and you suspect the motor is the problem, you could replace it. Replacing the motor may restore suction power back to your device; make sure that another part is not at fault instead of the motor before replacing it. This device contains a lithium battery, so be careful not to short it or damage it. A new motor will need to be purchased for this guide.

Выберете то, что вам нужно

Инструменты

Показать больше…

  1. Black and Decker Dustbuster HNVC115J22 Motor Replacement, Motor: шаг 1, изображение 1 из 2 Black and Decker Dustbuster HNVC115J22 Motor Replacement, Motor: шаг 1, изображение 2 из 2
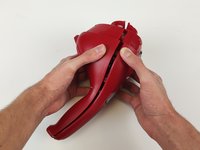
    • Press the button above the dustbin and separate the dustbin from the handle.

  2. Black and Decker Dustbuster HNVC115J22 Motor Replacement: шаг 2, изображение 1 из 1
    • Remove five screws from the handle using a Phillips #1 screwdriver.

  3. Black and Decker Dustbuster HNVC115J22 Motor Replacement: шаг 3, изображение 1 из 2 Black and Decker Dustbuster HNVC115J22 Motor Replacement: шаг 3, изображение 2 из 2
    • Pry open the two halves of the case.

  4. Black and Decker Dustbuster HNVC115J22 Motor Replacement: шаг 4, изображение 1 из 2 Black and Decker Dustbuster HNVC115J22 Motor Replacement: шаг 4, изображение 2 из 2
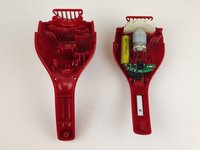
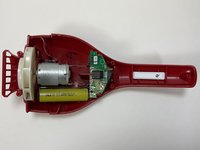
    • Lift the motor and circuitry out of the plastic casing using your hands.

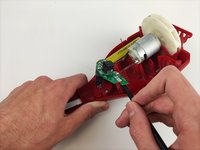
    • Pry out the PCB using a nylon spudger.

  5. Black and Decker Dustbuster HNVC115J22 Motor Replacement: шаг 5, изображение 1 из 1
    • Separate the motor leads from the PCB with a pair of needle nose pliers.

    • Be careful not to break the new motor leads as they can be fragile.

  6. Black and Decker Dustbuster HNVC115J22 Motor Replacement: шаг 6, изображение 1 из 1
    • Using a pair of pliers, insert the metal prongs of the new motor into the PCB.

Заключение

To reassemble your device, follow these instructions in reverse order.

Еще один человек закончил это руководство.

Ethan Hemstreet

Участник с: 09/08/21

172 Репутация

1 руководство автора

Команду

0 Комментариев

Добавить комментарий

Статистика просмотров:

За последние 24 час(ов): 0

За последние 7 дней: 3

За последние 30 дней: 14

За всё время: 742