
Dell Inspiron 15-5559 Hard Drive Replacement
Введение
Перейти к шагу 1Before you begin, make sure that your device is disconnected from any power sources and be sure that the battery has been removed. You'll need a Phillips #1 screwdriver and a black nylon spudger to complete this guide.
Выберете то, что вам нужно
Наборы для ремонта
Эти комплекты содержат все детали и инструменты, используемые в руководстве.


Запчасти


Инструменты


Показать больше…
-
-
Use a Phillips #1 screwdriver to remove the two 2.5x8mm screws on the back panel.
-
-
-
Place the plastic spudger in the slot. Using the flat side of the spudger pry the back panel upward and off.
-
-
-
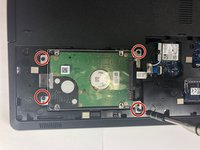
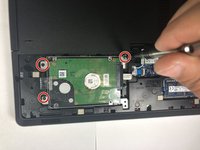
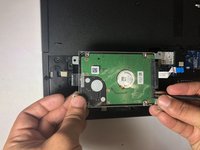
Remove each of the four (4) 2.5x8mm screws that anchor the hard drive using a Phillips #1 screwdriver.
-
-
-
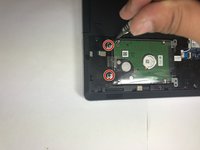
Use the plastic spudger to remove the hard drive conductive tape by lifting the black clasp holding it down, then pulling the conductive tape toward the left to remove it.
-
-
-
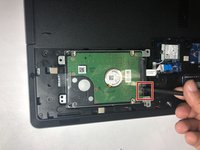
Place the plastic spudger underneath the hard drive at the indicated position.
-
Use the spudger along with your other hand to gently remove the hard drive.
-


To reassemble your device, follow these instructions in reverse order.
To reassemble your device, follow these instructions in reverse order.
Отменить: Я не выполнил это руководство.
4 человек успешно провели ремонт по этому руководству.
Команду

Baylor, Team S5-G5, Williams Spring 2018 Участник Baylor, Team S5-G5, Williams Spring 2018
BU-WILLIAMS-S18S5G5
3 членов
Автор 5 руководств
2 Комментариев
The blue part came off is that important?
can i put this in a harddrive enclosure?