Перейти к основному содержанию
/
Мой рабочий стол для верстки руководств

Получите быстрый доступ к руководствам, запчастям и ответам касательно ваших устройств

Dell Inspiron 15-5559 Keyboard Replacement

Dell Inspiron 15-5559 Keyboard Replacement

Martin Lechuga

Martin Lechuga и 4 другие участники

Последнее обновление May 30, 2023

9 - 10 минут
Средне

Before beginning, you should make sure that your laptop is not connected to a power source and that the battery has been removed.

Выберете то, что вам нужно

Запчасти

Инструменты

  • Spudger
    Spudger

Показать больше…

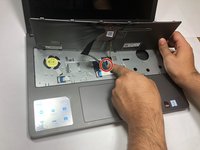
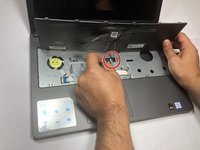
  1. Dell Inspiron 15-5559 Keyboard Replacement, Keyboard: шаг 1, изображение 1 из 3 Dell Inspiron 15-5559 Keyboard Replacement, Keyboard: шаг 1, изображение 2 из 3 Dell Inspiron 15-5559 Keyboard Replacement, Keyboard: шаг 1, изображение 3 из 3
    • Use the metal spudger to pry the keyboard off. Do this by inserting the spudger into each of the five indicated slots at the top of the keyboard and gently pulling up on the keyboard with the spudger. Do not be afraid to use a bit of muscle to remove the keyboard, as it takes a bit of force to remove

  2. Dell Inspiron 15-5559 Keyboard Replacement: шаг 2, изображение 1 из 1
    • Once you have pried the keyboard off with the spudger, lift the keyboard upward with you hands.

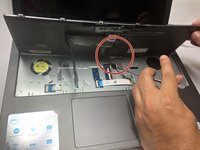
    • It is important to note that the keyboard is still attached to the device with two flat connective cables. It is important that you gently remove the keyboard to prevent damaging the cables.

  3. Dell Inspiron 15-5559 Keyboard Replacement: шаг 3, изображение 1 из 2 Dell Inspiron 15-5559 Keyboard Replacement: шаг 3, изображение 2 из 2
    • Once the keyboard has been lifted you will notice two conductive tape cables. one large and one small.

  4. Dell Inspiron 15-5559 Keyboard Replacement: шаг 4, изображение 1 из 2 Dell Inspiron 15-5559 Keyboard Replacement: шаг 4, изображение 2 из 2
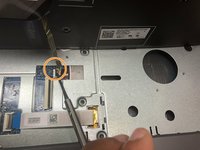
    • Disconnect the smaller of the two flat conductive tape cables.

    • Place a metal spudger on the end of the cable that is connected to the laptop and use it to lift the black clasp holding the tape down, then pull the cable out toward the right. Repeat for the second larger piece of conductive tape.

    • You should remove this flat connective cable with care to prevent damaging it.

Заключение

To reassemble your device, follow these instructions in reverse order.

4 человек успешно провели ремонт по этому руководству.

Martin Lechuga

Участник с: 03/18/18

183 Репутация

1 руководство автора

Команду

Baylor, Team S5-G5, Williams Spring 2018 Участник Baylor, Team S5-G5, Williams Spring 2018

BU-WILLIAMS-S18S5G5

3 членов

Автор 5 руководств

0 Комментариев

Добавить комментарий

Статистика просмотров:

За последние 24 час(ов): 3

За последние 7 дней: 10

За последние 30 дней: 39

За всё время: 3,147