Перейти к основному содержанию
/
Мой рабочий стол для верстки руководств

Получите быстрый доступ к руководствам, запчастям и ответам касательно ваших устройств

HP Slate 7 4601 Charging Port Replacement

HP Slate 7 4601 Charging Port Replacement

Raj Parekh

Raj Parekh и 5 другие участники

Последнее обновление October 3, 2018

10 - 20 минут
Средне

One of the most frustrating things that can happen to your tablet is the inability for it to charge; the tablet is practically useless if you're unable to charge it. This guide will breakdown all the necessary steps to ensure that you're able to charge life into your tablet. In this guide, you will be removing the following:

  1. Back Cover
  2. Battery
  3. Charging Port

Prepare your required tools, a new charging port for your tablet, and set aside about 10 to 20 minutes to delve into the inner workings of your HP Slate.

Выберете то, что вам нужно

Инструменты

  • Phillips #00 Screwdriver
    Phillips #00 Screwdriver
  • Spudger
    Spudger
  • T4 Torx Screwdriver
    T4 Torx Screwdriver

Показать больше…

  1. HP Slate 7 4601 Charging Port Replacement, Battery: шаг 1, изображение 1 из 2 HP Slate 7 4601 Charging Port Replacement, Battery: шаг 1, изображение 2 из 2
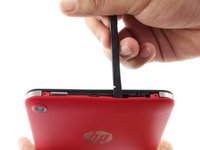
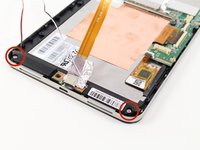
    • Begin your replacement by using a T3 or T4 Torx screwdriver.

    • Remove the two 1.4mm x 3mm Torx Head screws at the top of the device.

  2. HP Slate 7 4601 Charging Port Replacement: шаг 2, изображение 1 из 2 HP Slate 7 4601 Charging Port Replacement: шаг 2, изображение 2 из 2
    • With the pointed end of the spudger, remove the thin metal band.

    • It is easiest to remove the metal band through the headphone opening.

  3. HP Slate 7 4601 Charging Port Replacement: шаг 3, изображение 1 из 2 HP Slate 7 4601 Charging Port Replacement: шаг 3, изображение 2 из 2
    • Using the flat end of the spudger, pry back the rear plastic cover.

    • As you work your way around the edge, several "pop" noises will be made. These noises are caused by the plastic clips coming undone.

  4. HP Slate 7 4601 Charging Port Replacement: шаг 4, изображение 1 из 1
    • Remove the rear cover.

  5. HP Slate 7 4601 Charging Port Replacement: шаг 5, изображение 1 из 1
    • Locate and remove the yellow tape covering the red and white speaker wires.

  6. HP Slate 7 4601 Charging Port Replacement: шаг 6, изображение 1 из 2 HP Slate 7 4601 Charging Port Replacement: шаг 6, изображение 2 из 2
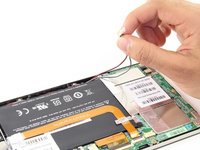
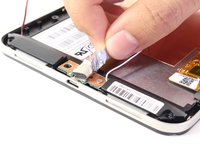
    • Using the pointed end of the spudger, push both sides of the speaker wire connector out of its base.

    • Push the same amount on both sides of the connector to avoid jamming or twisting its metal pins.

    • Do not yank or pull on the speaker wires, since they are fragile. Only push on the white connector.

  7. HP Slate 7 4601 Charging Port Replacement: шаг 7, изображение 1 из 1
    • Gently pull back the foil covering the gold charging port ribbon.

  8. HP Slate 7 4601 Charging Port Replacement: шаг 8, изображение 1 из 2 HP Slate 7 4601 Charging Port Replacement: шаг 8, изображение 2 из 2
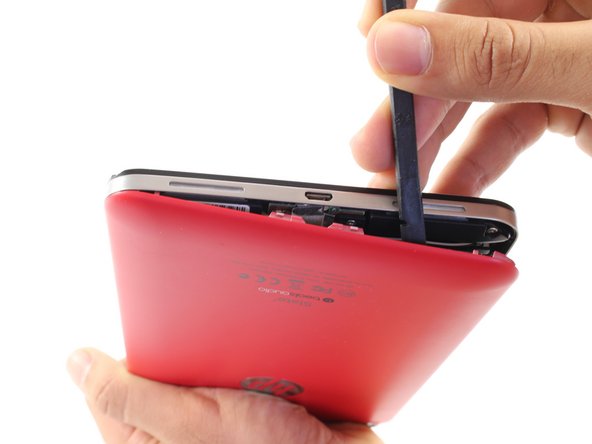
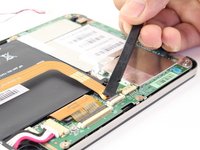
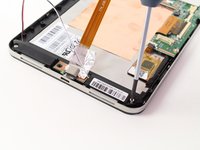
    • Using the flat end of the spudger, lift up the black panel covering the charging port connector.

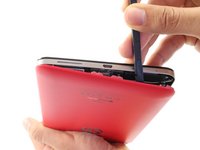
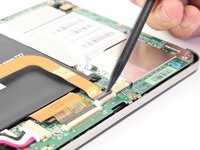
    • Gently slide the charging port ribbon out from its housing.

    • It may be easier to use the pointed end of the spudger than your fingers.

  9. HP Slate 7 4601 Charging Port Replacement: шаг 9, изображение 1 из 1
    • Lift gold charging strip away from the battery.

  10. HP Slate 7 4601 Charging Port Replacement: шаг 10, изображение 1 из 2 HP Slate 7 4601 Charging Port Replacement: шаг 10, изображение 2 из 2
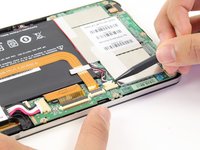
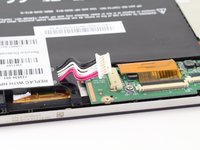
    • Push the white battery connector out of its housing using the pointed end of the spudger.

  11. HP Slate 7 4601 Charging Port Replacement: шаг 11, изображение 1 из 1
    • Using the #00 Phillips Head screwdriver, remove the 5 screws holding the battery in place.

    • The four 1.75mm x 3mm silver Phillips Head screws circled in red are interchangeable.

    • The black 1.75mm x 4mm Phillips Head screw must go back to the same spot during reassembly.

  12. HP Slate 7 4601 Charging Port Replacement: шаг 12, изображение 1 из 1
    • Lift battery out of its place and set aside.

  13. HP Slate 7 4601 Charging Port Replacement, Charging Port: шаг 13, изображение 1 из 2 HP Slate 7 4601 Charging Port Replacement, Charging Port: шаг 13, изображение 2 из 2
    • To free the speaker assembly, you will need a #00 Phillips Head screwdriver.

    • Remove the two 1.75mm x 3mm Phillips Head screws from the speaker assembly.

  14. HP Slate 7 4601 Charging Port Replacement: шаг 14, изображение 1 из 2 HP Slate 7 4601 Charging Port Replacement: шаг 14, изображение 2 из 2
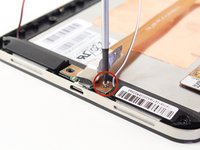
    • Pull back the foil overlapping the charging port to reveal another 1.75mm x 3mm Phillips Head screw.

    • Remove the screw with a #00 Phillips Head screwdriver.

  15. HP Slate 7 4601 Charging Port Replacement: шаг 15, изображение 1 из 1
    • Lift the charging port and set it aside.

Заключение

To reassemble your device, follow these instructions in reverse order.

34 человек успешно провели ремонт по этому руководству.

Raj Parekh

Участник с: 04/14/14

535 Репутация

1 руководство автора

Команду

Cal Poly, Team 13-30, Maness Spring 2014 Участник Cal Poly, Team 13-30, Maness Spring 2014

CPSU-MANESS-S14S13G30

3 членов

Автор 8 руководств

15 Комментариев

where do you get the replacement parts for charging port

Scott Winstone - Ответить

Since HP does not supply the replacement ribbon, or many other parts for that matter, it is easiest to search on eBay and/or Craigslist for the parts needed. I found that the UK version of Amazon and eBay offer the best availability for such parts.

Zachary -

I had to stop at Step 1. The T4 Torx screwdriver is too big.

stevwatsn - Ответить

My apologies for the incorrect sizing of the Torx driver; please use a T3 sized driver, as it is the next size down from the T4.

Zachary -

do you have a product number for the charger strip?

Courtney - Ответить

Добавить комментарий

Статистика просмотров:

За последние 24 час(ов): 1

За последние 7 дней: 1

За последние 30 дней: 12

За всё время: 48,033