Перейти к основному содержанию
/
Мой рабочий стол для верстки руководств

Получите быстрый доступ к руководствам, запчастям и ответам касательно ваших устройств

Holmes HEH8031 Thermostat Replacement

Holmes HEH8031 Thermostat Replacement

Richard S Woodruff

Richard S Woodruff и 2 другие участники

Последнее обновление September 6, 2023

3 мин.
Легко
Пропущенные шаги

This guide shows step by step instructions for replacement of the thermostat assembly in the Holmes HEH8031 heater.

Выберете то, что вам нужно

iFixit получает комиссию, когда вы совершаете покупку по этим ссылкам.
  1. Holmes HEH8031 Thermostat Replacement, Housing: шаг 1, изображение 1 из 1
    • Ensure the device is unplugged from the wall outlet.

  2. Holmes HEH8031 Thermostat Replacement: шаг 2, изображение 1 из 1
    • Remove eight 12-mm Phillips #2 screws from the back cover.

  3. Holmes HEH8031 Thermostat Replacement: шаг 3, изображение 1 из 2 Holmes HEH8031 Thermostat Replacement: шаг 3, изображение 2 из 2
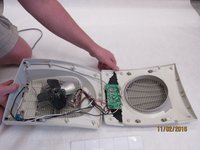
    • Turn heater over so the controls are facing up.

    • Lift the front housing away from the back of the fan and slowly fold the front housing back down to the floor.

    • Internal wires are connected to both halves of the housing. Be careful when separating the housing.

  4. Holmes HEH8031 Thermostat Replacement, Circuit Board Removal: шаг 4, изображение 1 из 1
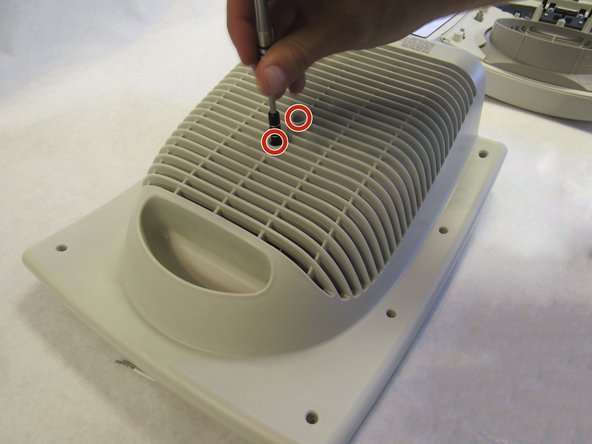
    • Remove four 12mm Phillips #2 screws from the circuit board.

  5. Holmes HEH8031 Thermostat Replacement, Fan: шаг 5, изображение 1 из 1
    • Remove two Phillips #2 12mm screws from housing

  6. Holmes HEH8031 Thermostat Replacement: шаг 6, изображение 1 из 1
    • Remove zip tie from wire with pliers

  7. Holmes HEH8031 Thermostat Replacement: шаг 7, изображение 1 из 1
    • Separate fan assembly from heating coil

  8. Holmes HEH8031 Thermostat Replacement, Thermostat: шаг 8, изображение 1 из 1
    • Remove 1 Phillips #2 screw

  9. Holmes HEH8031 Thermostat Replacement: шаг 9, изображение 1 из 1
    • Remove thermostat from rear housing

  10. Holmes HEH8031 Thermostat Replacement: шаг 10, изображение 1 из 1
    • remove solder from thermostat wire on circuit board

    • Soldering iron will be hot

Заключение

To reassemble your device, follow these instructions in reverse order.

Еще один человек закончил это руководство.

Richard S Woodruff

Участник с: 10/12/16

142 Репутация

1 руководство автора

Команду

IUPUI, Team 2-1, Baechle Fall 2016 Участник IUPUI, Team 2-1, Baechle Fall 2016

IUPUI-BAECHLE-F16S2G1

4 членов

Автор 16 руководств

0 Комментариев

Добавить комментарий

Статистика просмотров:

За последние 24 час(ов): 0

За последние 7 дней: 2

За последние 30 дней: 7

За всё время: 1,381