
How to Reattach Shoe Sole

Введение
Перейти к шагу 1When the sole detaches from a shoe, it drastically shortens the lifespan and renders the pair of shoes immediately unwearable. Securely re-attaching the soles will help you get the full value out of a pair of shoes.
Выберете то, что вам нужно

-
-
Pull the separated sole away from the bottom of the shoe.
-
Clean the bottom surface of the shoe with a cleaning wipe.
-
-
-
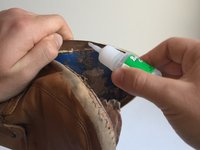
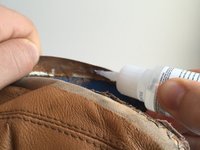
Apply a thin bead of glue along the top edge of the sole and across the interior surface of the sole.
-
-
-
Push the sole back to its original position on the bottom of the shoe.
-
Hold the shoe and sole together for 30 seconds.
-


Отменить: Я не выполнил это руководство.
25 человек успешно провели ремонт по этому руководству.

Команду

Michigan Tech, Team 1-19, Lauer Spring 2016 Участник Michigan Tech, Team 1-19, Lauer Spring 2016
MTU-LAUER-S16S1G19
1 член
Автор 7 руководств
7 Комментариев
Thank you! I have a pair of shoes of a brand i have never seen, Just love the uniqueness of them and want to make them wearable.
I have not yet attempted to repair the sole separation on the completely separated soles of the lady's boots I was hoping to. I was looking for guidance here. Yet even the instructions on the glue package tell me it needs 8-12 hours of pressured curing to correctly complete this repair. So if you meant to leave the last step of this tutorial to be “Hold the shoe and sole together for 30 seconds" which is the last step available gor viewing, then at least explain the contradiction.
I imagine its hold for 30 seconds, the leave for 8 to 12 hours.
Any gluing procedure almost always is more successful when clamped, weighted for at least 12 hours!
what’s the hurry? you can’t use it anyways! This includes leather, plastic, wood, fabric or whatever!
jim.
I would estimate a job like this a little longer. No need to rush this part, it's the most important asset to footwear. Its responsible for the function/use, comfortabilty, form, strength and durability. So this must be done efficiently and effectively.
I advise pulling apart the soles until you meet where they are joined. Starting from this point is best. Just observe the faces of the two soles and clean away any dirt and debris. Be sure to allow the footwear to dry before continuing with adhesive. Use a strong and durable adhesive to bond the two soles together. Be careful as some adhesives tend to swell after curing and this can cause discomfort and render footwear useless. Completely cover the face of both soles. Dont worry about excess just wipe away as you squeeze them together and hold. Be sure to clamp footwear soles for the duration of the curing process to prevent and leaks cracks. Then finish off with water/stain repellent to repel moisture and increase the life of the glue repair.