
Installing iMac Intel 21.5" EMC 2308 Dual Drive

Введение
Перейти к шагу 1There are many benefits to adding a second drive to your iMac such as improved speeds, greater storage space, and less heartache when installing new software. Use this guide to install one using our optical bay drive enclosure.
Выберете то, что вам нужно


-
Инструмент, используемый на этом этапе:Heavy-Duty Suction Cups (Pair)$14.95
-
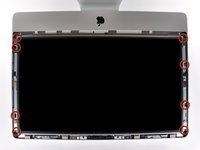
Stick a suction cup near each of the two top corners of the glass panel.
-
If your suction cups refuse to stick, try cleaning both the glass panel and the suction cup with a mild solvent.
-
-
-
Gently lift the glass panel perpendicular to the face of the LCD enough to clear the steel mounting pins attached along the underside of the top edge of the glass panel.
-
Pull the glass panel away from the lower edge of the iMac and carefully set it aside.
-
-
-
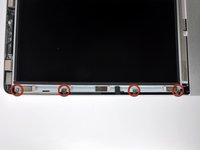
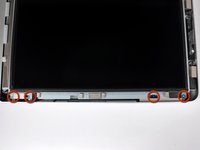
Remove the eight 8 mm T10 Torx screws securing the display to the outer case.
-
-
-
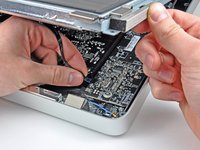
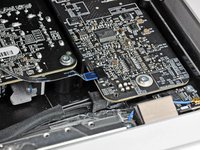
Pull the vertical sync ribbon cable out of its socket on the LED driver board near the top left corner of your iMac.
-
-
-
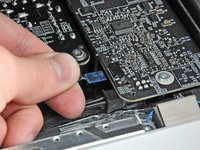
Rotate the display out of the outer case enough to disconnect the LED backlight power cable from the LED driver board.
-
-
-
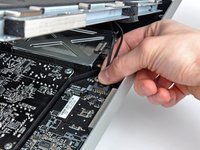
Squeeze the two display data cable connector arms together to unlock it from its socket on the logic board.
-
Pull the display data cable connector away from its socket on the logic board.
-
-
-
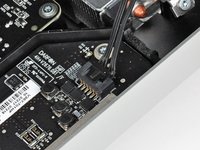
Disconnect the LCD thermal sensor cable connector from its socket on the logic board.
-
-
-
Carefully pull the display toward the top edge of your iMac and lift it out of the outer case, minding any cables that may get caught.
-
-
-
Pull the optical drive thermal sensor connector straight away from its socket on the logic board.
-
-
-
Remove the four 9 mm T10 Torx screws securing the optical drive to the outer case.
-
-
-
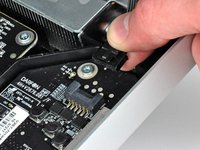
Lift the inner edge of the optical drive and maneuver its connector past the frame attached to the logic board.
-
Carefully pull the optical drive off its mounting pins on the edge of the outer case to gain clearance for disconnecting the optical drive cable.
-
-
-
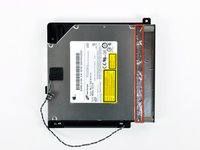
Peel back the portion of aluminum tape highlighted in red, leaving the rest attached to the black plastic optical drive bracket.
-
-
-
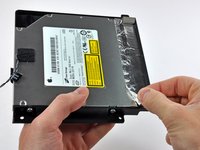
Remove the two T10 Torx screws from both sides of the optical drive (four screws total).
-
-
-
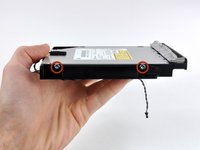
Rotate the optical drive bracket slightly away from the optical drive.
-
Pull the optical drive bracket away from the open end of the optical drive, minding any tabs that may get caught.
-
-
-
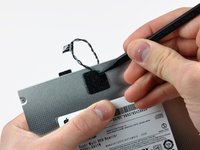
Use the tip of a spudger to peel back the piece of foam tape covering the optical drive thermal sensor.
-
Use the flat end of a spudger to carefully pry the thermal sensor up off the adhesive securing it to the optical drive.
-
-
-
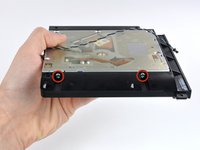
Remove the three 3.0 mm Phillips screws from the optical bay enclosure.
-
-
-
Starting from the left edge, gently pull open the optical bay enclosure.
-
Continue to pull open the two halves of the enclosure until they separate.
-
-
-
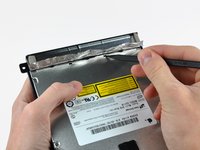
Remove the two 3.0 mm Phillips screws securing the faceplate to the optical bay enclosure.
-
-
-
Lift the black plastic faceplate out of the optical bay enclosure.
-
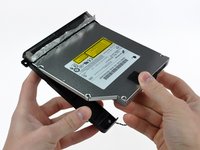
Reassemble the optical bay enclosure without the faceplate, reusing the original three 3.0 mm Phillips screws to keep it intact.
-
-
-
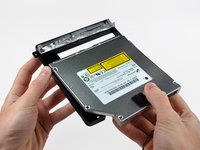
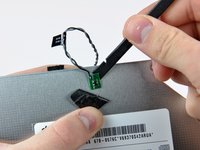
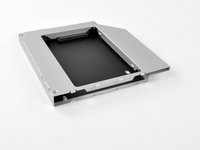
Remove the plastic positioner from the optical bay hard drive enclosure by pressing in on one of the clips on either side and lifting it up and out of the enclosure.
-
-
-
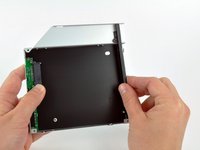
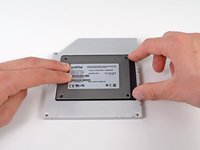
Make sure that the hard drive connectors are facing down before placing it into the enclosure.
-
Gently place the hard drive into the enclosure's hard drive slot.
-
While firmly holding the enclosure in place with one hand, use your other hand to press the hard drive into the enclosure connectors.
-
-
-
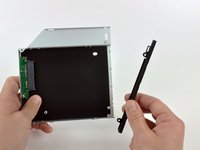
Once the hard drive is snug, reinsert the plastic positioner while holding the hard drive against the bottom of the enclosure.
-
Reconnect any cables you have removed from the original optical drive onto the optical bay enclosure.
-


To reassemble your device, follow these instructions in reverse order.
To reassemble your device, follow these instructions in reverse order.
Отменить: Я не выполнил это руководство.
53 человек успешно провели ремонт по этому руководству.


9 Комментариев
I followed this guide to place a samsung 840 EVO 750 GB ssd in the optical drive bay. The instructions worked near perfectly. However, I got many SATA CRC errrors. Not a connector seating problem. After placing the SSD in the hard drive bay (following the hard drive replacement guide) no more CRC errors.
I tested with an older laptop hdd: This works fine in the optical bay.
Apparently either the optical drive bay does not work well with the samsung 840 EVO or my optical drive cable is no good.
I reassembled my superdrive and placed the SSD in place of my built-in HDD for a nice speed increase.
Is there any listing of ssds that work well in the OD bay?
I recently replaced my HD with an SSD drive. Watching this guide actually helped too!
I would also like to replace the optical drive with a Hard Drive. Would it make much of a difference wether I use a SSD or a 7200rpm HD? I would be using it for video and audio files for Protools and Final Cut Pro that are running on the SSD..
It seems like the negotiated speed on the optical SATA is only 1.5 Gigabit..
Do you attach the thermal sensor to the equivalent place on drive enclosure as it was on the optical drive?
Would love to know how to re-use the optical drive externally, with an inexpensive enclosure.
There is the OWC SuperSlim (https://eshop.macsales.com/item/Other%20...) The iMac drive looks at least half again as thick as a laptop drive, so there would be a gap between the top and bottom pieces of the SuperSlim - maybe build a thin wood frame to take up the gap? Four pieces, each about a quarter-inch thick, glued or lapped on the corners. If you want to be *really* nifty, maybe try to do a dove-tail on each corner - but that would require cutting about 2 mm "doves and tails".
jimwitte -