Перейти к основному содержанию
/
Мой рабочий стол для верстки руководств

Получите быстрый доступ к руководствам, запчастям и ответам касательно ваших устройств

Motorola Moto G 2nd Generation Speakers Replacement

Motorola Moto G 2nd Generation Speakers Replacement

Jacob Garzini

Jacob Garzini и 7 другие участники

Последнее обновление March 21, 2025

30 - 35 минут
Средне

By following this guide, you'll be able to remove and replace the speakers in your Moto G, in the event that they are malfunctioning. This repair is not difficult, but it may take some time, as you have to dig through a few layers to reach the speakers. All you'll need is a T5 Torx screwdriver and a plastic opening tool.

Before you begin, download the Software Fix app to backup your device and diagnose whether your problem is software or hardware related.

Выберете то, что вам нужно

Инструменты

Показать больше…

  1. Motorola Moto G 2nd Generation Speakers Replacement, Battery: шаг 1, изображение 1 из 3 Motorola Moto G 2nd Generation Speakers Replacement, Battery: шаг 1, изображение 2 из 3 Motorola Moto G 2nd Generation Speakers Replacement, Battery: шаг 1, изображение 3 из 3
    • Make sure your Moto G is turned off and that any SIM or SD cards are removed before beginning disassembly.

    • Starting at the USB port on the bottom, remove the rear cover by prying it off with your finger.

    • Work your way down the sides to avoid cracking the rear cover.

  2. Motorola Moto G 2nd Generation Speakers Replacement: шаг 2, изображение 1 из 3 Motorola Moto G 2nd Generation Speakers Replacement: шаг 2, изображение 2 из 3 Motorola Moto G 2nd Generation Speakers Replacement: шаг 2, изображение 3 из 3
    • Remove the eight 4.2 mm screws at the top and bottom of the phone using a T5 Torx screwdriver.

    • Using the same screwdriver, remove the six 3.2 mm screws on the sides.

    • Remove the next layer of the phone by prying it off with your fingers.

  3. Motorola Moto G 2nd Generation Speakers Replacement: шаг 3, изображение 1 из 3 Motorola Moto G 2nd Generation Speakers Replacement: шаг 3, изображение 2 из 3 Motorola Moto G 2nd Generation Speakers Replacement: шаг 3, изображение 3 из 3
    Инструмент, используемый на этом этапе:
    Tweezers
    $4.99
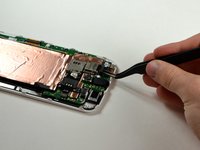
    • Using a plastic opening tool or tweezers, disconnect the SIM/SD card reader at the top of the phone.

    • Disconnect the battery connector by prying it off of the motherboard.

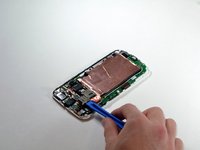
    • Disconnect the vibration motor by prying its connector off of the motherboard.

  4. Motorola Moto G 2nd Generation Speakers Replacement: шаг 4, изображение 1 из 3 Motorola Moto G 2nd Generation Speakers Replacement: шаг 4, изображение 2 из 3 Motorola Moto G 2nd Generation Speakers Replacement: шаг 4, изображение 3 из 3
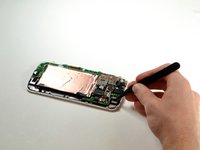
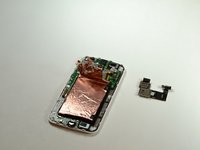
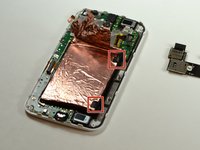
    • Using a plastic opening tool, carefully pry off the entire SIM/SD card reader component.

    • Don't worry about ripping the copper foil a little bit, it is easy to put back on.

    • When reassembling the device, do not attempt to smooth the foil down with your finger. Metal foil can become sharp if folded in a certain way, and you may be cut.

    • The battery may be removed without removing the SIM/SD card reader. Simply peel back the copper foil from the opposite end of the device, stopping just before you reach the SIM/SD card reader.

  5. Motorola Moto G 2nd Generation Speakers Replacement: шаг 5, изображение 1 из 3 Motorola Moto G 2nd Generation Speakers Replacement: шаг 5, изображение 2 из 3 Motorola Moto G 2nd Generation Speakers Replacement: шаг 5, изображение 3 из 3
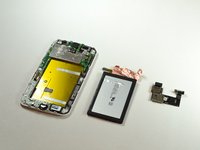
    • Peel off the two black stickers on the right side of the battery using your fingers.

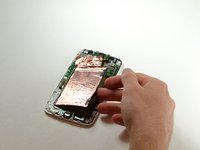
    • Remove the battery by pulling the right side of it upwards.

    • The black stickers are the protruding ends of the two parallel adhesive strips which hold the battery in place. You can see the adhesive strips in the third image. Focus your effort on these regions.

    • If you did not remove the SIM/SD card reader in the previous step, you will need to carefully slide the battery ribbon cable out from under it once you have freed the battery from the adhesive strips.

  6. Motorola Moto G 2nd Generation Speakers Replacement, Motherboard: шаг 6, изображение 1 из 3 Motorola Moto G 2nd Generation Speakers Replacement, Motherboard: шаг 6, изображение 2 из 3 Motorola Moto G 2nd Generation Speakers Replacement, Motherboard: шаг 6, изображение 3 из 3
    • Remove LCD connector by lifting the black plastic flap.

  7. Motorola Moto G 2nd Generation Speakers Replacement: шаг 7, изображение 1 из 3 Motorola Moto G 2nd Generation Speakers Replacement: шаг 7, изображение 2 из 3 Motorola Moto G 2nd Generation Speakers Replacement: шаг 7, изображение 3 из 3
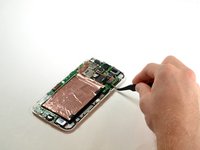
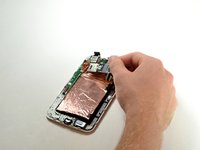
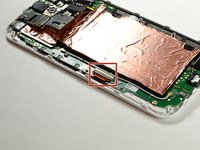
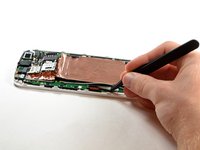
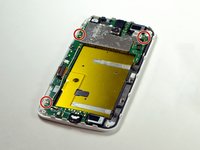
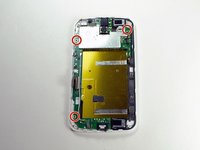
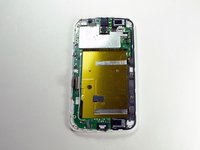
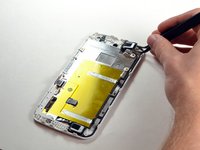
    • Using a T5 Torx screwdriver, unscrew the three 2.2 mm screws holding the motherboard in place.

  8. Motorola Moto G 2nd Generation Speakers Replacement: шаг 8, изображение 1 из 2 Motorola Moto G 2nd Generation Speakers Replacement: шаг 8, изображение 2 из 2
    • Carefully remove the motherboard.

  9. Motorola Moto G 2nd Generation Speakers Replacement, Speakers: шаг 9, изображение 1 из 1
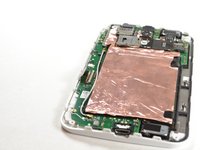
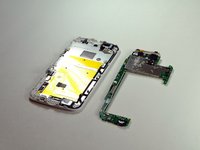
    • This is where you will find the two speakers, after you have taken off the motherboard.

  10. Motorola Moto G 2nd Generation Speakers Replacement: шаг 10, изображение 1 из 2 Motorola Moto G 2nd Generation Speakers Replacement: шаг 10, изображение 2 из 2
    Инструмент, используемый на этом этапе:
    Tweezers
    $4.99
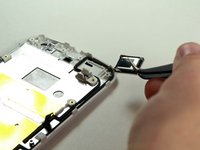
    • With the motherboard off, use tweezers to grab the top speaker.

    • Remove the speaker and replace it with a new one.

  11. Motorola Moto G 2nd Generation Speakers Replacement: шаг 11, изображение 1 из 2 Motorola Moto G 2nd Generation Speakers Replacement: шаг 11, изображение 2 из 2
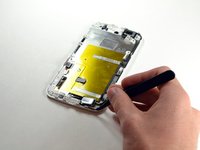
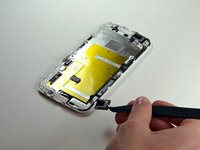
    • Use tweezers to replace the bottom speaker.

    • Remove the speaker and replace it with a new one.

Заключение

To reassemble your device, follow these instructions in reverse order.

16 человек успешно провели ремонт по этому руководству.

Jacob Garzini

Участник с: 10/08/15

485 Репутация

1 руководство автора

Команду

Cal Poly, Team 1-19, Maness Fall 2015 Участник Cal Poly, Team 1-19, Maness Fall 2015

CPSU-MANESS-F15S1G19

4 членов

Автор 15 руководств

10 Комментариев

Same problem happened to me when I replaced the screen, had to remove the speaker and when I put it back the upper (left) didn't work and the lower (right) had terrible distortion noise. playing a little with the upper speaker location made it work but with noise as well.

The phone is useless without this speaker, it's pretty shame that nobody pays attention to this point in their guides.

Tal wns - Ответить

Have you fixed your speakers? Did you at least discovered why it happened?

Erick Carvalho Campos -

I had a similar problem after replacing my battery. After I put the phone back together, my bottom speaker was not working. I went ahead and ordered a speaker to replace the one that was not working, and it still didn't work. Knowing that my top speaker was working okay, I replaced the top speaker to see if the new one I received was working, and it didn't work on top either. As a matter of fact, I put back the original top speaker that was working okay, and now it doesn't work. So now neither one of them are working. I have to use earphones to hear my phone. I don't know what happened. The instructions to replace the speakers are not that difficult.

Does anyone have any suggestions on what I should do? I'm not ready to give up my phone just yet.

Betsey -

I replaced the speakers recently and it is not recessary to remove the motherboard to replace them.

Dan Eff - Ответить

To corroborate with the other commenters: removing the motherboard is unnecessary. The speakers are only held in with a small ring of adhesive, which can easily be pried out. Additionally, the two speakers are identical.

Gavin Lochtefeld - Ответить

Добавить комментарий

Статистика просмотров:

За последние 24 час(ов): 0

За последние 7 дней: 0

За последние 30 дней: 26

За всё время: 15,213