
Nintendo 2DS Joystick Replacement
Введение
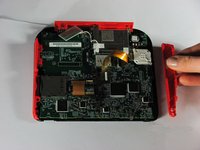
Перейти к шагу 1We will teach you how to first remove the battery and back panel then access the joystick for repair or cleaning purposes.
Выберете то, что вам нужно


-
-
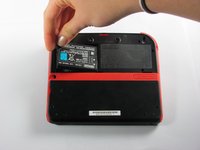
Remove the battery from its housing by lifting it up from the side closest to the outside edge.
-
-
-
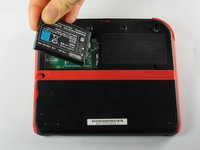
Use your fingernail or the flat end of a spudger to flip up the connector securing the ribbon cable to the motherboard
-
Remove the cable from the connector
-
-
-
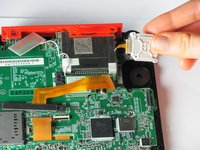
Remove the trigger button on the top right corner by pulling upwards and outwards.
-
Remove the right red side panel by pulling outwards.
-
-
-
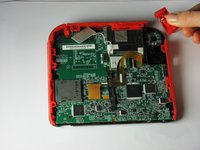
Use a spudger to lift the gray locking lever on the joystick ribbon cable ZIF connector. Pry straight up from the motherboard on the side of the connector opposite the cable.
-
Gently slide the cable straight out of the connector.
-
-
-
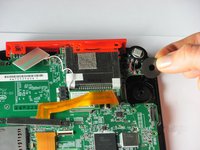
Remove the joystick cover. It should detach with little force.
-
Remove the joystick washer under the joystick cover.
-


To reassemble your device, follow these instructions in reverse order.
To reassemble your device, follow these instructions in reverse order.
Отменить: Я не выполнил это руководство.
25 человек успешно провели ремонт по этому руководству.
Команду

Cal Poly, Team 70-1, Forte Winter 2015 Участник Cal Poly, Team 70-1, Forte Winter 2015
CPSU-FORTE-W15S70G1
4 членов
Автор 35 руководств
12 Комментариев
My ribbon cable is broke, Is there a way to fix it?Thanks.
When I put the circle pad back in, my 2DS thinks that I am holding up and right on it, when in reality it is in the neutral position. Please help.
Use the calibrate option in system settings. Also make sure the cable is connected nicely.
Recalibrate it in system settings.
The guide fails to mention that the joystick ribbon cable is locked into the motherboard. You can use a spudger to lift the grey tab, leveraging upwards on the side opposite of the ribbon cable. The tab will pop up and should make getting the ribbon cable out (and back in) easier.
I followed this guide and ripped the ribbon cable while attempting to get it connected back to the system. If I had known the grey tab unlocks, I might not have ripped the cable by trying to force it back under the pins. My iFixit tweezers were also very sharp, and may have cut the ribbon cable. Would anyone be able to recommend something gentler for the ribbon cable?