
Samsung Galaxy Centura Speaker Replacement
Введение
Перейти к шагу 1This guide will demonstrate how to remove and replace the external speaker on the Samsung Galaxy Centura. Note this speaker is different than the earpiece speaker used to listen during phone calls.
Выберете то, что вам нужно


-
-
Locate the rectangular groove on the top side of the device.
-
Firmly press the tip of your index finger, or plastic opening tool into the groove, and pull back firmly. The device should pop open as shown.
-
-
-
With the back casing removed, the phone should appear as shown, with a clear view of the battery.
-
Gently pull the battery up with your thumb and index finger. It should come out without resistance.
-
-
-
Find the positions of the seven screws on the back of the device. Use the Phillips #00 screwdriver to remove these 5.0mm screws.
-
-
-
Gently insert the plastic opening tool into the notch on the side of the device. Apply a firm prying motion to pop open and remove the plastic casing.
-
-
-
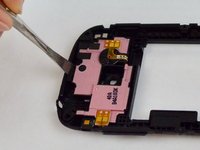
Locate the black plastic clip at the top of the removed plastic casing. Use the metal spudger to release this clip.
-
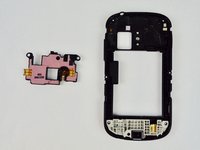
Apply a firm prying motion to remove the pink plastic section. The external speaker is a part of this assembly.
-


To reassemble your device, follow these instructions in reverse order.
To reassemble your device, follow these instructions in reverse order.
Команду

USF Tampa, Team S2-G5, Nance Spring 2017 Участник USF Tampa, Team S2-G5, Nance Spring 2017
USFT-NANCE-S17S2G5
3 членов
Автор 6 руководств