Перейти к основному содержанию

Samsung Galaxy S III Plastic Midframe Replacement

Выберете то, что вам нужно

  1. Samsung Galaxy S III Plastic Midframe Replacement, Rear Case: шаг 1, изображение 1 из 2 Samsung Galaxy S III Plastic Midframe Replacement, Rear Case: шаг 1, изображение 2 из 2
    • The following four steps can be accomplished without a plastic opening tool. However, it's recommended to use a tool to best avoid breaking any clips along the perimeter of the rear case.

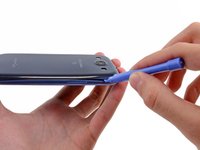
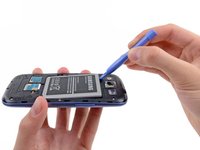
    • Insert a plastic opening tool or fingernail into the notch in the gap between the rear case and the rest of the phone, located at the top of the device.

    • Gently twist the opening tool to disconnect the clips securing the top of the rear case.

  2. Samsung Galaxy S III Plastic Midframe Replacement: шаг 2, изображение 1 из 2 Samsung Galaxy S III Plastic Midframe Replacement: шаг 2, изображение 2 из 2
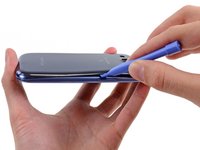
    • Slide the plastic opening tool left along the top edge and repeat the twisting motion to widen the gap between the rear case and the phone.

  3. Samsung Galaxy S III Plastic Midframe Replacement: шаг 3, изображение 1 из 2 Samsung Galaxy S III Plastic Midframe Replacement: шаг 3, изображение 2 из 2
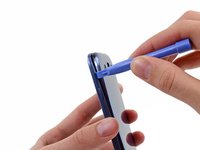
    • Continue to move the plastic opening tool around the perimeter of the top left corner, gently prying up along the rear case.

  4. Samsung Galaxy S III Plastic Midframe Replacement: шаг 4, изображение 1 из 2 Samsung Galaxy S III Plastic Midframe Replacement: шаг 4, изображение 2 из 2
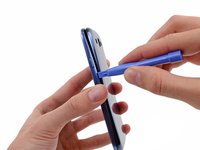
    • Pry along the top right side, and continue prying down the right side of the rear case.

  5. Samsung Galaxy S III Plastic Midframe Replacement: шаг 5, изображение 1 из 2 Samsung Galaxy S III Plastic Midframe Replacement: шаг 5, изображение 2 из 2
    • Lift up and remove the rear case from the phone.

    • You may need to peel the case up to separate it from any clips still holding it to the bottom of the phone.

  6. Samsung Galaxy S III Plastic Midframe Replacement, Battery: шаг 6, изображение 1 из 2 Samsung Galaxy S III Plastic Midframe Replacement, Battery: шаг 6, изображение 2 из 2
    • This step can be accomplished without the need of a plastic opening tool. Just use your finger if you want to.

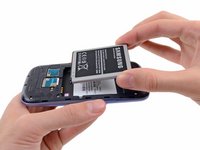
    • Wedge a plastic opening tool into the small notch above the battery.

    • Pry the battery up out of its recess.

  7. Samsung Galaxy S III Plastic Midframe Replacement: шаг 7, изображение 1 из 2 Samsung Galaxy S III Plastic Midframe Replacement: шаг 7, изображение 2 из 2
    • Remove the battery.

  8. Samsung Galaxy S III Plastic Midframe Replacement, SIM Card: шаг 8, изображение 1 из 3 Samsung Galaxy S III Plastic Midframe Replacement, SIM Card: шаг 8, изображение 2 из 3 Samsung Galaxy S III Plastic Midframe Replacement, SIM Card: шаг 8, изображение 3 из 3
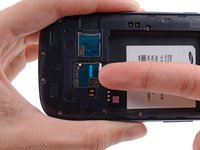
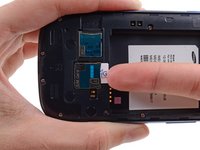
    • Using your fingernail, push the SIM card slightly deeper into its slot, until you hear a click.

    • After the click, release the card and it will pop out of its slot.

    • For reassembly, push the SIM card into the slot until it clicks in place.

  9. Samsung Galaxy S III Plastic Midframe Replacement: шаг 9, изображение 1 из 3 Samsung Galaxy S III Plastic Midframe Replacement: шаг 9, изображение 2 из 3 Samsung Galaxy S III Plastic Midframe Replacement: шаг 9, изображение 3 из 3
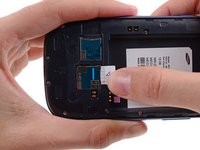
    • Use your thumb to slide enough of the SIM card out of its slot to grab ahold of it.

    • Grasp and remove the SIM card away from the phone.

  10. Samsung Galaxy S III Plastic Midframe Replacement, microSD Card: шаг 10, изображение 1 из 3 Samsung Galaxy S III Plastic Midframe Replacement, microSD Card: шаг 10, изображение 2 из 3 Samsung Galaxy S III Plastic Midframe Replacement, microSD Card: шаг 10, изображение 3 из 3
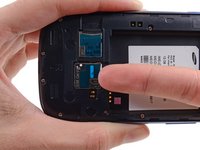
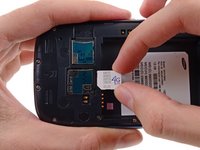
    • Using your fingernail, push the microSD card slightly deeper into its slot, until you hear a click.

    • After the click, release the card and it will pop out of its slot.

    • For reassembly, push the microSD card into the slot until it clicks in place.

  11. Samsung Galaxy S III Plastic Midframe Replacement: шаг 11, изображение 1 из 2 Samsung Galaxy S III Plastic Midframe Replacement: шаг 11, изображение 2 из 2
    • Use your thumb to slide the microSD card out of the slot.

    • Remove the microSD card from the phone.

  12. Samsung Galaxy S III Plastic Midframe Replacement, Plastic Midframe: шаг 12, изображение 1 из 1
    • Remove the ten 4.0 mm Phillips screws securing the midframe to the front panel assembly.

  13. Samsung Galaxy S III Plastic Midframe Replacement: шаг 13, изображение 1 из 2 Samsung Galaxy S III Plastic Midframe Replacement: шаг 13, изображение 2 из 2
    • Grasp the left side of the plastic midframe with your thumb and forefinger and lift it away from the phone.

    • The midframe lightly snaps in place, and can be removed with very little force.

Заключение

To reassemble your device, follow these instructions in reverse order.

38 участников успешно повторили данное руководство.

0 Комментариев

Добавить комментарий

Просмотр статистики:

За последние 24часов: 0

За последние 7 дней: 4

За последние 30 дней: 9

За всё время: 41,034