Перейти к основному содержанию
Присоединяйся к сообществу ремонтников - Создай аккаунт

Steam Controller (2nd Gen, 2026) Main Board Replacement

Выберете то, что вам нужно

  1. Steam Controller (2nd Gen, 2026) Main Board Replacement, Before you begin: шаг 1, изображение 1 из 3 Steam Controller (2nd Gen, 2026) Main Board Replacement, Before you begin: шаг 1, изображение 2 из 3 Steam Controller (2nd Gen, 2026) Main Board Replacement, Before you begin: шаг 1, изображение 3 из 3
    • Let your controller's battery drain below 25% before starting this repair.

    • Unplug all cables and accessories from the controller, including the Steam Controller Puck.

    • During your repair, it can be helpful to lay the Steam Controller on a clean, soft cloth for stabilization and to prevent scratches.

    Спросите у FixBot

    Добавить комментарий

  2. Steam Controller (2nd Gen, 2026) Main Board Replacement, Remove the back cover screws: шаг 2, изображение 1 из 2 Steam Controller (2nd Gen, 2026) Main Board Replacement, Remove the back cover screws: шаг 2, изображение 2 из 2
    Инструмент, используемый на этом этапе:
    TR6 Torx Security Screwdriver
    $5.99
    Спросите у FixBot

    Добавить комментарий

  3. Steam Controller (2nd Gen, 2026) Main Board Replacement, Remove the back cover: шаг 3, изображение 1 из 2 Steam Controller (2nd Gen, 2026) Main Board Replacement, Remove the back cover: шаг 3, изображение 2 из 2
    • Remove the back cover.

    Спросите у FixBot

    Добавить комментарий

  4. Steam Controller (2nd Gen, 2026) Main Board Replacement, Remove the battery: шаг 4, изображение 1 из 3 Steam Controller (2nd Gen, 2026) Main Board Replacement, Remove the battery: шаг 4, изображение 2 из 3 Steam Controller (2nd Gen, 2026) Main Board Replacement, Remove the battery: шаг 4, изображение 3 из 3
    • If your battery is swollen, take appropriate precautions. Never reinstall a swollen battery—replace it with a new one.

    • Lift the right edge of the battery to remove it.

    • During reassembly, first slide the left side of the battery into place so its connector is fully seated. Then, press the right side into place to secure it.

    Спросите у FixBot

    Добавить комментарий

  5. Steam Controller (2nd Gen, 2026) Main Board Replacement, Remove the mounting bracket screws: шаг 5, изображение 1 из 2 Steam Controller (2nd Gen, 2026) Main Board Replacement, Remove the mounting bracket screws: шаг 5, изображение 2 из 2
    • During the rest of your repair, don't forcefully push the controller down onto your work surface—you may damage the thumbsticks and trackpads.

    • Use a T6 Torx screwdriver to remove the four 7.4 mm‑long screws securing the battery mounting bracket.

    Спросите у FixBot

    Добавить комментарий

  6. Steam Controller (2nd Gen, 2026) Main Board Replacement, Remove the mounting bracket: шаг 6, изображение 1 из 2 Steam Controller (2nd Gen, 2026) Main Board Replacement, Remove the mounting bracket: шаг 6, изображение 2 из 2
    Спросите у FixBot

    Добавить комментарий

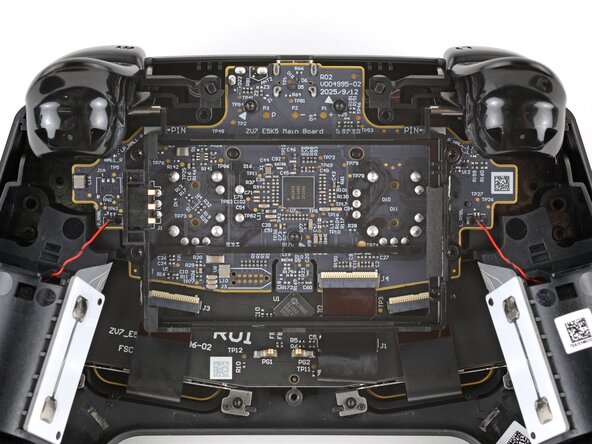
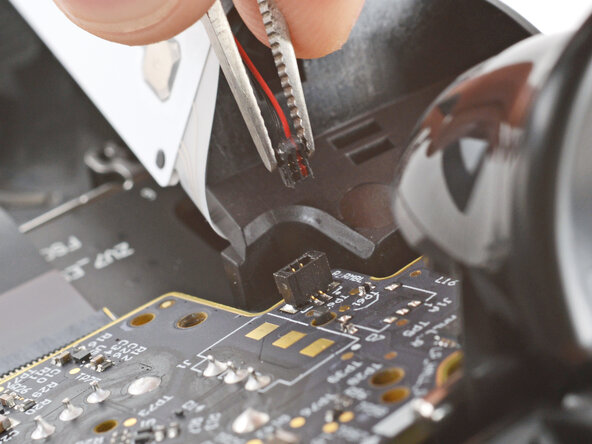
  7. Steam Controller (2nd Gen, 2026) Main Board Replacement, Disconnect the rumble motors: шаг 7, изображение 1 из 3 Steam Controller (2nd Gen, 2026) Main Board Replacement, Disconnect the rumble motors: шаг 7, изображение 2 из 3 Steam Controller (2nd Gen, 2026) Main Board Replacement, Disconnect the rumble motors: шаг 7, изображение 3 из 3
    • Don't pull on the rumble motor's delicate wires—they're easily damaged. Be careful not to pinch the wires with your tweezers, and only pull on the connector itself.

    • Firmly grip the short edges of one rumble motor connector with a pair of tweezers and pull straight up to disconnect it

    • Grip the tweezers as close to the tip as possible to get a better hold on the connector.

    Спросите у FixBot

    Добавить комментарий

  8. Steam Controller (2nd Gen, 2026) Main Board Replacement: шаг 8, изображение 1 из 3 Steam Controller (2nd Gen, 2026) Main Board Replacement: шаг 8, изображение 2 из 3 Steam Controller (2nd Gen, 2026) Main Board Replacement: шаг 8, изображение 3 из 3
    • Repeat to disconnect the other rumble motor.

    Спросите у FixBot

    Добавить комментарий

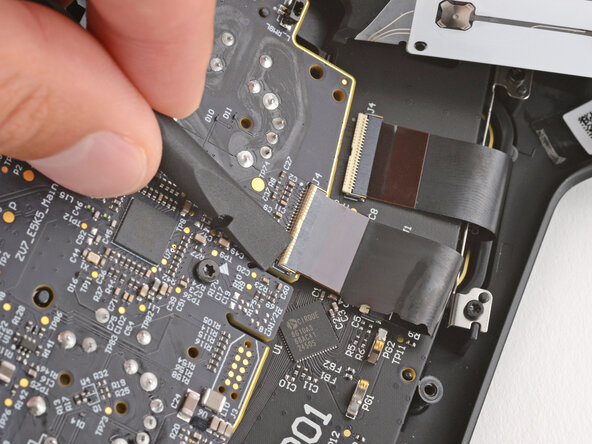
  9. Steam Controller (2nd Gen, 2026) Main Board Replacement, Disconnect the interconnect cable: шаг 9, изображение 1 из 3 Steam Controller (2nd Gen, 2026) Main Board Replacement, Disconnect the interconnect cable: шаг 9, изображение 2 из 3 Steam Controller (2nd Gen, 2026) Main Board Replacement, Disconnect the interconnect cable: шаг 9, изображение 3 из 3
    • Be careful not to damage any of the small, surface-mounted components on the main board.

    • Use a spudger to lift the hinged locking flap on the interconnect cable ZIF connector, located on the bottom edge of the main board.

    Спросите у FixBot

    Добавить комментарий

  10. Steam Controller (2nd Gen, 2026) Main Board Replacement: шаг 10, изображение 1 из 2 Steam Controller (2nd Gen, 2026) Main Board Replacement: шаг 10, изображение 2 из 2
    • Use tweezers to grip the cable by its plastic pull tab and slide it out of the socket.

    Спросите у FixBot

    Добавить комментарий

  11. Steam Controller (2nd Gen, 2026) Main Board Replacement, Remove the main board screws: шаг 11, изображение 1 из 3 Steam Controller (2nd Gen, 2026) Main Board Replacement, Remove the main board screws: шаг 11, изображение 2 из 3 Steam Controller (2nd Gen, 2026) Main Board Replacement, Remove the main board screws: шаг 11, изображение 3 из 3
    • Use a T6 Torx screwdriver to remove the three 7.4 mm‑long screws securing the main board.

    • When reinstalling the screws, raise the controller so the thumbsticks aren't pressed against your work surface—pressure on the thumbsticks can cause improper alignment and seating.

    Спросите у FixBot

    Добавить комментарий

  12. Steam Controller (2nd Gen, 2026) Main Board Replacement, Remove the main board: шаг 12, изображение 1 из 3 Steam Controller (2nd Gen, 2026) Main Board Replacement, Remove the main board: шаг 12, изображение 2 из 3 Steam Controller (2nd Gen, 2026) Main Board Replacement, Remove the main board: шаг 12, изображение 3 из 3
    • Pull the main board down so the top corners clear the triggers.

    • You should be able to remove the board without removing the triggers. If you're having trouble, check out this guide to remove them.

    • Remove the main board, guiding the thumbsticks through their cutouts.

    • During reassembly, make sure the two rumble motor wires don't get trapped underneath the board. Use the four alignment posts to ensure the board is properly positioned.

    Спросите у FixBot

    Добавить комментарий

  13. Steam Controller (2nd Gen, 2026) Main Board Replacement, Rubber piece information: шаг 13, изображение 1 из 3 Steam Controller (2nd Gen, 2026) Main Board Replacement, Rubber piece information: шаг 13, изображение 2 из 3 Steam Controller (2nd Gen, 2026) Main Board Replacement, Rubber piece information: шаг 13, изображение 3 из 3
    • The rubber piece above the status LED may have been dislodged when removing the main board.

    • If the rubber piece is out of place, remove it and set it aside.

    • During reassembly, place the rubber piece so the two tabs are on the bottom and towards the back.

    Спросите у FixBot

    Добавить комментарий

Заключение

To reassemble your device, follow these instructions in reverse order.

Take your e-waste to an R2 or e-Stewards certified recycler.

Repair didn’t go as planned? Try some basic troubleshooting, or ask our Answers community for help.

Отменить: Я не выполнил это руководство.

Еще один человек закончил это руководство.

Spencer Day

Участник с: 09/14/22

196 371 Репутация

Автор 1 243 руководств

0 Комментарии к руководству

Добавить комментарий

Статистика просмотров:

За последние 24 часов: 22

За последние 7 дней: 159

За последние 30 дней: 825

За всё время: 3,478