Перейти к основному содержанию

Toshiba Satellite A215-S7425 Optical Drive Replacement

Выберете то, что вам нужно

  1. Toshiba Satellite A215-S7425 Optical Drive Replacement, Battery: шаг 1, изображение 1 из 1
    • Turn off the computer.

    • Disconnect the charging cable from computer.

    • Failure to unplug the cable could result in electric shock.

    • Flip the computer upside down.

  2. Toshiba Satellite A215-S7425 Optical Drive Replacement: шаг 2, изображение 1 из 1
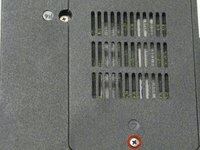
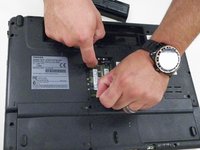
    • Slide latches labeled #1 and #2, located outside the battery cover, away from each other.

    • Latch #1 will click over and stay while latch #2 will have to be held for battery to release.

  3. Toshiba Satellite A215-S7425 Optical Drive Replacement: шаг 3, изображение 1 из 1
    • Gently lift and pull the battery out of the device.

  4. Toshiba Satellite A215-S7425 Optical Drive Replacement, RAM: шаг 4, изображение 1 из 1
    • Locate the RAM vented plastic cover in the center of the device.

  5. Toshiba Satellite A215-S7425 Optical Drive Replacement: шаг 5, изображение 1 из 2 Toshiba Satellite A215-S7425 Optical Drive Replacement: шаг 5, изображение 2 из 2
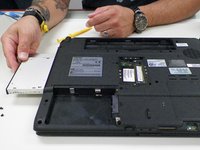
    • Loosen 1 Phillips 4.2 mm size captive screw and lift cover off device to expose 2 RAM sticks.

  6. Toshiba Satellite A215-S7425 Optical Drive Replacement: шаг 6, изображение 1 из 3 Toshiba Satellite A215-S7425 Optical Drive Replacement: шаг 6, изображение 2 из 3 Toshiba Satellite A215-S7425 Optical Drive Replacement: шаг 6, изображение 3 из 3
    Инструмент, используемый на этом этапе:
    Anti-Static Wrist Strap
    $7.95
    Купить
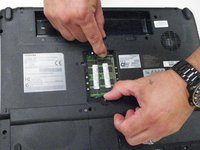
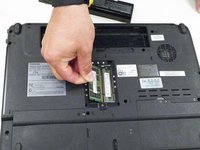
    • Locate 2 metal pinchers on either side of the 1st RAM stick.

    • Use a finger from each hand to push the 2 pinchers simultaneously away from the stick of RAM and towards the exterior of the case.

    • The RAM stick will automatically rise up. Gently pull out the RAM stick with one hand.

    • The use of a anti-static wrist strap while working with the RAM is advise to prevent electrostatic discharge(ESD) from damaging the RAM.

  7. Toshiba Satellite A215-S7425 Optical Drive Replacement: шаг 7, изображение 1 из 3 Toshiba Satellite A215-S7425 Optical Drive Replacement: шаг 7, изображение 2 из 3 Toshiba Satellite A215-S7425 Optical Drive Replacement: шаг 7, изображение 3 из 3
    • To remove the 2nd RAM stick, repeat previous steps.

    • You will be unable to remove 2nd RAM stick if the first one is not removed first.

  8. Toshiba Satellite A215-S7425 Optical Drive Replacement, Optical Drive: шаг 8, изображение 1 из 1
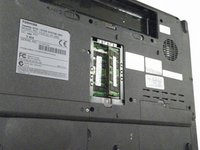
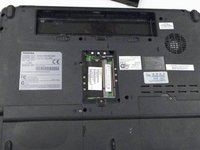
    • Locate and remove 1 Phillips 4.2 mm size screw along right side of RAM container.

    • Tweezers may be needed to lift out the screw.

  9. Toshiba Satellite A215-S7425 Optical Drive Replacement: шаг 9, изображение 1 из 2 Toshiba Satellite A215-S7425 Optical Drive Replacement: шаг 9, изображение 2 из 2
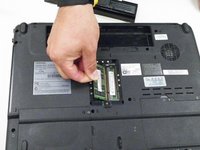
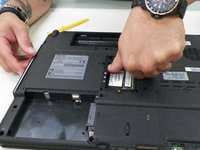
    • Push down metal rod until optical drive pops out from its container on the side of the device.

    • To avoid damage to your RAM, make sure RAM is removed and out of the way before beginning this step.

Заключение

To reassemble your device, follow these instructions in reverse order.

Marianne

Участник с: 09/08/14

647 Репутация

Автор 6 руководств

Команда

Pasco Hernando, Team 5-2, Prince Fall 2014 Участник Pasco Hernando, Team 5-2, Prince Fall 2014

PHSC-PRINCE-F14S5G2

10 членов

Автор 18 руководств

0 Комментариев

Добавить комментарий

Просмотр статистики:

За последние 24часов: 2

За последние 7 дней: 4

За последние 30 дней: 6

За всё время: 348