Toshiba Satellite C660 HDD / RAM Memory Replacement

Введение
Перейти к шагу 1If you want to replace the HDD or the RAM memory, or you plan to make an upgrade, this video will help you.
The video manual is for both models, start with Satellite C850 and continue at 2:05 with Satellite C660.
Выберете то, что вам нужно


Видео обзор
-
-
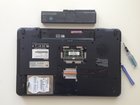
Remove the battery.
-
Unscrew 1x Phillips screw and disassemble the HDD / RAM memory cover.
-
-
-
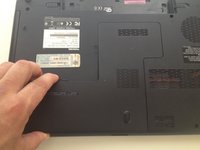
Use a plastic tool and an anti static gloves to pull out the memory modules.
-
If you have not, then hold the board only at the ends.
-
If you plan to make an upgrade, first of all check the specification of yours model. Depending of the Chipset and the producer, every laptop have a limit of the expansion of the RAM memory.
-
Check exactly type of the used memory modules. This models use DDR3 technology.
-
You can use modules with a different speed but the processor will work with them at the speed of the slower one.
-
Some modules will not work together.
-
-
-
Unscrew the 4x Phillips screws and separate the HDD from the HDD caddy.
-
You can upgrade your HDD to maximum 1TB.
-


To reassemble your device, follow these instructions in reverse order.
To reassemble your device, follow these instructions in reverse order.
Отменить: Я не выполнил это руководство.
5 человек успешно провели ремонт по этому руководству.

Команду

3 Комментариев
I dunno, I would class this as easy peasy. One captive screw. No need for tool to remove ram, it pops up when you flex open the metal bits. Doing it with fingers is way easier.
While you can remove the 4 screws to remove and transplant the bit of plastic onto the new drive, a dab of sugru to secure 20 quid ssd drive will do the job. Upgrading these things tales less than 5 minutes.
Can I replace the HDD with a SATA SSD?
To Steve Jamolin:No