
Toshiba Satellite M45 Display Replacement
Введение
Перейти к шагу 1This guide will demonstrate how to dismantle and replace components of your computers display (screen).
Выберете то, что вам нужно


-
-
Carefully use the blue iFixit Opening Tool to pry the panel above the keyboard from the left and right side.
-
Push back the screen until it is flat with the laptop.
-
Gently remove the clips that connect the panel to the screen.
-
-
-
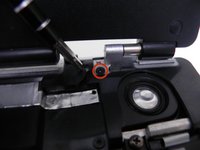
Use the Phillips #1 screwdriver to remove the two screws.
-
Gently pry the keyboard from the laptop using the blue iFixit opening tool.
-
Slowly lift the keyboard away from the laptop.
-
Remove the ribbon that connects to the laptop.
-
-
-
Remove the 2-3 pieces of black electrical tape covering the black-and-white antenna cable.
-
Close the display, flip the laptop over, and disconnect the black-and-white antenna cables from the Wi-Fi card.
-
Flip the laptop back over and open the display.
-
-
-
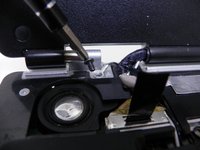
Remove the two Phillips #1 screws securing the display hinges.
-
Remove the four Phillips #1 screws on the back of the laptop.
-
-
-
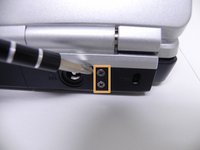
Gently pull up on the display's video connector to remove it.
-
Remove the black-and-white antenna cable from the groove.
-
Your display can now be removed.
-


To reassemble your device, follow these instructions in reverse order.
To reassemble your device, follow these instructions in reverse order.
Отменить: Я не выполнил это руководство.
3 человек успешно провели ремонт по этому руководству.
Команду

Cal Poly, Team 10-42, Garner Spring 2010 Участник Cal Poly, Team 10-42, Garner Spring 2010
CPSU-GARNER-S10S10G42
5 членов
Автор 10 руководств