Перейти к основному содержанию
/
Мой рабочий стол для верстки руководств

Получите быстрый доступ к руководствам, запчастям и ответам касательно ваших устройств

Toshiba Satellite P75-A7100 Fan Replacement

Toshiba Satellite P75-A7100 Fan Replacement

Pria Dalrymple

Pria Dalrymple и 2 другие участники

Последнее обновление June 12, 2018

10 - 15 минут
Средне

Through this guide you will learn to replace the fan inside of your laptop. Make sure you have the proper tools in order to complete the repair. This kind of repair is usually done to fix the problem of your laptop overheating.

Выберете то, что вам нужно

Инструменты

Показать больше…

  1. Toshiba Satellite P75-A7100 Fan Replacement, Battery: шаг 1, изображение 1 из 1
    • Slide the tabs apart from each other.

  2. Toshiba Satellite P75-A7100 Fan Replacement: шаг 2, изображение 1 из 2 Toshiba Satellite P75-A7100 Fan Replacement: шаг 2, изображение 2 из 2
    • Lift the battery upwards and remove it from the device.

  3. Toshiba Satellite P75-A7100 Fan Replacement, Wi-Fi Adapter: шаг 3, изображение 1 из 2 Toshiba Satellite P75-A7100 Fan Replacement, Wi-Fi Adapter: шаг 3, изображение 2 из 2
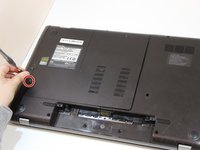
    • Using a Phillips #1 screwdriver, remove the screw from the back cover.

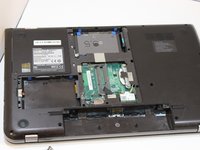
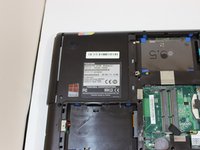
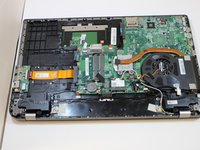
    • Remove the back cover from the device.

  4. Toshiba Satellite P75-A7100 Fan Replacement: шаг 4, изображение 1 из 3 Toshiba Satellite P75-A7100 Fan Replacement: шаг 4, изображение 2 из 3 Toshiba Satellite P75-A7100 Fan Replacement: шаг 4, изображение 3 из 3
    • Remove the optical drive from the device.

  5. Toshiba Satellite P75-A7100 Fan Replacement: шаг 5, изображение 1 из 2 Toshiba Satellite P75-A7100 Fan Replacement: шаг 5, изображение 2 из 2
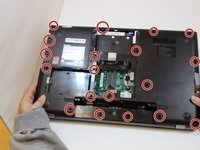
    • Using a Phillips #1 screwdriver, unscrew the remaining screws that are visible on the laptop.

    • Remove the back cover from your device.

  6. Toshiba Satellite P75-A7100 Fan Replacement: шаг 6, изображение 1 из 3 Toshiba Satellite P75-A7100 Fan Replacement: шаг 6, изображение 2 из 3 Toshiba Satellite P75-A7100 Fan Replacement: шаг 6, изображение 3 из 3
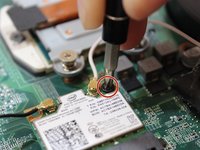
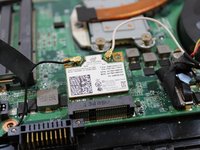
    • Using a Phillips #1 screwdriver, remove the screw connecting the Wi-Fi adapter to the motherboard.

    • Remove the Wi-Fi adapter from the device.

  7. Toshiba Satellite P75-A7100 Fan Replacement, Fan: шаг 7, изображение 1 из 2 Toshiba Satellite P75-A7100 Fan Replacement, Fan: шаг 7, изображение 2 из 2
    • Using a Phillips #1 screwdriver, unscrew the 6 remaining screws attached to the fan.

    • Unplug the connector connecting the fan to the motherboard.

    • Remove the fan from the device.

Заключение

To reassemble your device, follow these instructions in reverse order.

2 человек успешно провели ремонт по этому руководству.

Pria Dalrymple

Участник с: 01/17/18

144 Репутация

1 руководство автора

Команду

Eastern Washington University, Team S1-G5, Ramos Winter 2018 Участник Eastern Washington University, Team S1-G5, Ramos Winter 2018

EWU-RAMOS-W18S1G5

4 членов

Автор 5 руководств

Один комментарий

How do you remove and replace the fan from from/to the heatsink? Mine is secured with a metallic tape that is not sticky once removed.

Bruce - Ответить

Добавить комментарий

Статистика просмотров:

За последние 24 час(ов): 0

За последние 7 дней: 4

За последние 30 дней: 8

За всё время: 2,364