
Toshiba Satellite S55T-B5335 Wi-Fi Adapter Replacement
Введение
Перейти к шагу 1The Wi-Fi adapter receives a signal from a wireless router and gives the laptop the ability to connect to a network and internet without the use of wires. Please refer to the Wi-Fi Troubleshooting Guide to determine if your Wi-Fi adapter needs replaced.
Выберете то, что вам нужно
Инструменты


Показать больше…
-
-
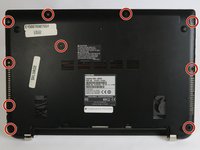
Wedge the tip of a plastic opening tool between the back cover and the metal frame.
-
Twist the plastic opening tool, while wedged, in order to release the retaining tabs from the frame.
-
Repeat these steps in a circular pattern around the laptop to release all retaining tabs.
-
-
-
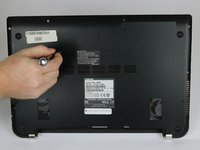
Once all retaining tabs are released from the frame, you can pull up on the back cover to remove it.
-
-
-
Using the pointed end of the Spudger, gently disconnect the antenna (white and black wires) from the Wi-Fi adapter.
-
-
-
While grabbing the Wi-Fi adapter on both sides, gently pull away from the socket in the direction of the removed screw.
-


To reassemble your device, follow these instructions in reverse order.
To reassemble your device, follow these instructions in reverse order.
Отменить: Я не выполнил это руководство.
Еще один человек закончил это руководство.
Команду

USF Tampa, Team 2-1, Blackwell Fall 2016 Участник USF Tampa, Team 2-1, Blackwell Fall 2016
USFT-BLACKWELL-F16S2G1
4 членов
Автор 7 руководств