Перейти к основному содержанию
Присоединяйся к сообществу ремонтников - Создай аккаунт

Xbox Series X Shell Replacement

Выберете то, что вам нужно

  1. Xbox Series X Shell Replacement, Uncover the back panel screws: шаг 1, изображение 1 из 2 Xbox Series X Shell Replacement, Uncover the back panel screws: шаг 1, изображение 2 из 2
    • Before you begin, completely power down and unplug all cables from your console.

    • Use a pair of tweezers to remove the sticker hiding the first screw on the back panel, near the base.

    Спросите у FixBot
  2. Xbox Series X Shell Replacement: шаг 2, изображение 1 из 3 Xbox Series X Shell Replacement: шаг 2, изображение 2 из 3 Xbox Series X Shell Replacement: шаг 2, изображение 3 из 3
    • For cleaner removal, use an iOpener or hair dryer to heat the sticker.

    • Use a pair of tweezers or a sharp blade to peel up a corner of the large sticker on the back panel. Use your fingers to peel it farther, just enough to reveal the second screw.

    • You only need to peel this sticker to where you can access the hidden screw. You don't need to pull it completely off.

    • Technically, these are tamper-evident stickers, but don't worry—Microsoft can't legally void your warranty, as long as you don't damage anything. Have fun!

    Спросите у FixBot
  3. Xbox Series X Shell Replacement, Remove the back panel screws: шаг 3, изображение 1 из 1
    Инструмент, используемый на этом этапе:
    Magnetic Project Mat
    $19.95
    • Use a T8 Torx driver to remove the two 7.4 mm‑long screws securing the back panel.

    • Throughout this repair, keep track of each screw and make sure it goes back exactly where it came from to avoid damaging your console.

    Спросите у FixBot
  4. Xbox Series X Shell Replacement, Unclip the back panel: шаг 4, изображение 1 из 3 Xbox Series X Shell Replacement, Unclip the back panel: шаг 4, изображение 2 из 3 Xbox Series X Shell Replacement, Unclip the back panel: шаг 4, изображение 3 из 3
    • Insert the flat end of a spudger into the gap between the back panel and the shell, near the left side of the base.

    • Pry up the back panel to release it from the locking clips.

    Спросите у FixBot
  5. Xbox Series X Shell Replacement: шаг 5, изображение 1 из 2 Xbox Series X Shell Replacement: шаг 5, изображение 2 из 2
    • Insert the flat end of a spudger into the gap between the back panel and the shell, near the right side of the base.

    • Pry up the back panel to release it from the locking clips.

    Спросите у FixBot
  6. Xbox Series X Shell Replacement, Remove the back panel: шаг 6, изображение 1 из 3 Xbox Series X Shell Replacement, Remove the back panel: шаг 6, изображение 2 из 3 Xbox Series X Shell Replacement, Remove the back panel: шаг 6, изображение 3 из 3
    • Grip the back panel at the opening you just created and pull it up and away from the shell to unclip the long edges.

    • During reassembly, press along the edges of the back panel to snap it into place.

    Спросите у FixBot
  7. Xbox Series X Shell Replacement: шаг 7, изображение 1 из 3 Xbox Series X Shell Replacement: шаг 7, изображение 2 из 3 Xbox Series X Shell Replacement: шаг 7, изображение 3 из 3
    • The back panel slots into a gap at the top of the shell.

    • Tilt the back panel up and pull it away from the top edge of the shell to release it from the gap.

    • Remove the back panel.

    Спросите у FixBot
  8. Xbox Series X Shell Replacement, Remove the fan screws: шаг 8, изображение 1 из 1
    • Use a T8 Torx driver to remove the three screws securing the fan to the center chassis:

    • One 10.5 mm pancake screw

    • Two 8.8 mm screws

    Спросите у FixBot
  9. Xbox Series X Shell Replacement, Disconnect the fan cable: шаг 9, изображение 1 из 3 Xbox Series X Shell Replacement, Disconnect the fan cable: шаг 9, изображение 2 из 3 Xbox Series X Shell Replacement, Disconnect the fan cable: шаг 9, изображение 3 из 3
    Инструмент, используемый на этом этапе:
    Tweezers
    $4.99
    • Use your fingers or a pair of blunt tweezers to grip the edges of the fan cable connector, and pull up to disconnect it from the center chassis.

    • Always pull cables by their connectors and not the wires themselves.

    • During reassembly, route the fan cable underneath its small cable guide on the fan housing so it doesn't interfere with the back panel.

    Спросите у FixBot
  10. Xbox Series X Shell Replacement, Remove the fan: шаг 10, изображение 1 из 2 Xbox Series X Shell Replacement, Remove the fan: шаг 10, изображение 2 из 2
    • Slide the fan out of its slot to remove it.

    • During reinstallation, note that the fan can only be installed one way—make sure Master Chief is facing you.

    • If you're replacing the fan, a new fan might not include the plastic installation bracket, which is attached to the fan with four T10 Torx screws. This isn't pictured in this guide.

    Спросите у FixBot
  11. Xbox Series X Shell Replacement, Unlatch the base: шаг 11, изображение 1 из 3 Xbox Series X Shell Replacement, Unlatch the base: шаг 11, изображение 2 из 3 Xbox Series X Shell Replacement, Unlatch the base: шаг 11, изображение 3 из 3
    • Use the flat end of a spudger to lift up on the locking tab holding the base to the shell.

    Спросите у FixBot
  12. Xbox Series X Shell Replacement, Twist and remove the base: шаг 12, изображение 1 из 3 Xbox Series X Shell Replacement, Twist and remove the base: шаг 12, изображение 2 из 3 Xbox Series X Shell Replacement, Twist and remove the base: шаг 12, изображение 3 из 3
    • Grip the base and rotate it counterclockwise to unlock it from the shell.

    • You may need to hold the locking tab open while you get the base started.

    • Remove the base.

    • During reassembly, drop the base tabs into their holes on the shell and twist clockwise until the base snaps into the interior locking tab.

    • When locked in place, the "Hello from Seattle" line will be parallel with the device's sides.

    Спросите у FixBot
  13. Xbox Series X Shell Replacement, Remove the optical drive screws: шаг 13, изображение 1 из 2 Xbox Series X Shell Replacement, Remove the optical drive screws: шаг 13, изображение 2 из 2
    • Use a T8 Torx driver to remove the two 8.8 mm screws securing the optical drive's vibration isolator to the shell: one on the base and one on the top of the isolator.

    Спросите у FixBot
  14. Xbox Series X Shell Replacement, Remove the vibration isolator: шаг 14, изображение 1 из 3 Xbox Series X Shell Replacement, Remove the vibration isolator: шаг 14, изображение 2 из 3 Xbox Series X Shell Replacement, Remove the vibration isolator: шаг 14, изображение 3 из 3
    • Lift up the optical drive's vibration isolator to remove it.

    • The vibration isolator grips the sides of the optical drive with silicone pads, so you may need to "walk" the isolator off of the drive to slip it off each side.

    • During reassembly, ensure the vibration isolator is pushed down and around both edges of the optical drive, so it sits flush with the rest of the center chassis.

    Спросите у FixBot
  15. Xbox Series X Shell Replacement, Disconnect the power and data cables: шаг 15, изображение 1 из 3 Xbox Series X Shell Replacement, Disconnect the power and data cables: шаг 15, изображение 2 из 3 Xbox Series X Shell Replacement, Disconnect the power and data cables: шаг 15, изображение 3 из 3
    Инструмент, используемый на этом этапе:
    Tweezers
    $4.99
    • Use a pair of blunt tweezers to grip the edges of the optical drive power connector and pull up to disconnect it from the optical drive.

    • Always pull cables by their connectors and not the wires themselves.

    • Use your fingers to pull up and disconnect the data cable from the optical drive.

    Спросите у FixBot
  16. Xbox Series X Shell Replacement, Remove the optical drive: шаг 16, изображение 1 из 2 Xbox Series X Shell Replacement, Remove the optical drive: шаг 16, изображение 2 из 2
    • Grip the top edge of the optical drive and pull it out of its slot in the shell to remove it.

    • During reassembly, align the pegs on the bottom edge of the optical drive with the guide holes on the bottom of the shell.

    • If the drive is misaligned, the top vibration isolator will not be able to be installed correctly, and the disc reader will be misaligned with the front of the console.

    Спросите у FixBot
  17. Xbox Series X Shell Replacement, Disconnect the USB port cable: шаг 17, изображение 1 из 3 Xbox Series X Shell Replacement, Disconnect the USB port cable: шаг 17, изображение 2 из 3 Xbox Series X Shell Replacement, Disconnect the USB port cable: шаг 17, изображение 3 из 3
    • The ribbon cables and their connectors are extremely fragile, so always open locking tabs gently and pull cables slowly.

    • Use the flat end of a spudger to flip open the metal locking tab on the USB port ribbon cable.

    • During reassembly, gently snap the metal locking tab back into place once the cable has been inserted.

    Спросите у FixBot
  18. Xbox Series X Shell Replacement: шаг 18, изображение 1 из 2 Xbox Series X Shell Replacement: шаг 18, изображение 2 из 2
    • Use a pair of tweezers to pull up on the black plastic pull tab to disconnect the USB port cable.

    • Pull only on the pull tab, not the cable itself.

    • If the USB port cable feels adhered to the metal chassis, use an apply an iOpener or hair dryer to heat the cable. Depending on your model of Xbox, you may also need to slide an opening pick under the cable to separate the adhesive.

    Спросите у FixBot
  19. Xbox Series X Shell Replacement, Disconnect the power button cable: шаг 19, изображение 1 из 3 Xbox Series X Shell Replacement, Disconnect the power button cable: шаг 19, изображение 2 из 3 Xbox Series X Shell Replacement, Disconnect the power button cable: шаг 19, изображение 3 из 3
    • Use the pointed end of a spudger to depress the metal tab on the side of the power button cable's board connector.

    • With the metal tab depressed, use a pair of tweezers to pull up on the pull tab to disconnect the power button cable from the center chassis.

    • Pull only on the pull tab, not the cable itself.

    • Don't pull on the cable without depressing the metal tab, otherwise you risk damaging either the cable or the connector.

    • During reassembly, the cable should lightly "snap" into place when inserted.

    Спросите у FixBot
  20. Xbox Series X Shell Replacement, Remove the chassis screws: шаг 20, изображение 1 из 1
    • Use a T8 Torx driver to remove the three 7.4 mm screws securing the center chassis assembly to the shell.

    Спросите у FixBot
  21. Xbox Series X Shell Replacement, Peel up the USB port cable: шаг 21, изображение 1 из 2 Xbox Series X Shell Replacement, Peel up the USB port cable: шаг 21, изображение 2 из 2
    • Gently peel the taped USB port ribbon cable off of the heatsink.

    • Depending on your model of Xbox, the adhesive may be on the underside of the cable. If so, use an iOpener or hair dryer to heat the cable.

    Спросите у FixBot
  22. Xbox Series X Shell Replacement, Remove the center chassis assembly: шаг 22, изображение 1 из 3 Xbox Series X Shell Replacement, Remove the center chassis assembly: шаг 22, изображение 2 из 3 Xbox Series X Shell Replacement, Remove the center chassis assembly: шаг 22, изображение 3 из 3
    • The center chassis is aligned to the shell with guide pegs. These pegs will need to slide out of their slots to allow the chassis to be lifted out.

    • Grip the center chassis and pull it towards the green fan grille at the top of the shell, uncoupling the guide pegs from the shell.

    • Lift out the center chassis assembly to remove it from the shell.

    • During reassembly, make sure neither of the ribbon cables get pinched as you lower the center chassis into the shell.

    Спросите у FixBot
  23. Xbox Series X Shell Replacement, Separate the power button cable: шаг 23, изображение 1 из 2 Xbox Series X Shell Replacement, Separate the power button cable: шаг 23, изображение 2 из 2
    • The power button cable is adhered to the shell with pieces of mild adhesive.

    • Use an iOpener or a hair dryer to heat the power button cable.

    Спросите у FixBot
  24. Xbox Series X Shell Replacement: шаг 24, изображение 1 из 3 Xbox Series X Shell Replacement: шаг 24, изображение 2 из 3 Xbox Series X Shell Replacement: шаг 24, изображение 3 из 3
    Инструмент, используемый на этом этапе:
    iFixit Opening Picks (Set of 6)
    $4.95
    • Be very careful when lifting the cable where it connects to the board. Peel gently, and slide an opening pick under the cable if you're having trouble separating the adhesive.

    • Use your fingers to peel up the power button cable and fully separate it from the shell.

    • During reassembly, use thin double‑sided adhesive to secure the cable. If there's adhesive left and it's still sticky, you can reuse it. If you have a new cable, check it for pre‑installed adhesive and remove any liners.

    Спросите у FixBot
  25. Xbox Series X Shell Replacement, Remove the power button board screws: шаг 25, изображение 1 из 2 Xbox Series X Shell Replacement, Remove the power button board screws: шаг 25, изображение 2 из 2
    • Use a T8 Torx driver to remove the four 5.5 mm‑long screws securing the power button board.

    Спросите у FixBot
  26. Xbox Series X Shell Replacement, Remove the board: шаг 26, изображение 1 из 1
    • Remove the power button board.

    Спросите у FixBot
  27. Xbox Series X Shell Replacement, Separate the USB board cable: шаг 27, изображение 1 из 2 Xbox Series X Shell Replacement, Separate the USB board cable: шаг 27, изображение 2 из 2
    • The USB board cable is adhered to the shell with pieces of mild adhesive.

    • Use an iOpener or a hair dryer to heat the USB board cable.

    Спросите у FixBot
  28. Xbox Series X Shell Replacement: шаг 28, изображение 1 из 3 Xbox Series X Shell Replacement: шаг 28, изображение 2 из 3 Xbox Series X Shell Replacement: шаг 28, изображение 3 из 3
    Инструмент, используемый на этом этапе:
    iFixit Opening Picks (Set of 6)
    $4.95
    • Be very careful when lifting the cable where it connects to the board. Peel gently, and slide an opening pick under the cable if you're having trouble separating the adhesive.

    • Use your fingers to peel up the USB board cable and fully separate it from the shell.

    • During reassembly, use thin double‑sided adhesive to secure the cable. If there's adhesive left and it's still sticky, you can reuse it. If you have a new cable, check it for pre‑installed adhesive and remove any liners.

    Спросите у FixBot
  29. Xbox Series X Shell Replacement, Remove the USB enclosure screws: шаг 29, изображение 1 из 3 Xbox Series X Shell Replacement, Remove the USB enclosure screws: шаг 29, изображение 2 из 3 Xbox Series X Shell Replacement, Remove the USB enclosure screws: шаг 29, изображение 3 из 3
    • Use a T8 Torx driver to remove the two 8.9 mm‑long screws securing the USB board enclosure:

    • One screw inside the shell

    • One screw on the bottom of the shell (where the base was)

    Спросите у FixBot
  30. Xbox Series X Shell Replacement, Remove the USB enclosure: шаг 30, изображение 1 из 3 Xbox Series X Shell Replacement, Remove the USB enclosure: шаг 30, изображение 2 из 3 Xbox Series X Shell Replacement, Remove the USB enclosure: шаг 30, изображение 3 из 3
    • Use your fingers to slide the USB board enclosure out from under the metal clip securing it to the shell.

    • Remove the enclosure.

    • During reassembly:

    • Make sure the Pair button is properly oriented and fully inserted in its slot.

    • Firmly slide the enclosure into position until it snaps into place under the metal clip.

    Спросите у FixBot
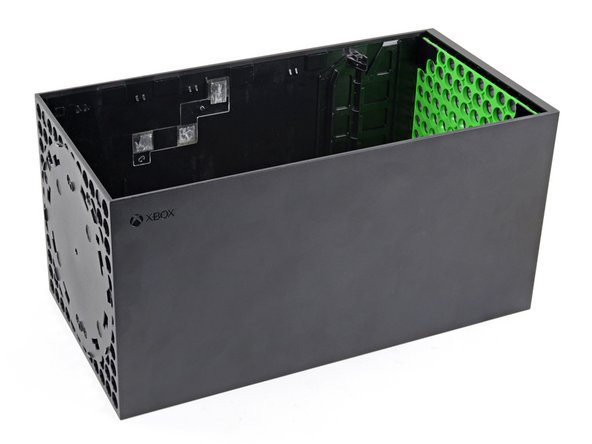
  31. Xbox Series X Shell Replacement, You're left with the shell: шаг 31, изображение 1 из 1
    • You're left with the shell.

    • Compare your new replacement shell to the original—you may need to transfer remaining components or remove adhesive backings.

    Спросите у FixBot
Заключение

To reassemble your device, follow these instructions in reverse order.

Repair didn’t go as planned? Try some basic troubleshooting, or ask our Xbox Series X Answers community for help.

2 человек успешно провели ремонт по этому руководству.

Spencer Day

Участник с: 09/14/22

187 978 Репутация

Автор 1 187 руководств

Команда

iFixit Участник iFixit

Staff

123 членов

Автор 25 713 руководств

0 Комментарии к руководству

Добавить комментарий

Статистика просмотров:

За последние 24 часов: 16

За последние 7 дней: 104

За последние 30 дней: 523

За всё время: 6,257